
The gap between your alarm and your first meeting is always shorter than it needs to be. You have time to get dressed, find your keys, and drink half a coffee. Your hair usually gets whatever is left, which is about four minutes.
That is what good easy hairstyles for work are actually for. Not complicated techniques or a drawer full of hot tools. Just a handful of shapes you can do half awake, with one elastic, a few pins, or a clip you already own.
Every look below started from a real photo. Each one comes with what makes it work and how to copy it, including the small steps most tutorials skip, like where to set a bun so your collar cannot flatten it and which direction to twist a rope ponytail so it holds.
Some take two minutes flat. A few need a curling iron for the last three inches. Three of them are haircuts rather than styles, for anyone quietly thinking about going shorter.
Buns, ponytails, braids, twists, a half-up, and a French roll that needs exactly one claw clip. Start anywhere.
1. The Low Rolled Chignon That Holds Through a Long Day
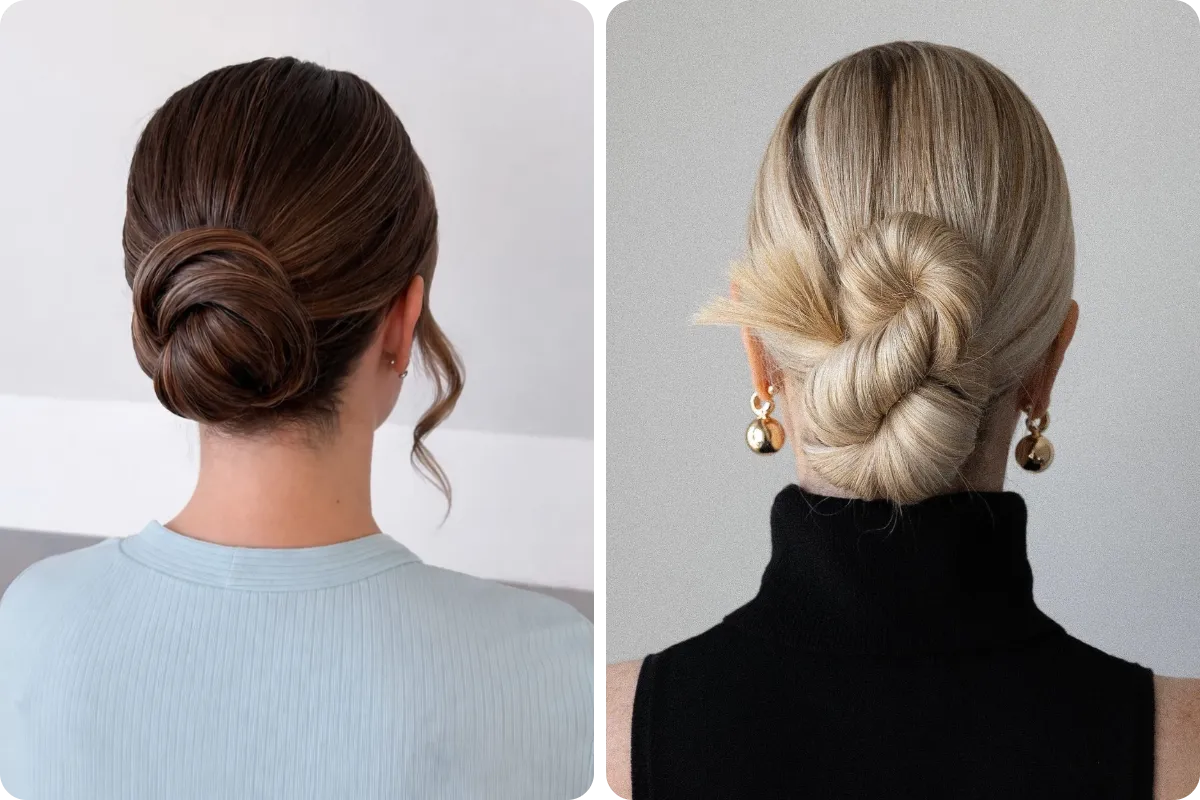
Hair tucked at the nape reads as neat no matter what the rest of the day throws at you.
The top here is brushed flat and smooth, and the length is rolled under itself into a soft loop that sits just above the collar. One thin piece is left loose near the ear, which keeps the whole thing from looking severe.
What makes this version work:
- The top section is smoothed first, since that flat surface is what the eye reads as tidy
- The length is rolled under instead of twisted tight, so the shape stays round and soft
- Pins go in from underneath, so no metal shows from the back
Spray a little hairspray onto your brush rather than straight onto your head, then run it over the top. Flyaways settle without the crunchy feel.
2. A Single Side Braid Finished With a Satin Scrunchie
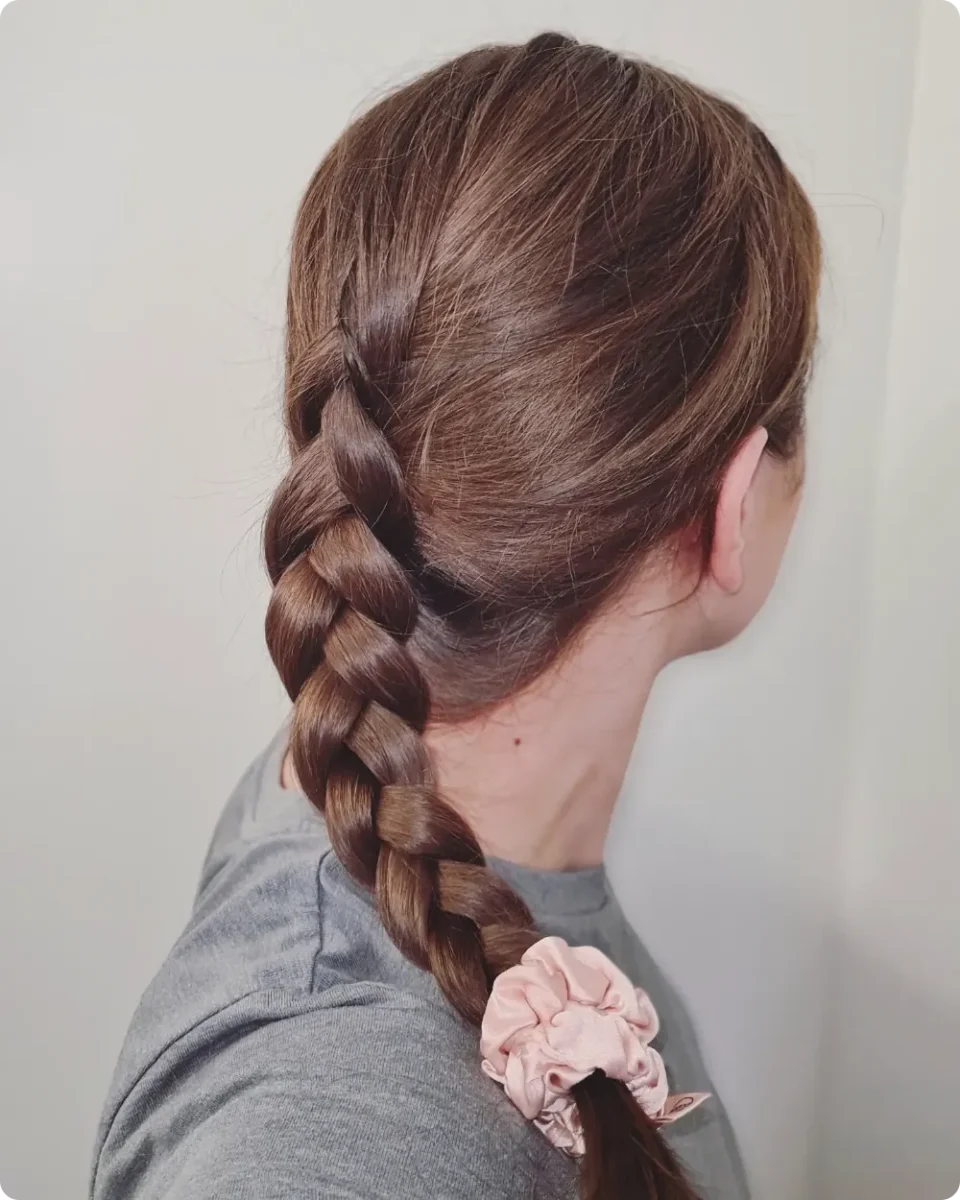
Braids can slide into schoolyard territory fast, and this one stays on the right side of the line. It starts high near the crown, runs down one side of the head, and drapes forward over the shoulder instead of hanging down the back.
The sections are wide rather than tiny, so it looks relaxed instead of fussy. The blush satin scrunchie at the end does real work too. Satin slides against the hair rather than gripping it, so the ends do not get dented or snapped when you pull it out at five o’clock.
Where to keep it tidy: the first three or four crossings near the crown. Everything below that can loosen through the day and still look intentional.
Braiding hair that is still damp will leave a crimp if you take it down at lunch, so save this one for dry hair.
Brush everything to one side and hold it just behind the ear.
Split into three wide sections and braid straight down, keeping the first few crossings snug.
Bring the braid over your shoulder once you pass the ear, then finish to the ends.
Tie with a satin scrunchie and tug the outer edges of each section gently to widen it.
3. The Knotted Low Ponytail for Back-to-Back Meeting Days
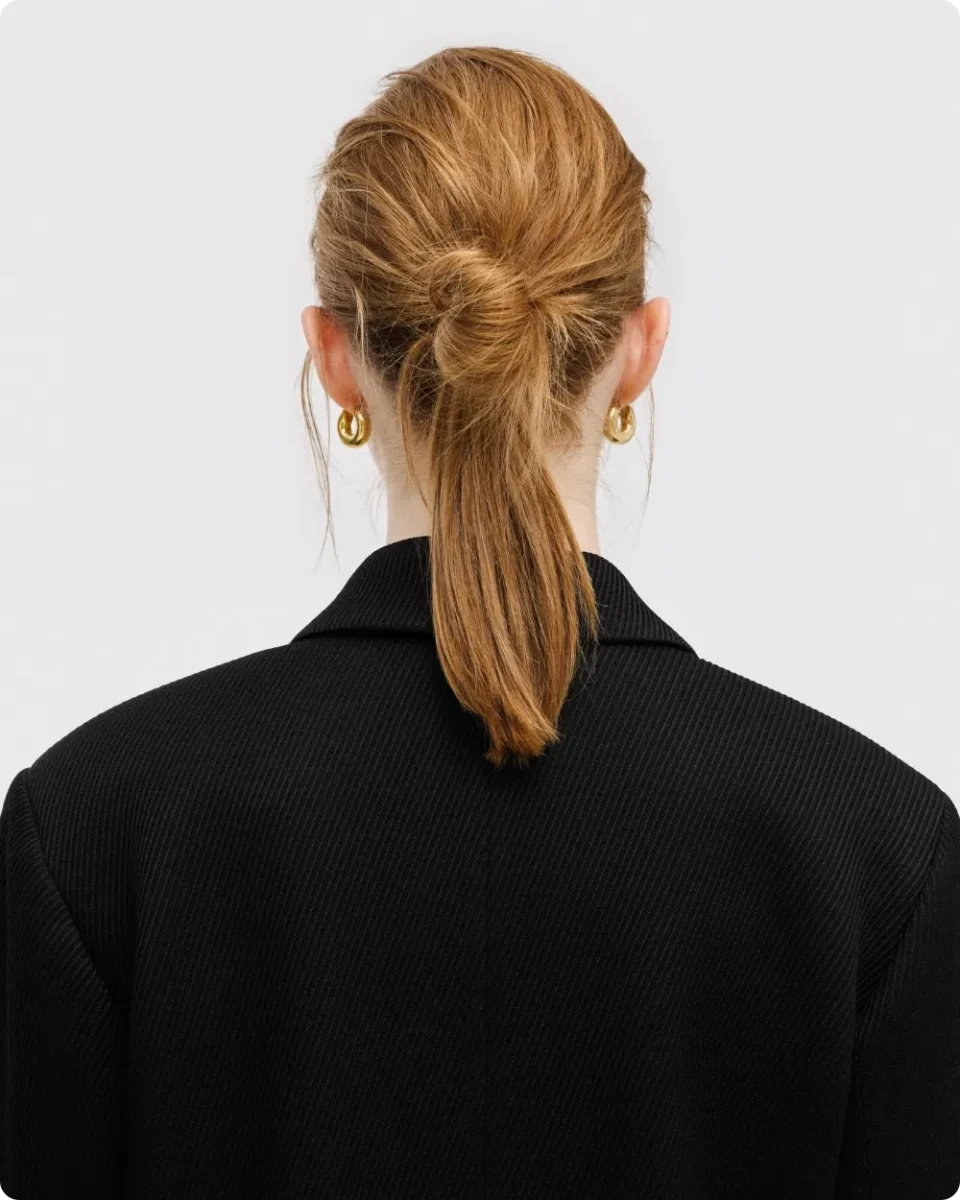
Two minutes gets you this one, and it holds up well on camera.
The twist: the hair is gathered and turned over itself once before the elastic goes on. That small move lifts the shape away from the head and stops the flat, scraped-back look a plain ponytail can have.
The front pieces: a few strands sit forward near the ears on purpose. They soften the face and make the style read as a choice rather than a rush job.
The height: it sits right at the nape, low enough to stay comfortable under a blazer collar all afternoon.
If your hair is fine, keep that twist loose. Pulled too tight, it opens up and shows scalp along the part.
Pull the front pieces loose after you tie it, so the shape stays where you put it.
Pick an elastic close to your hair color and let the twist be the detail people notice.
Brushing the tail completely flat. The soft texture is what keeps it from looking stern.
Tying it high under a stiff collar. It rubs and slips down by mid afternoon anyway.
4. The Glossy Wrapped Bun That Reads as Dressed Up Without Effort
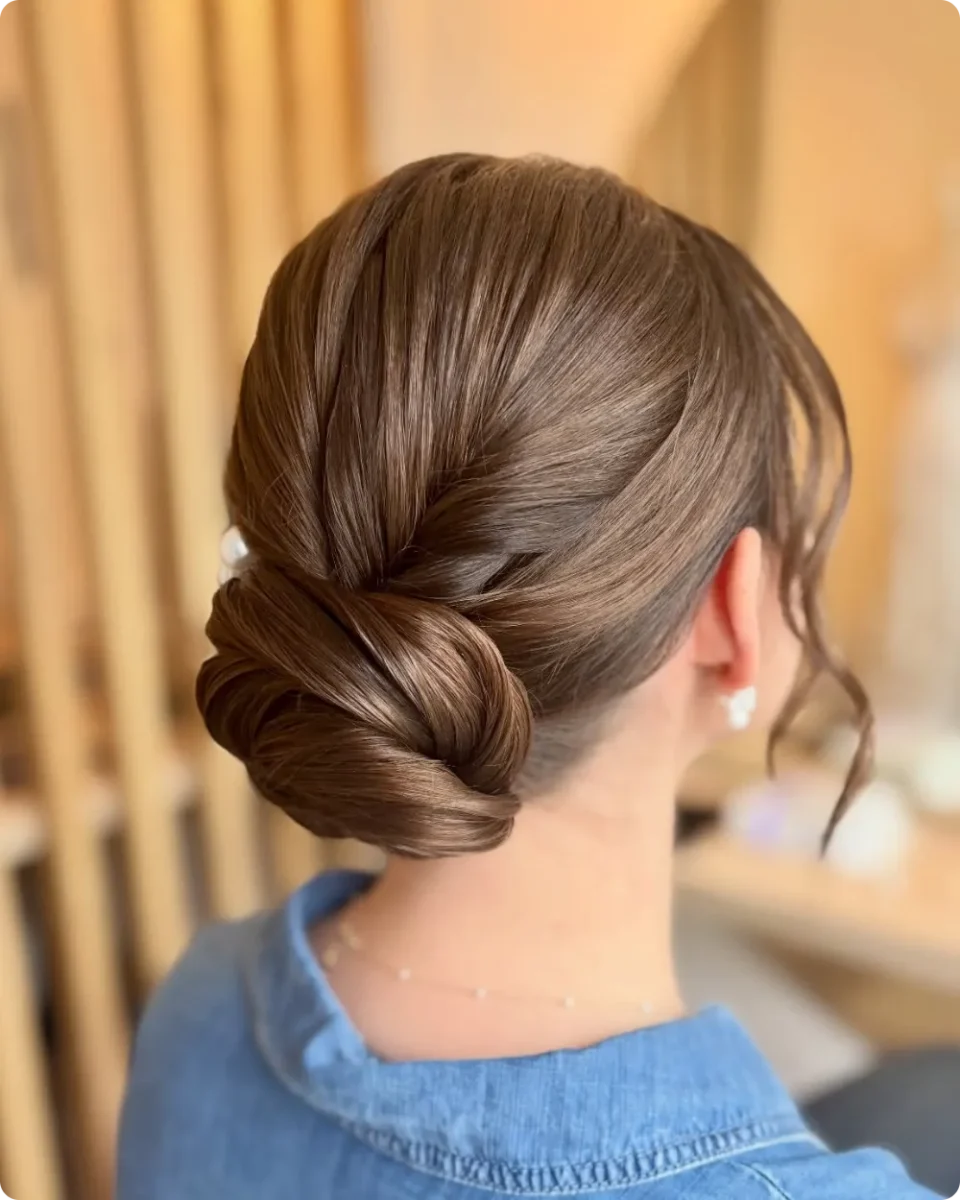
Shine does half the work here. The top is brushed smooth and swept back at a slight angle, so light runs across it in one clean line instead of breaking into pieces.
The length is coiled low at the nape with the folds left wide enough to actually see. That visible wrap is what separates this from a plain twisted bun. Two small pearl pins sit off to one side, enough detail for a client meeting without tipping into evening territory.
A single curled piece stays out in front of the ear and keeps the smooth back from looking stiff.
Smooth styles show every bump, so brush from the ends upward before you gather anything. Working top down just drags knots into the middle.
Recreate this look
5. Half-Up Bun Held With a Single Gold Pin
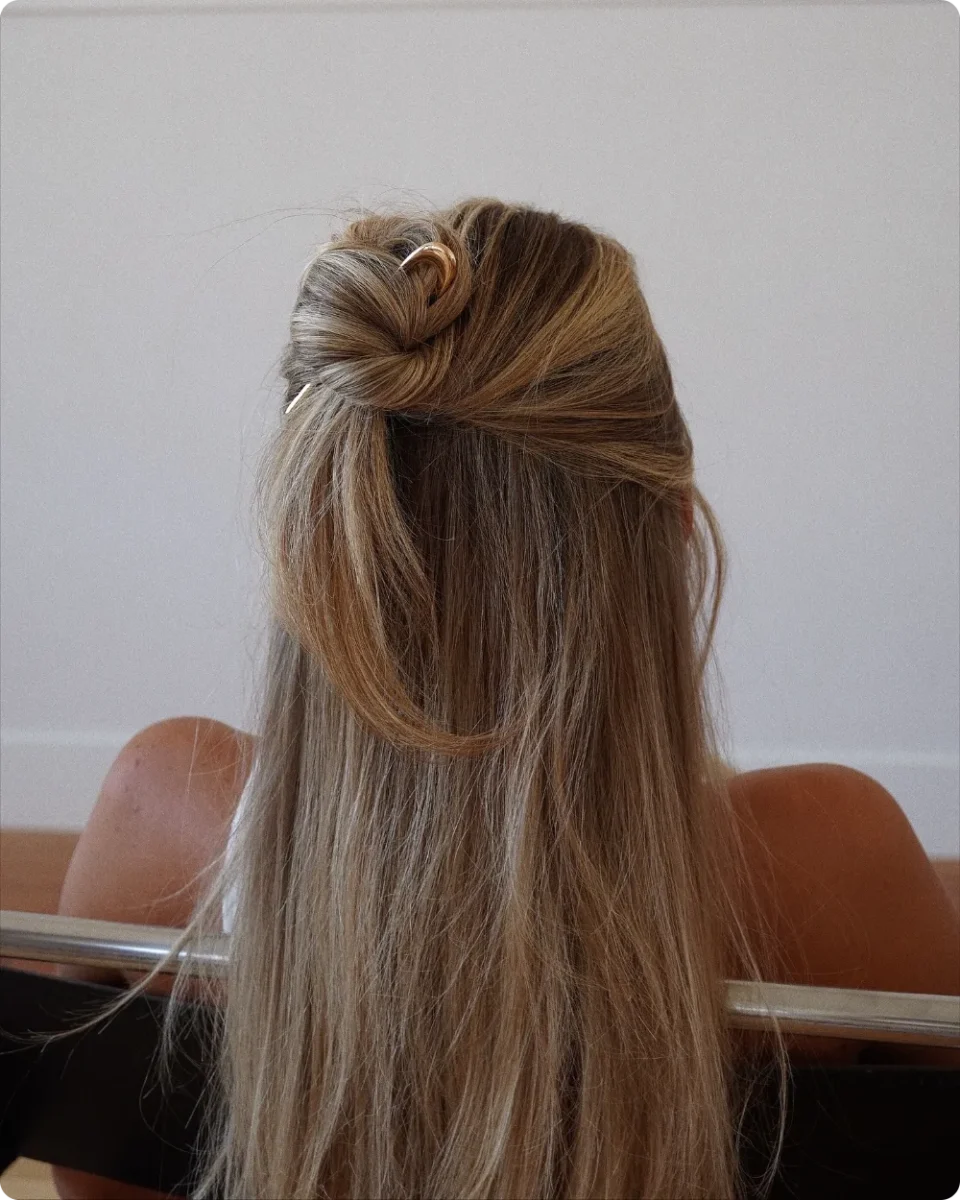
Long hair does not have to go all the way up to look sorted. The top section is twisted into a small bun at the crown and held with one slim gold pin, while everything underneath stays down and straight.
The bun is deliberately loose. A few strands fall out near the face and the crown keeps a little lift, so the shape looks soft instead of yanked back.
Worth knowing before you copy it: this holds far better on second-day hair. Freshly washed strands slip out of a pin within the hour.
The tool you pick changes the whole feel of it.
| Gold pin or hair fork | Small clear elastic |
|---|---|
| Adds a small metal detail that looks intentional in photos | Disappears completely, which suits a plain office day |
| Slides out in one second with no snagging | Usually has to be cut or tugged out at the end of the day |
| Needs enough hair to grip, so thin sections may loosen | Holds fine hair firmly and will not budge through a commute |
| Best when the bun is loose and a little undone | Best when you want the bun small and tight |
Either way, twist the section before you secure it. Wrapping without the twist gives you a flat loop that unravels by lunch.
6. The Sleek High Bun for Presentation Mornings
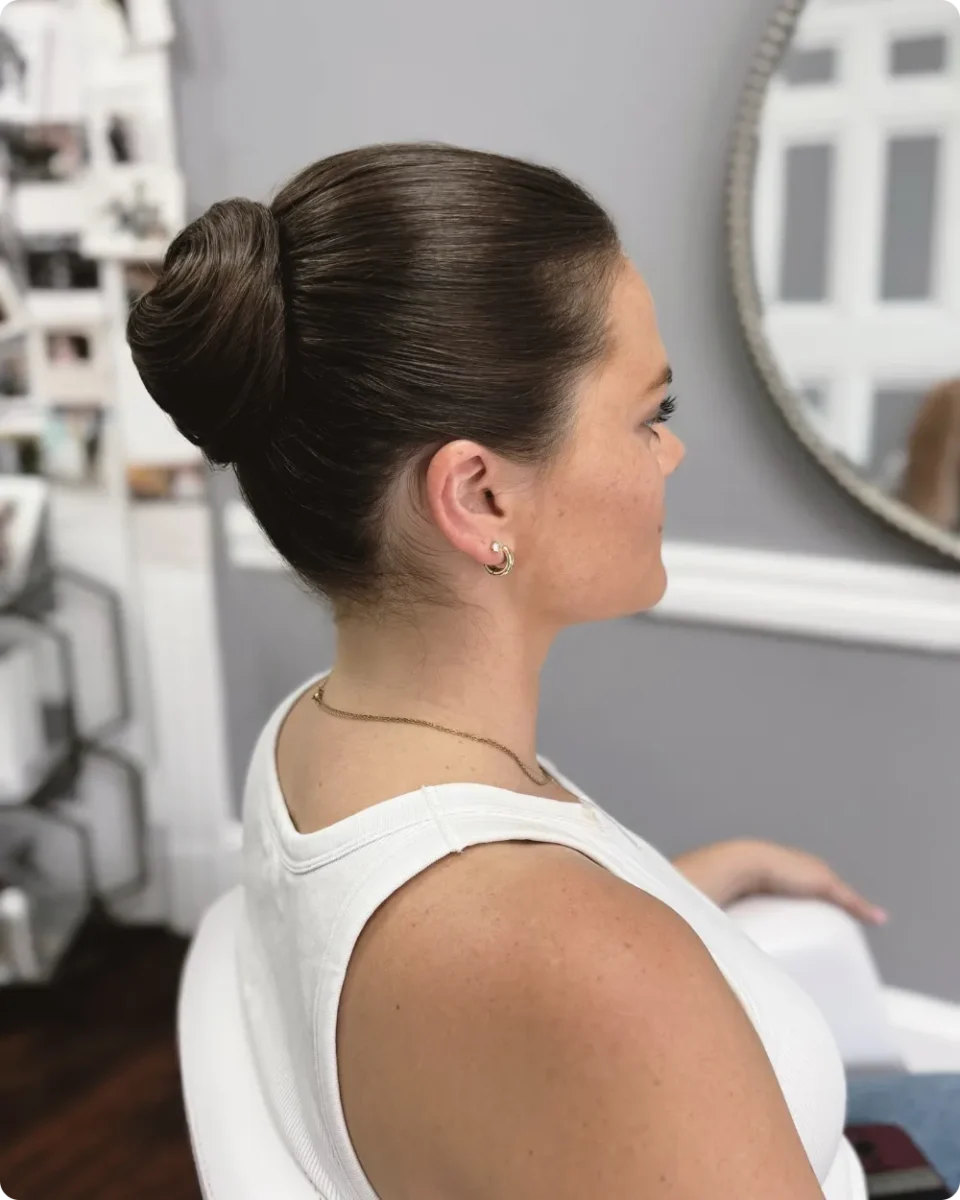
Gather everything high at the crown and the rest of the work is just wrapping.
There is no part in this one, which is the point. The hair is brushed straight back from the hairline with a damp brush so the surface stays flat all the way to the ears, then pulled into a ponytail sitting well above the occipital bone.
From there the tail winds around the base in one direction and gets pinned in a circle rather than one clump. Push the pins in toward the center of your head instead of down into your scalp. That angle is what keeps it locked for eight hours.
Fine hair can borrow some size from a small hair donut slipped over the ponytail before you wrap.
7. Braid It From the Hairline When Your Hair Falls Past Your Waist
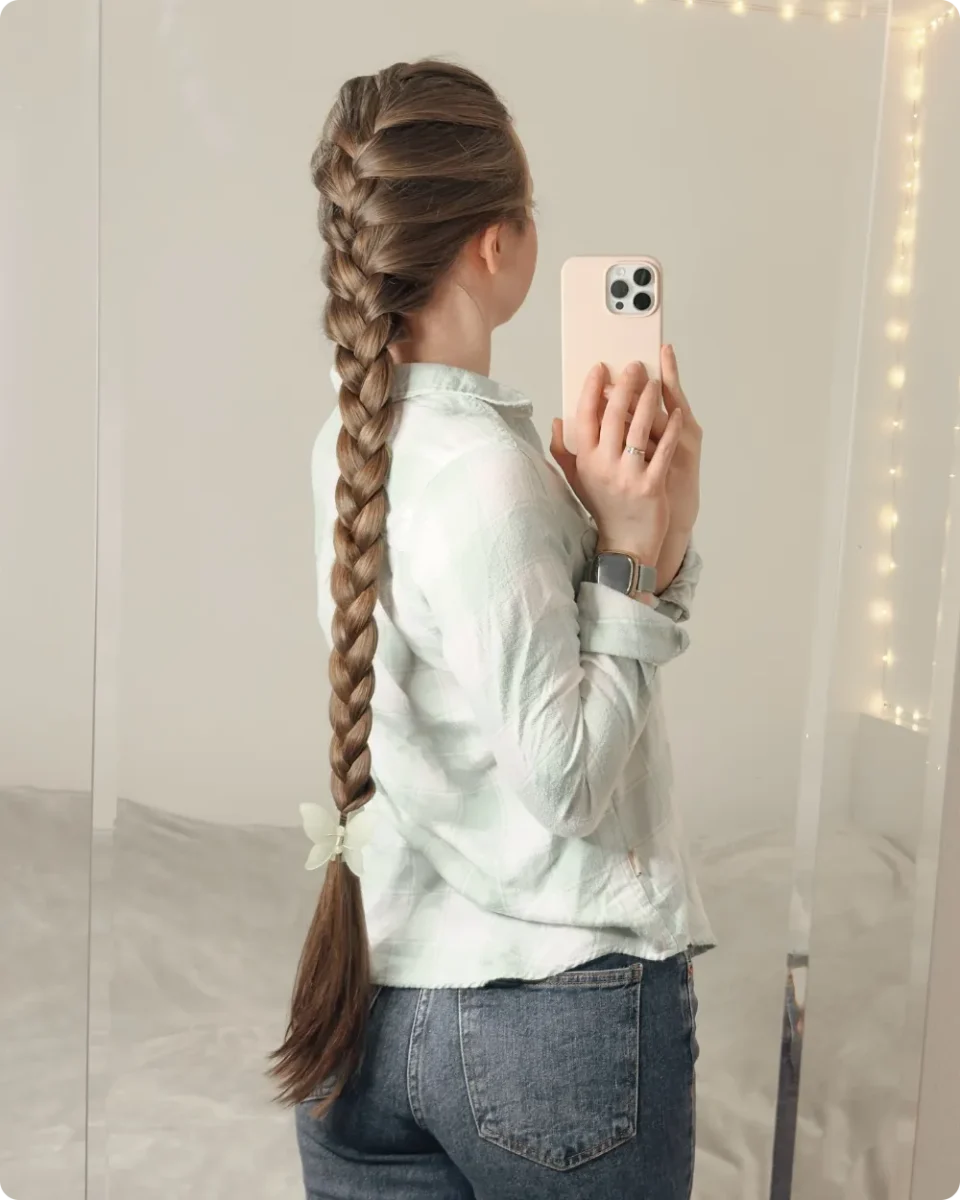
Long hair carries real weight by three in the afternoon, and a plain braid tied at the nape does nothing about the front.
The braid here starts right at the hairline on one side and travels back across the head at an angle, picking up new hair with every crossing. Once it clears the crown it turns into a regular three-strand braid and keeps going all the way down. A small clip sits near the bottom instead of a thick elastic.
What the attached section buys you:
- Nothing slides forward when you look down at a keyboard
- The weight sits against your head instead of pulling at one point
- Baby hairs at the temples stay put without needing a headband
Braiding tightly at the same spot on your hairline every single day is hard on the finest hair there. Switch sides through the week.
Starts at the neck, so the front half is still loose. Pieces fall around your face all morning and you end up tucking them behind your ears every few minutes.
Every strand is caught from the front. It stays exactly where you put it through a full day and still looks neat on the commute home.
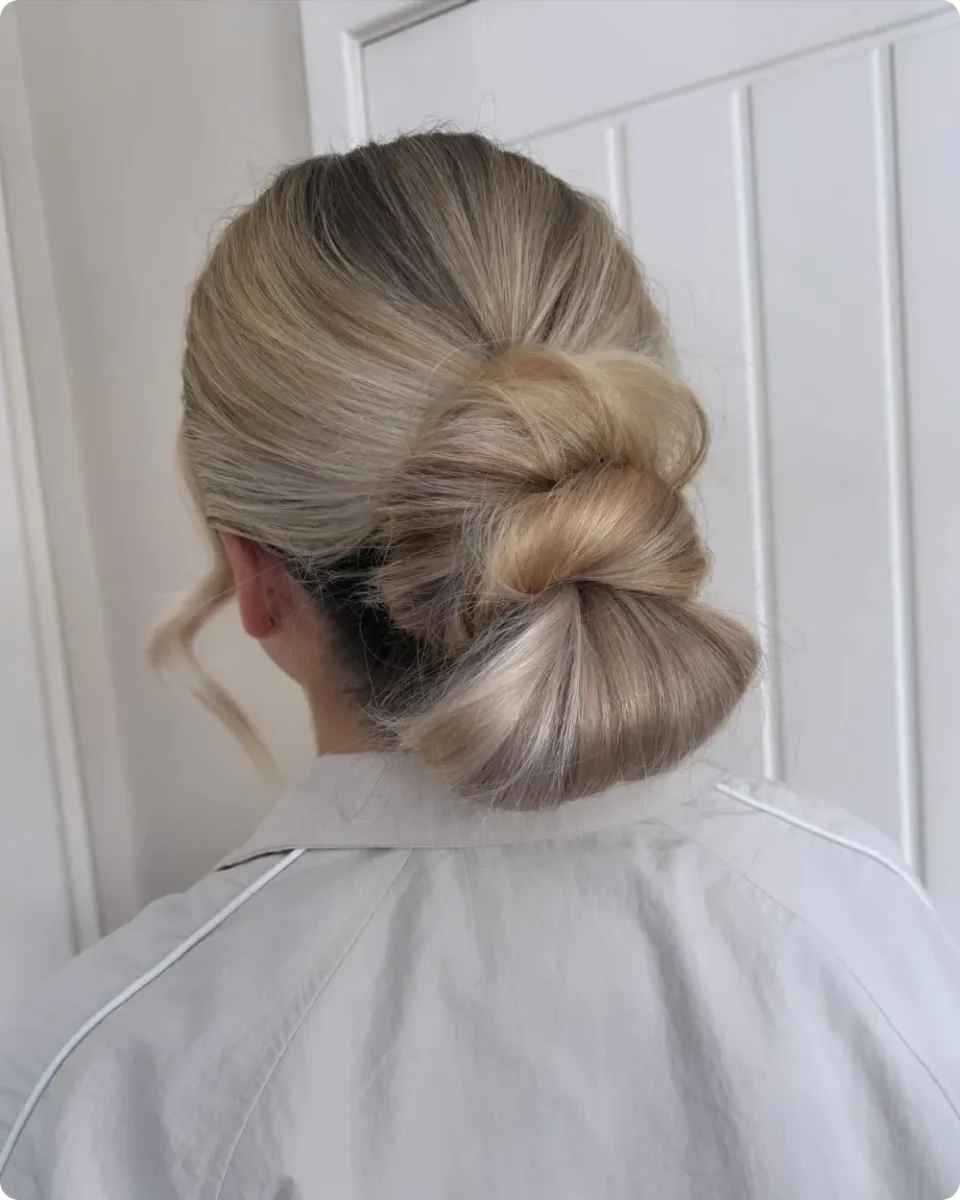
8. Twisted Low Bun Wrapped in an Oversized Satin Scrunchie
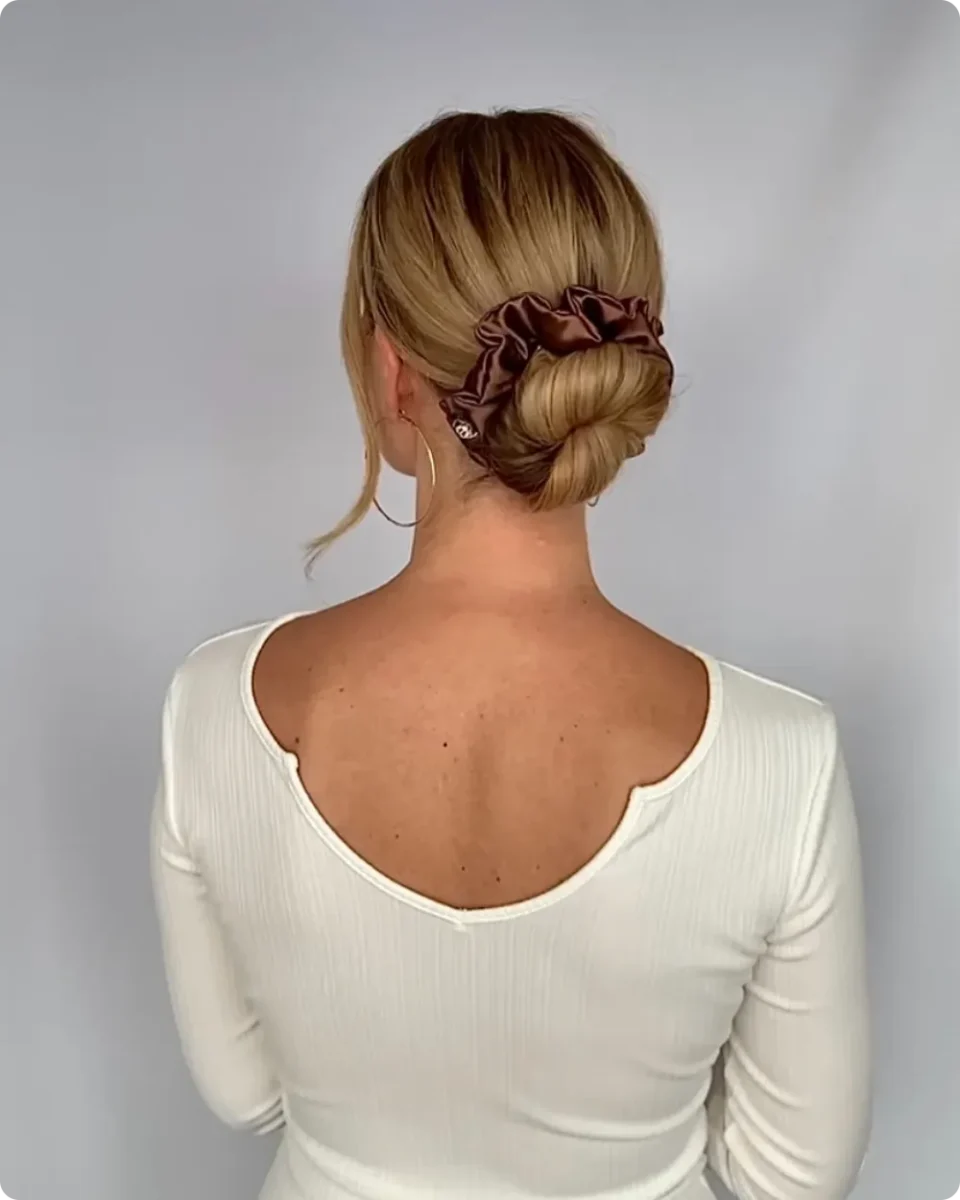
Fine hair and a big scrunchie work well together, because the fabric supplies the bulk your hair does not have.
The length here is twisted once and folded up against the nape, and then a wide chocolate satin scrunchie goes over the whole base. It hides the mechanics and doubles as the only accessory needed. Choosing a shade that contrasts with your hair color is a deliberate move. Against blonde, the deep brown reads as intentional rather than like a gym tie you forgot about.
💡 Quick Tip
Secure the folded bun with one small clear elastic first, then slide the scrunchie over the top. A scrunchie alone stretches out as the day goes on and the bun slowly droops toward your collar.
Leave a soft piece down in front of each ear before you gather anything. That one step is the difference between a low bun that looks finished and one that looks like you were in a hurry.
9. Low Ponytail Held With a Decorative Claw Clip
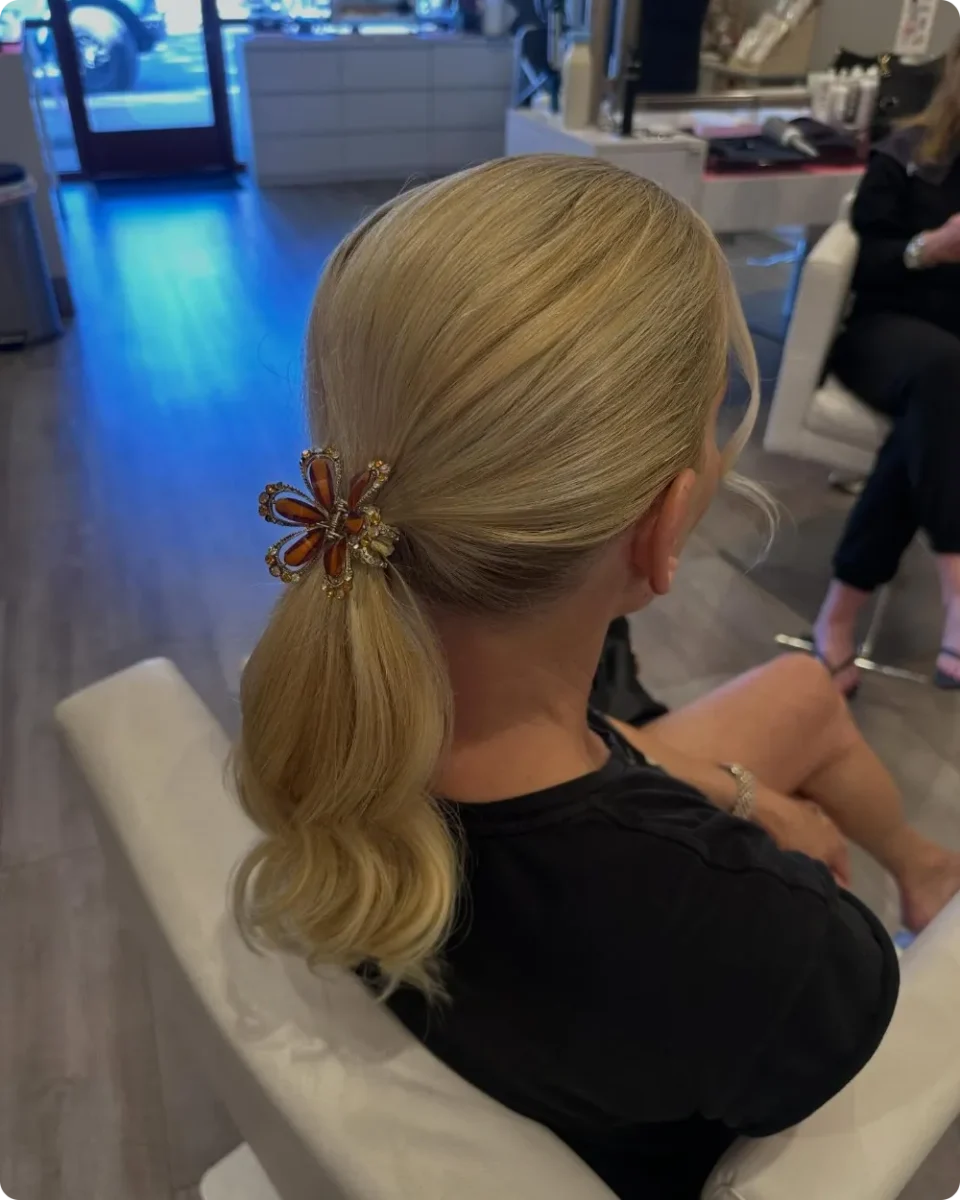
Swap the elastic for something worth looking at and a basic ponytail turns into an outfit detail.
The top and sides are brushed smooth and pulled back low, just under the crown. Holding it all is a small ornate claw in warm amber and gold tones, sitting sideways where an elastic would normally go. It does the gripping and the decorating at the same time, so no other jewelry in your hair is needed.
The ends matter too. They have a loose wave through the bottom few inches, which gives the tail some shape instead of letting it hang flat. Two quick passes with a curling iron on the bottom half is enough.
One honest limit: a claw clip holds a medium ponytail well, but a very thick one will force it open by midday.
Smooth on top, soft at the ends, and one good clip in the middle. The polish comes from the contrast, not from extra styling time.
10. Sleek Ponytail Softened by an Oversized Black Scrunchie
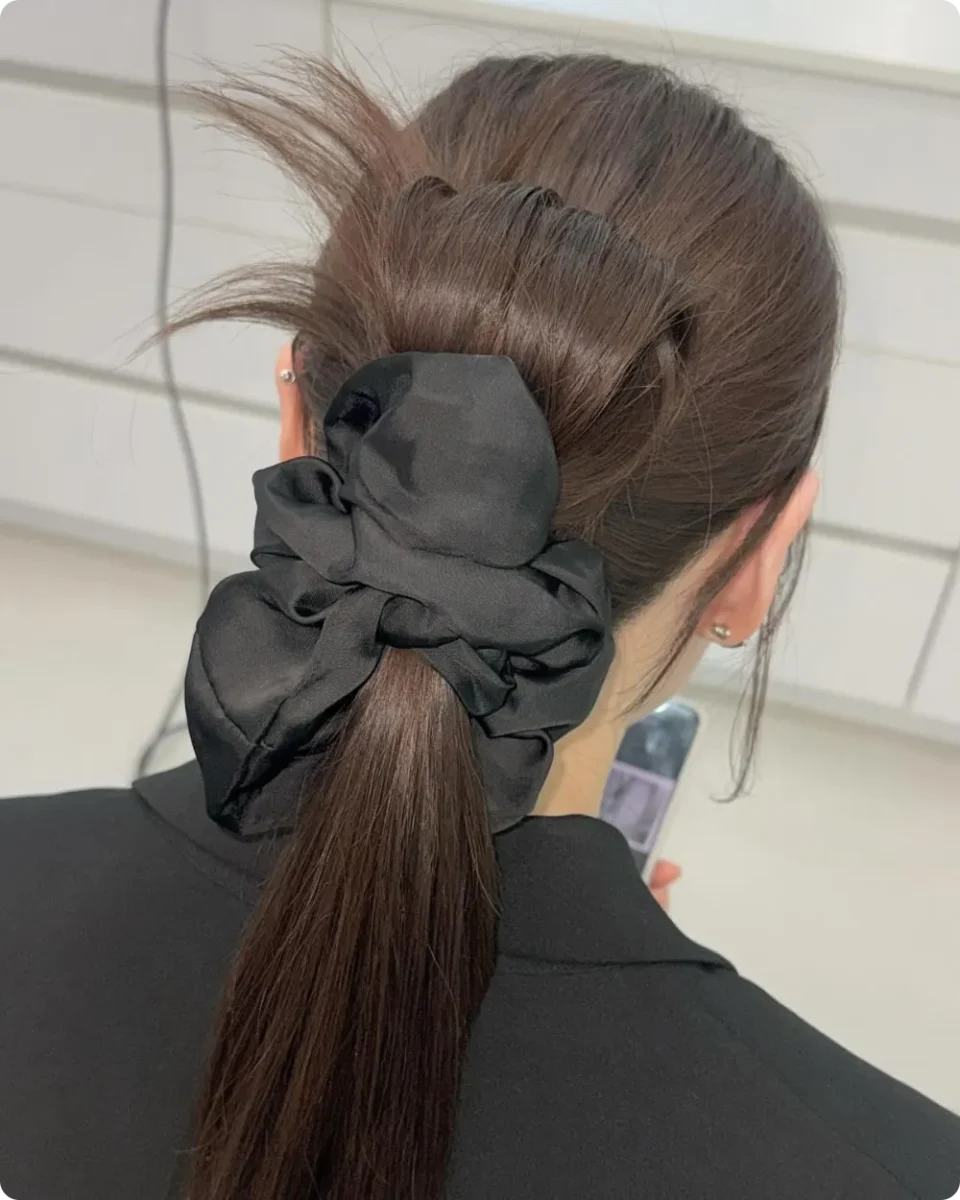
Black on black takes almost no thought and still looks deliberate. With a dark blazer, a large black satin scrunchie stops reading as a hair tie and starts reading as part of the outfit.
The ponytail sits mid height, level with the top of the ear, which is the useful middle ground between a high one that skews casual and a low one that skews formal. The sides are brushed flat but the crown keeps a little lift, so the head shape stays round instead of pressed down. The length below hangs straight and smooth, which lets the scrunchie be the only busy thing back there.
Why it earns a place in a workday rotation:
- ▸A wide scrunchie spreads the pull across more hair, so you get less tension at one spot by the afternoon.
- ▸Black works with every outfit you own, so there is nothing to coordinate at seven in the morning.
- ▸The volume at the crown balances the weight of the tail, which keeps the whole shape from looking flat.
- ▸It takes one pass with a brush and one loop of fabric. No pins, no mirror gymnastics.
Lift the crown by pinching a small section at the top and tugging it up gently once the tie is on.
11. A Low Knot Finished With One Long Curved Face Piece
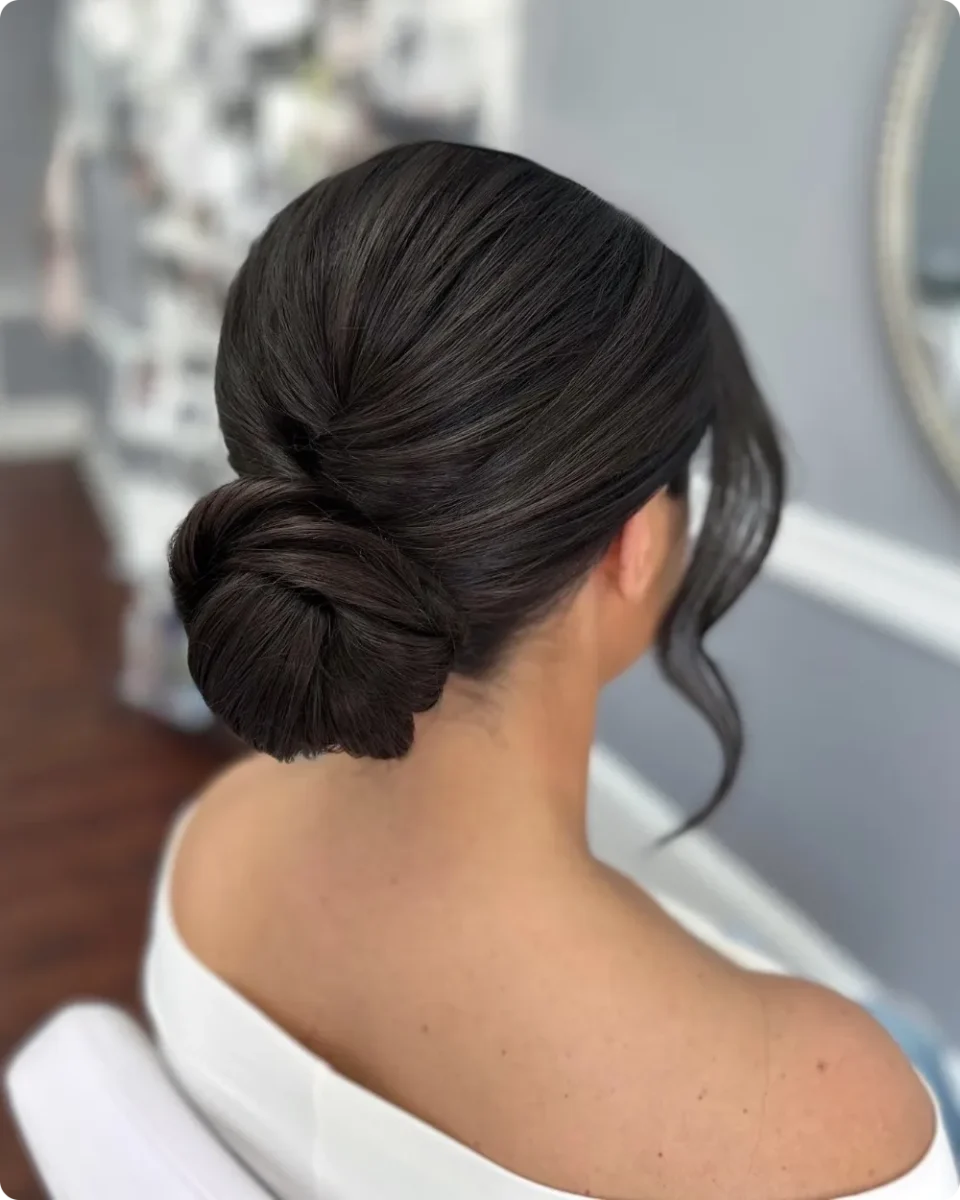
Dark hair reflects more light than lighter shades, which is a gift when the shape is smooth and a problem when it is not. Everything here is brushed clean off the face with no visible part, then coiled into a knot that sits just below the crown.
The detail doing the real work is the single piece left out on one side. It is long, it curves in a soft S down past the jaw, and it stops the sleek back from feeling severe in a way a short wispy bit never manages.
Pull that piece before you gather anything else. Trying to tug one out after the knot is set drags the whole shape loose.
One piece on one side only. Two matching pieces tip it toward a wedding look.
12. The Rope Twist Ponytail That Passes for a Braid
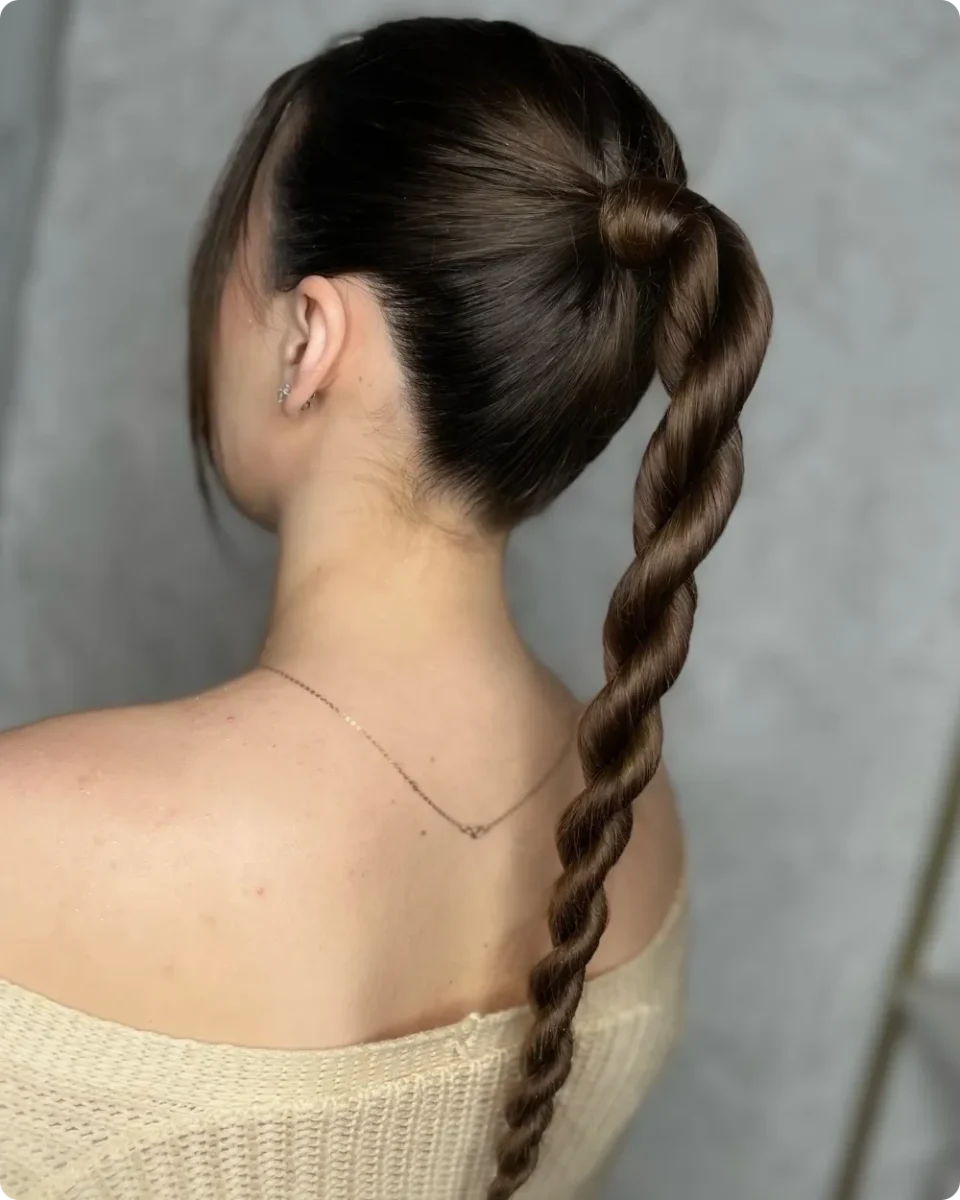
Rope twists take about half the time a braid does and hold better on hair that is too silky to keep a three-strand pattern.
Start with a high ponytail at the crown, then wrap a small piece of the tail around the elastic so no band shows. Split the rest in two and you are basically done thinking. The direction is the only rule that matters, and it is the step most people get wrong.
Twist the right section away from you, winding it tight until it starts to coil on its own.
Twist the left section the exact same way. Both must spin in the same direction or the rope will not hold.
Cross them over each other in the opposite direction, all the way down, then tie the ends.
The opposite cross is what locks it. Twist and cross the same way and the whole thing unwinds before you reach your desk.
13. The Round Low Bun That Sits Just Above Your Collar
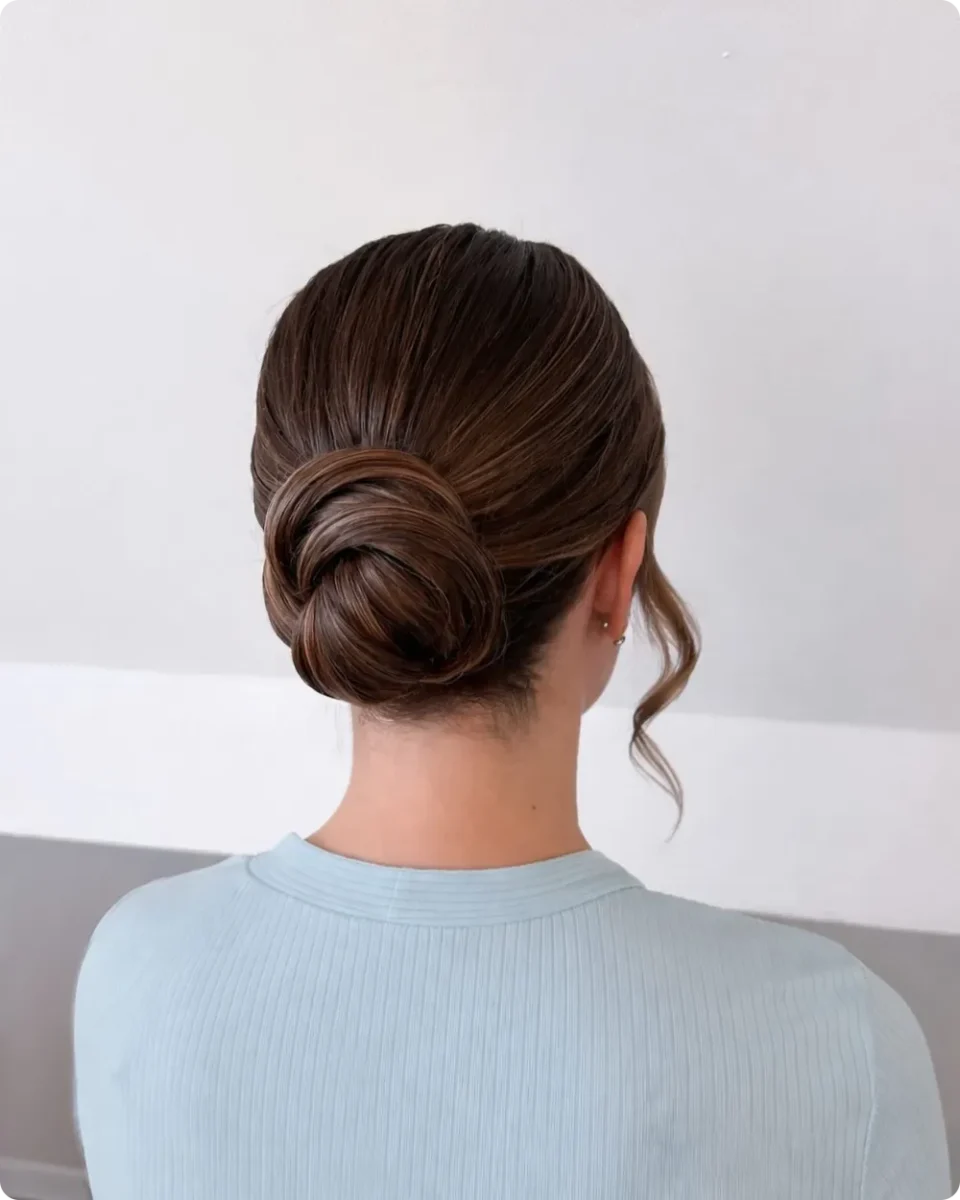
Most low buns end up pressed flat against the neck by mid morning.
This one keeps its shape because of where it sits. The base is set slightly above the nape rather than right on it, so a collar or a high neckline cannot squash it from below. The length wraps around in wide, visible folds and the whole thing stays round and full instead of pancaking.
The top is combed smooth with a clear line running from the crown down into the bun, and a single curled piece falls in front of the ear to keep it from looking stern.
Sits on the neck, gets pushed sideways by your collar, and flattens against a chair back every time you sit down.
Clears the neckline completely, holds its round shape all day, and still reads as a low style from the front.
Two fingers width above your hairline at the back is the sweet spot. Any higher and it stops being a low bun.
14. The Crossed-Over Low Ponytail That Hides the Elastic
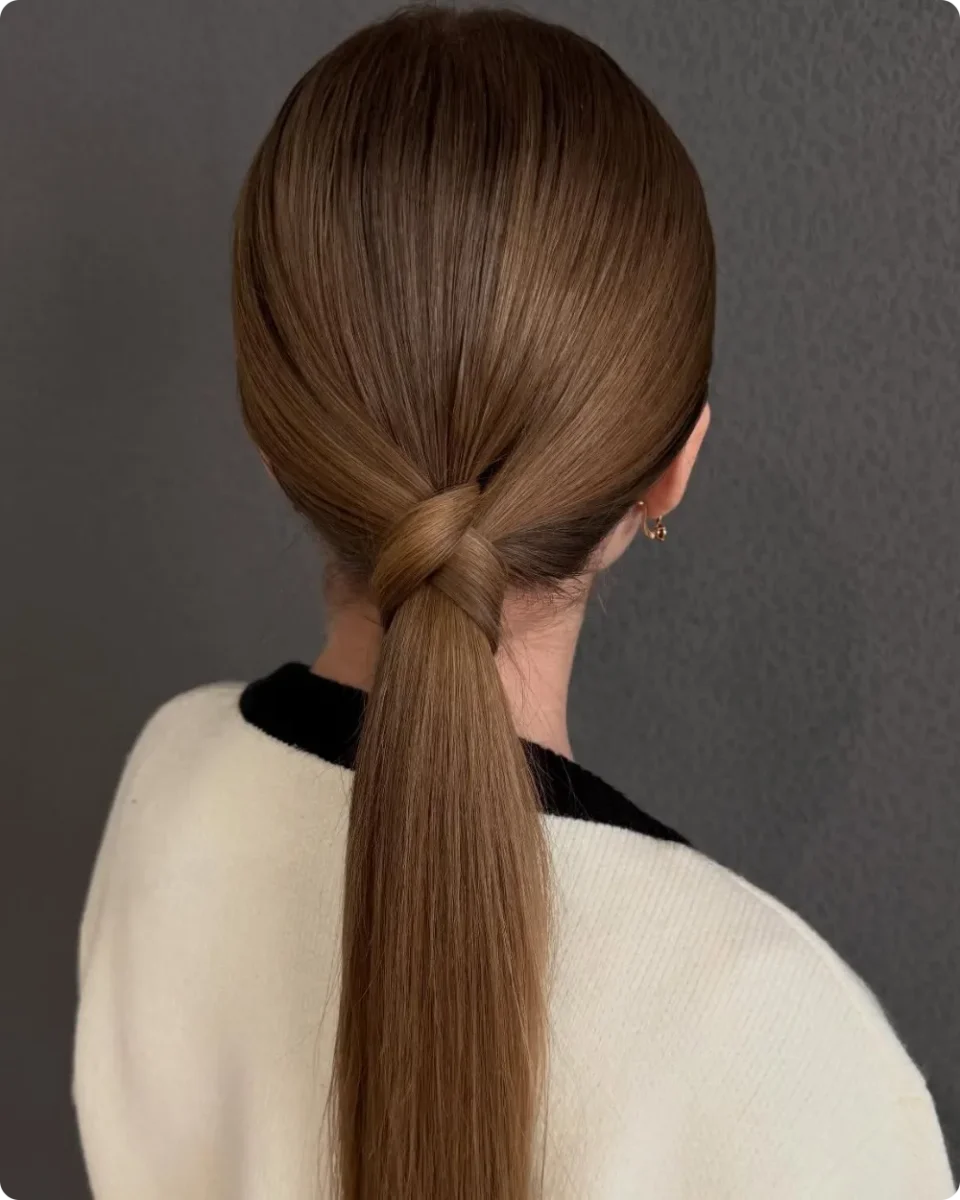
No band shows anywhere here, and that is what makes a two-minute style look like more.
Instead of gathering everything at once, the hair is split down the middle and the two sides are crossed over each other at the nape before anything is tied. The crossing point covers the elastic completely and pulls the sides taut, so the front stays smooth without any product.
It suits very straight, slippery hair especially well, since a wrapped strand tends to slide off that texture but a full cross section stays locked.
Part down the center and comb each half back smoothly toward the nape.
Cross the right half over the left, holding both flat against your head.
Gather both halves together underneath the cross and tie with a thin elastic.
Nudge the crossed section down with your thumb so it covers the band fully.
Tie it a little looser than feels right. Pulled tight, the cross buckles and lifts away from your head.
15. Side Part, Flat Sides, Waves Only at the Ends
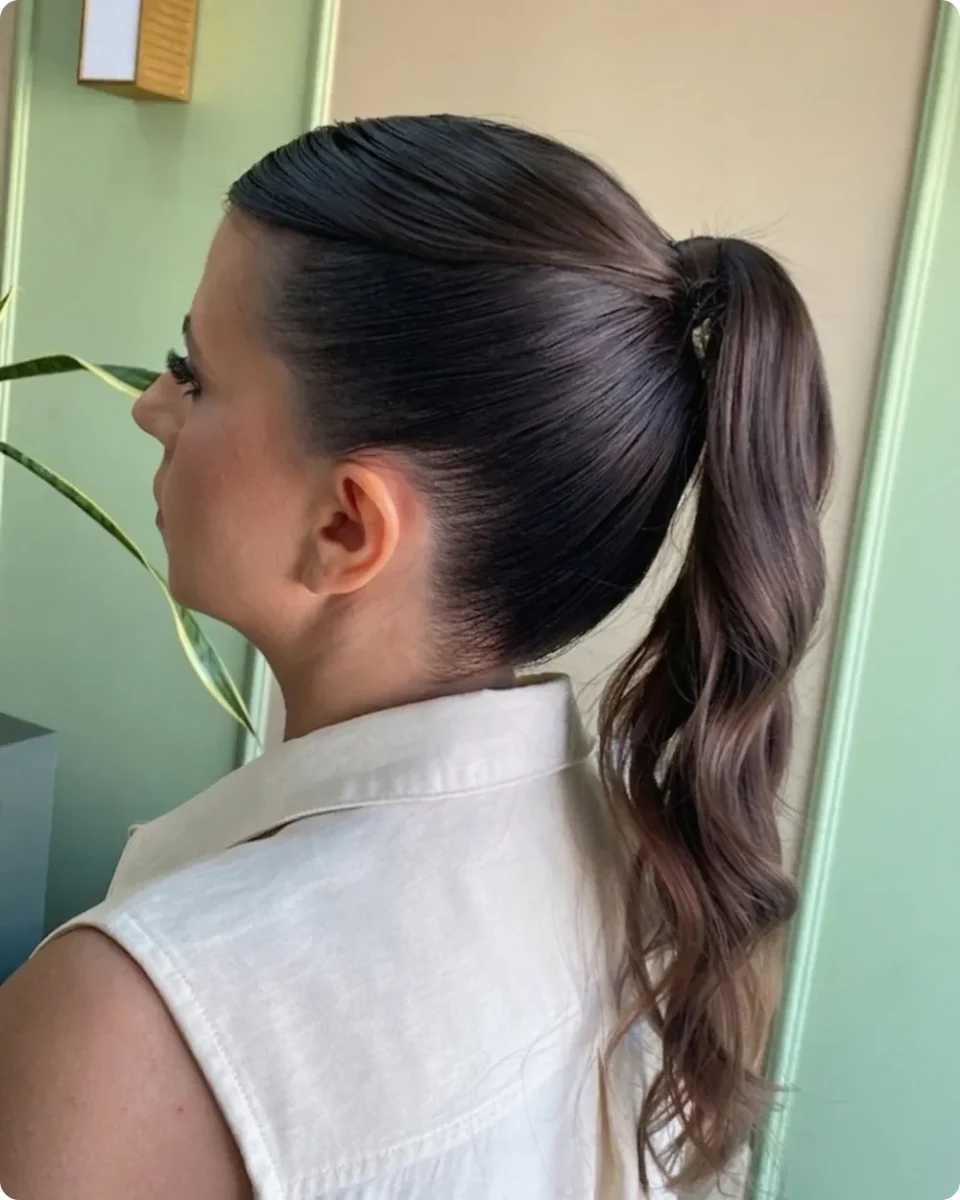
Curling your whole head takes fifteen minutes. Curling the bottom third takes three, and from behind you cannot tell the difference.
That is what is happening here. The hair is parted deeply on one side, swept back with a fine tooth comb so both sides lie completely flat against the head, then tied level with the top of the ear. Only the last few inches of the tail are waved, which gives the ponytail movement without adding any bulk near the elastic.
The deep part is the piece most people skip, and it does a lot. Moving it well off center creates a sweep across the front that a middle part cannot give you.
Run the comb through in one clean stroke. Going back over the same spot lifts the hair you just smoothed.
16. The Chin-Length Bob You Tuck Behind One Ear and Leave Alone
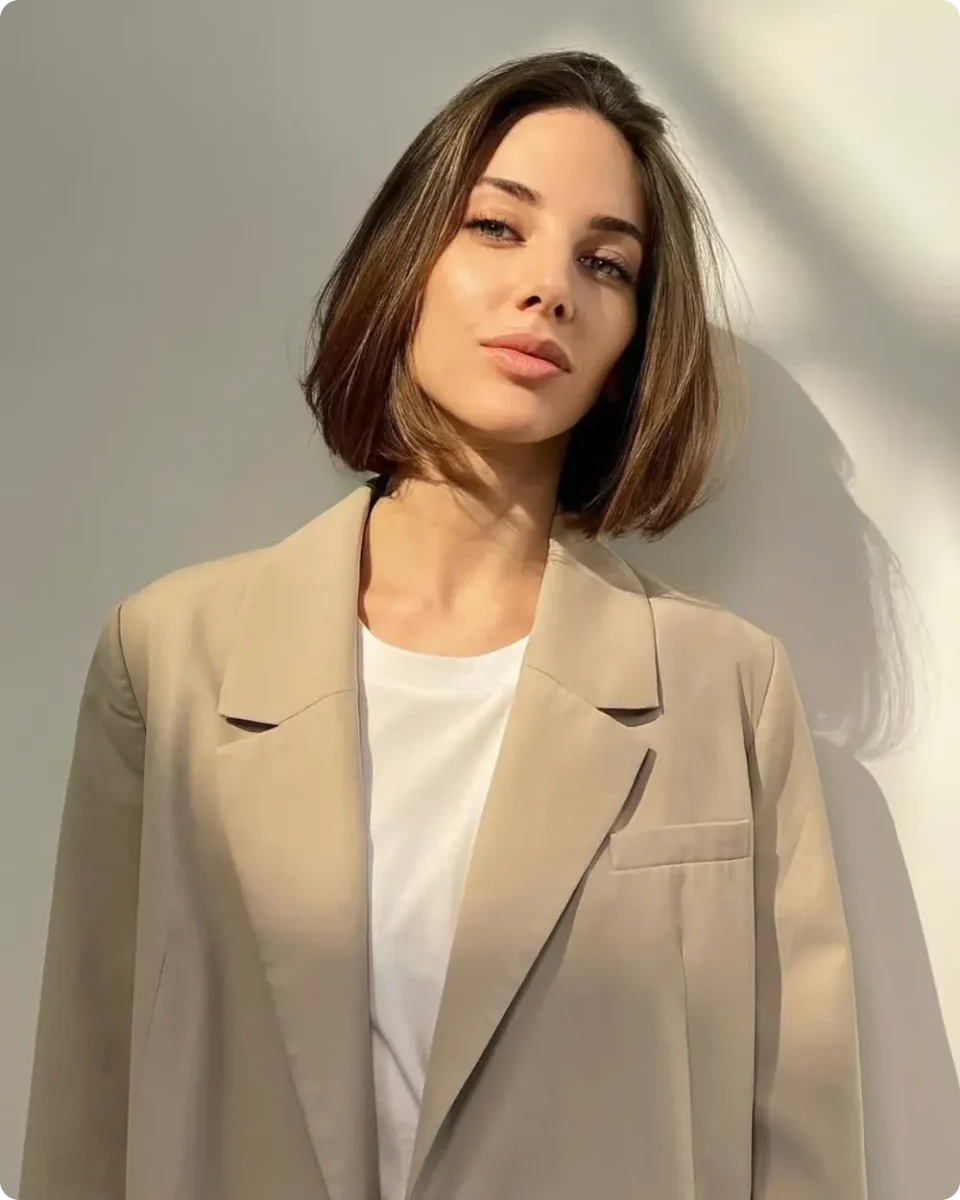
Short hair earns its keep on the mornings when you have four minutes and no plan.
This bob ends right at the chin with a blunt line at the bottom, parted slightly off center so one side falls forward and the other tucks behind the ear. That single tuck is the whole style. It clears one side of your face for a video call and creates a little asymmetry that stops it looking flat.
The ends are smooth and the length is even, so the shape holds itself. There is nothing to pin, nothing to tie, and nothing to redo at lunch.
Worth knowing before you cut: a blunt bob shows regrowth of the shape fast. It needs a trim more often than longer layers do.
17. Center-Parted Lob With a Razor-Straight Bottom Line
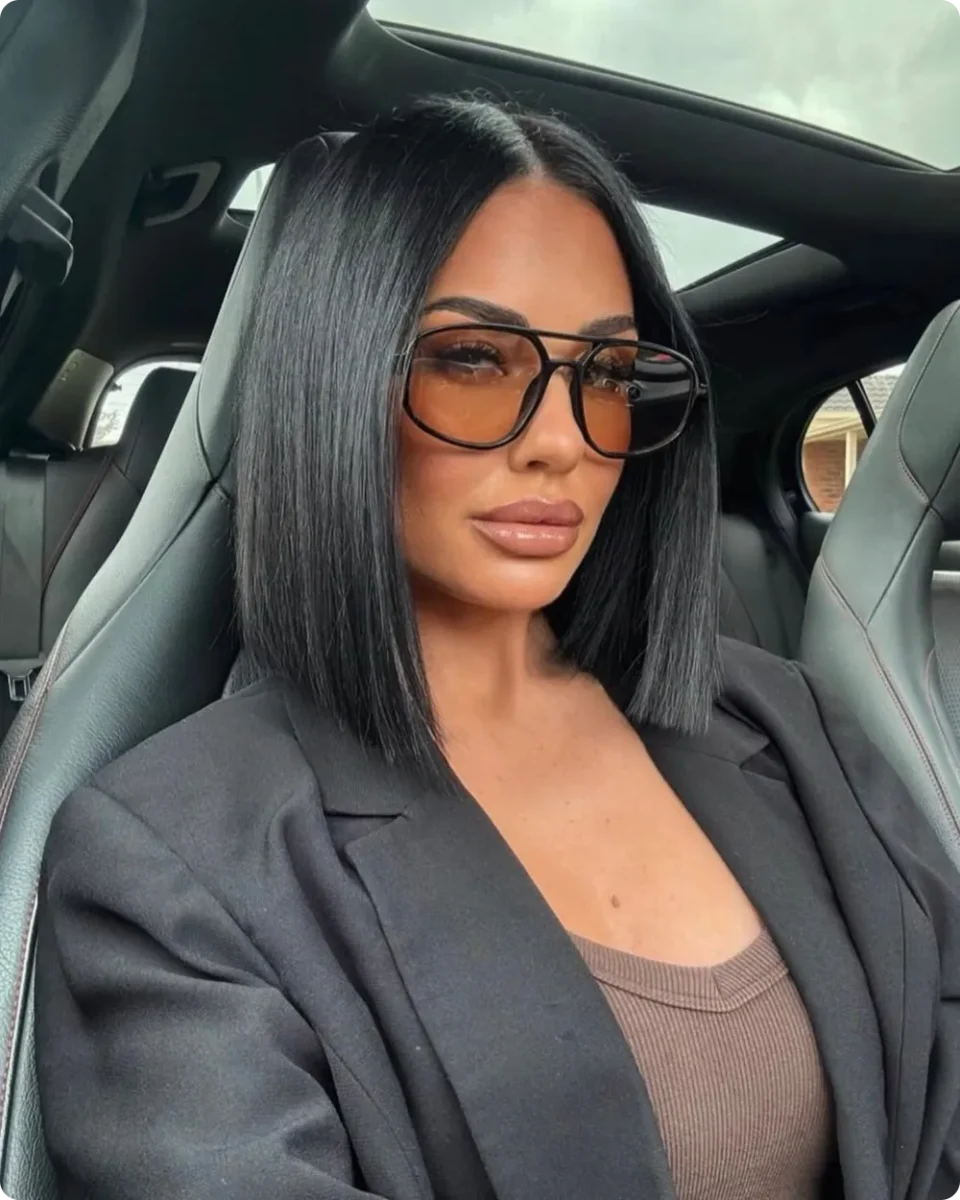
Length that stops just below the collarbone is long enough to tie back when you need to and short enough to dry in half the time.
The part here sits dead center and both sides fall forward in equal panels, framing the face symmetrically. The bottom edge is cut sharp and flat straight, with no layers breaking it up, which is exactly why the whole thing looks so deliberate. Straight, glossy hair shows that clean line better than any styling could.
The trade-off worth naming: a center part is unforgiving on the crown. If your roots lack lift, the top can sit flat against your head by afternoon.
📌 Good To Know
Dry the roots at the crown by flipping your head upside down for the last minute, then part it. You get lift where the part sits without touching a single styling product.
Skip the flat iron on the roots and save it for the bottom four inches. The blunt edge is what people notice, so that is where the shine needs to be.
18. The Tapered Pixie You Only Have to Wake Up and Shake Out
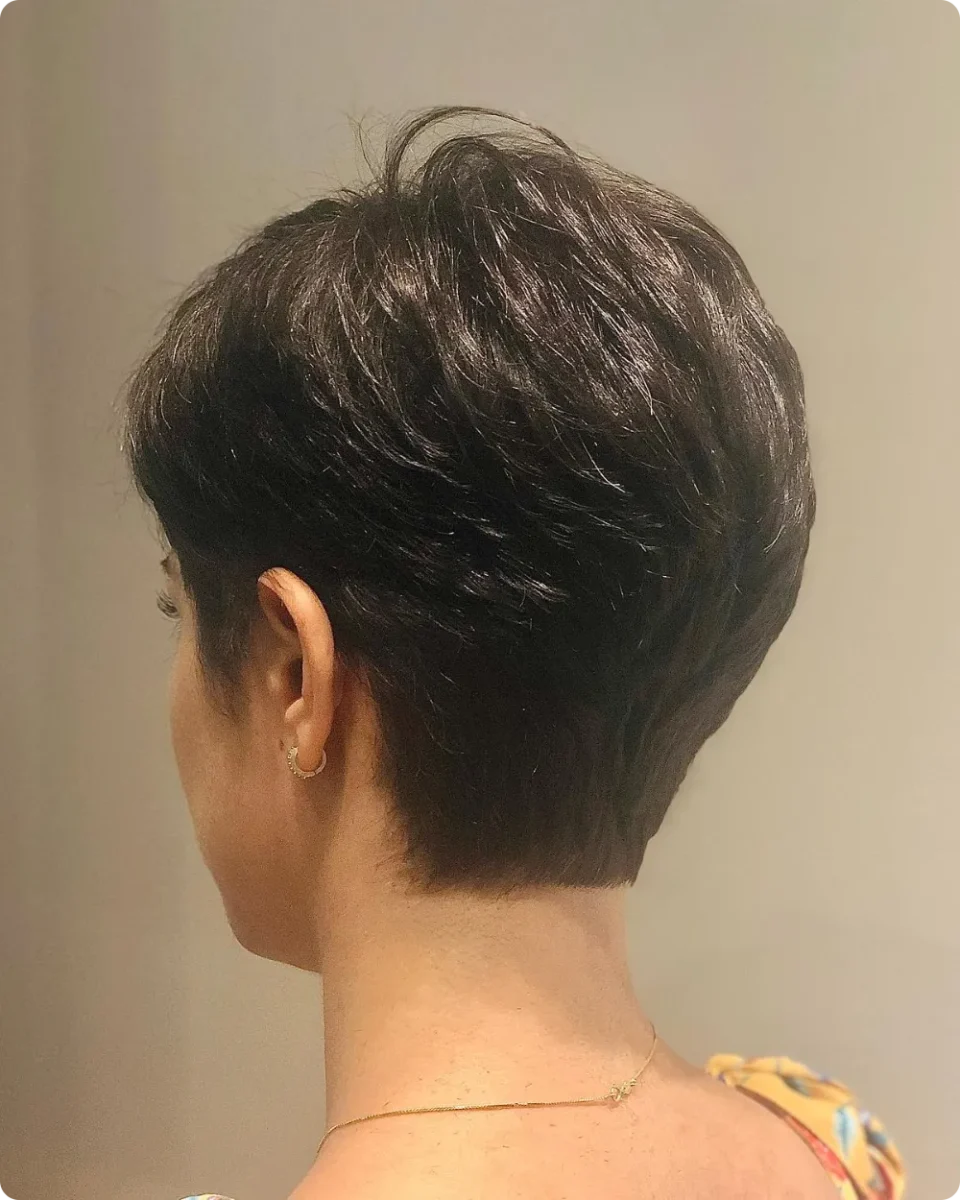
Wash-and-go is a real thing at this length, and it is the reason a lot of women never grow their hair back out.
The back here is cut close and tapered tight to the neck, so it stays clean under any collar. The length builds gradually toward the crown, where the pieces are longer and fall over each other in soft layers. A little natural texture runs through the top, which gives the shape its volume without needing a round brush.
Three things to know about living with this cut:
- All the styling happens in about thirty seconds, usually with fingertips and a pea of product at the crown
- The tapered back grows out fastest and is the first part that starts to look shaggy
- Earrings show completely, so small hoops or studs do more visual work than they would with longer hair
Work a small amount of light paste through damp hair with your fingers, focusing on the crown where the length is.
Book the next trim before you leave. Short cuts lose their shape on a schedule, not gradually.
Heavy wax or gel. It drags the top layers down and the shape collapses against your head.
Brushing it flat. The soft separation between pieces is what gives this cut its movement.
19. A Coiled Low Bun That Clears a Turtleneck
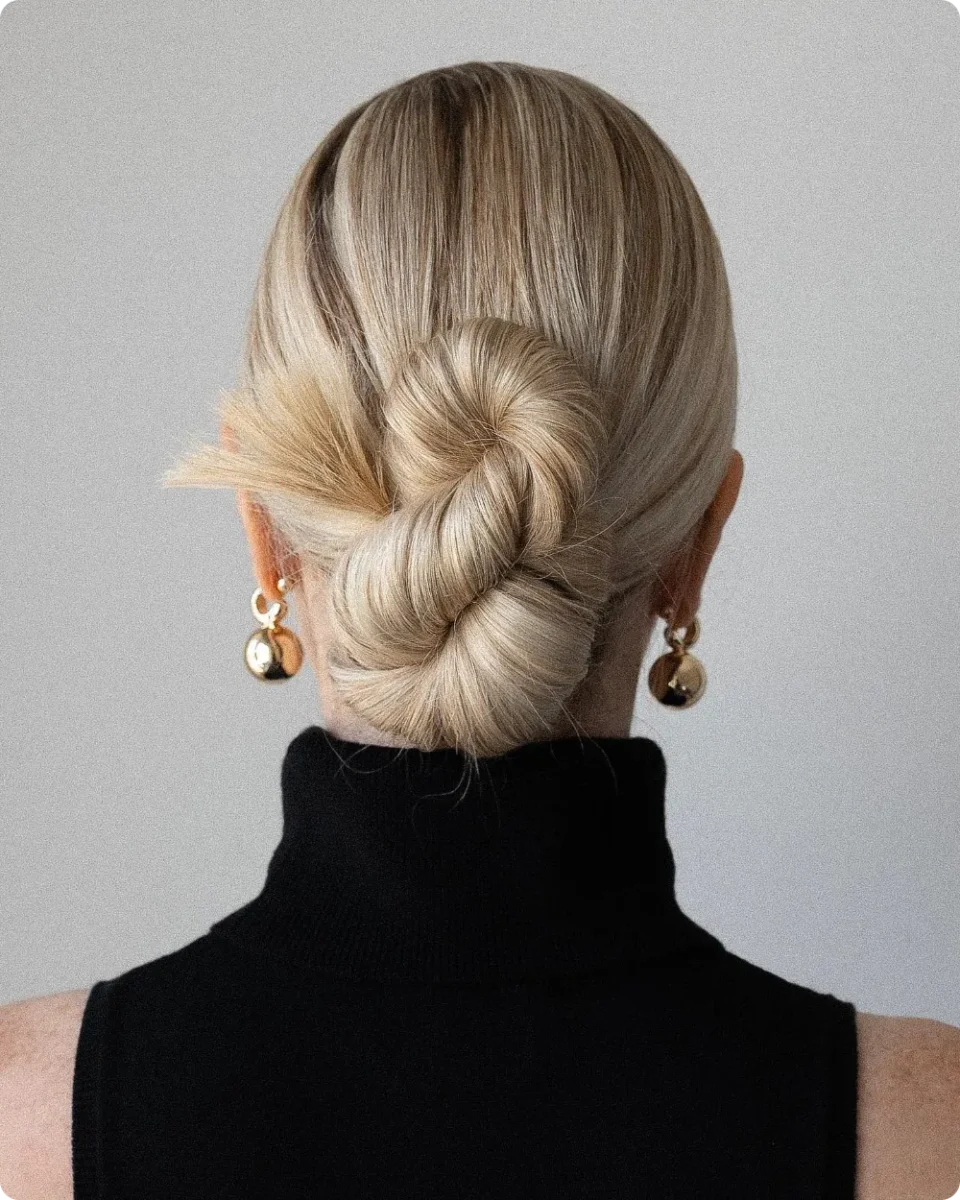
High necklines ruin most low styles, and this one is built to sit above the problem.
The hair is smoothed back from a center part and coiled into a spiral at the base of the skull, a little higher than a standard nape bun. The turtleneck sits underneath it instead of pushing into it. What keeps the whole thing from looking severe is the ends. They are left sticking out slightly on one side rather than tucked away, which gives the smooth shape a bit of grit.
Gold drop earrings finish it, since a bun this tidy leaves your ears completely clear.
Recreate this look
Let the twist do the coiling for you. Forcing the shape by hand usually gives you a lumpy roll.
20. The French Roll, Done With One Claw Clip Instead of Ten Pins
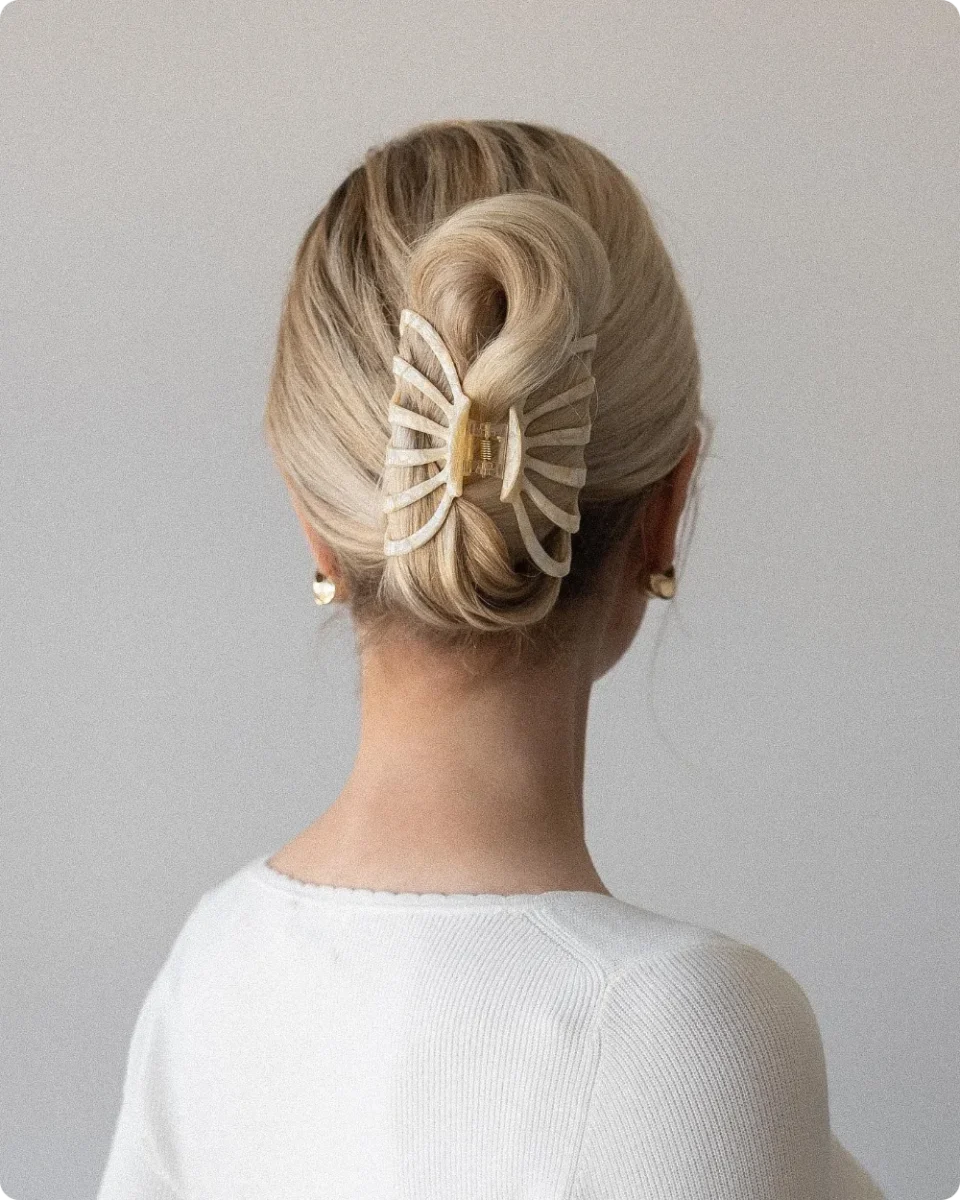
Vertical rolls used to mean a handful of pins and a lot of swearing at the mirror. A wide claw clip replaces all of it.
The hair is brushed back, gathered at the center of the head, then folded upward into a vertical roll against the scalp. The clip goes on sideways, jaws facing in, and grips the folded edge. A pearly shell-shaped clip keeps the whole thing soft, and the loop of hair left visible at the top stops it reading as stiff.
The part people get wrong: the roll goes up, not down. Folding the tail toward the floor gives you a flat lump with no structure behind it.
| Claw clip version | Pinned version |
|---|---|
| Under two minutes once you have done it twice | Five to ten minutes and a second mirror |
| Comes down in one motion at the end of the day | Pins hide in the roll and you always miss one |
| The clip is part of the look, so it can be pretty | Nothing shows, which suits a very formal day |
| Best for medium thickness. Very thick hair forces the jaws open | Holds any thickness if you use enough pins |
Damp-brush the sides before you roll. Any bump near the ears shows up twice as much on a vertical shape.
21. The High-Shine Chignon for the Days That Matter Most
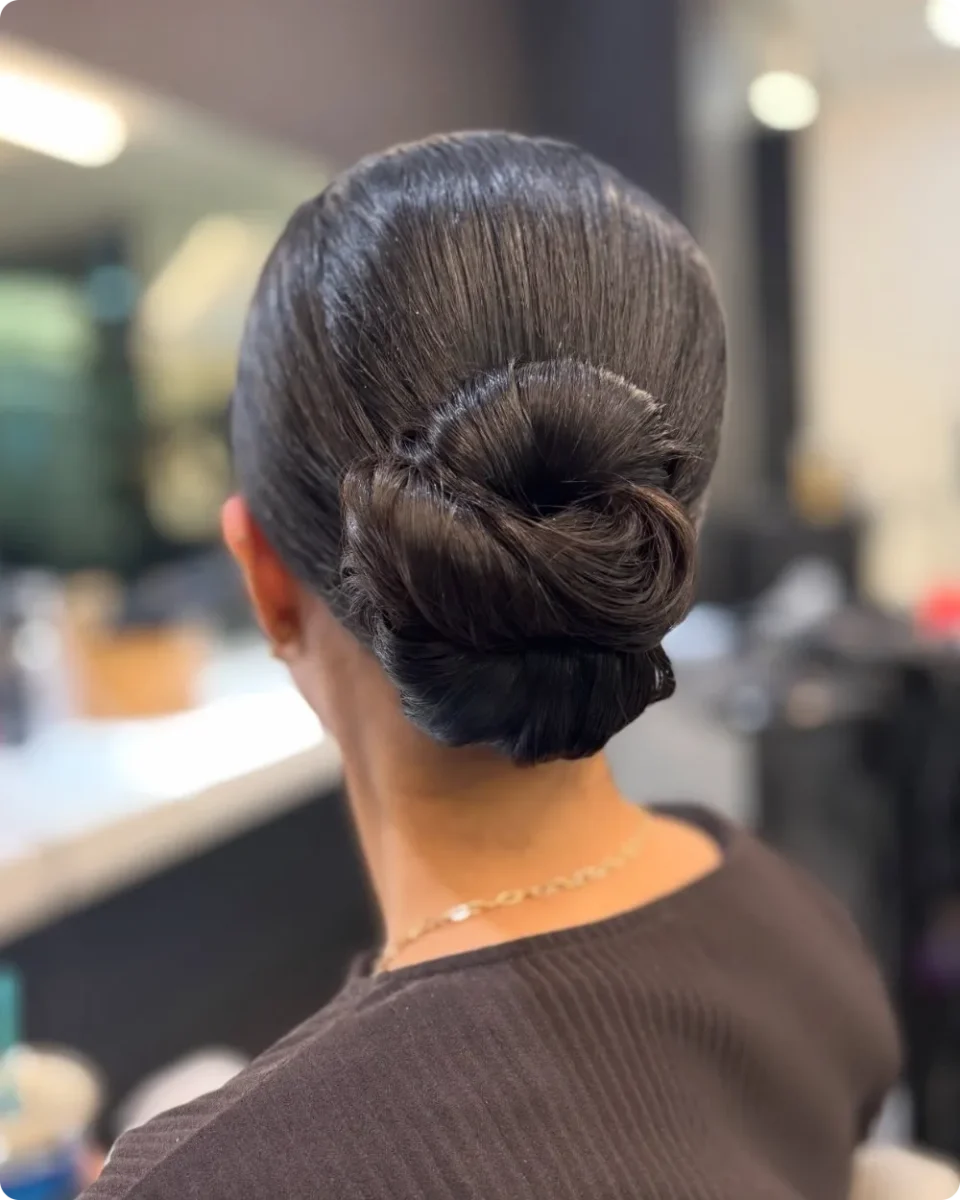
Crown volume is what separates this from every other low bun in the list.
Look at the top of the head. It rises in a smooth dome before sweeping down into the bun, and that lift is built by combing the section behind the front hairline back and up before anything is gathered. Without it, a glossy bun sits flat and reads a little severe. With it, the whole shape has a curve to it.
The finish is high shine all the way through, the kind you get from a serum on damp hair, a blow dry with a bristle brush, and a light shine spray at the end instead of hairspray.
Match the level of shine to your day.
Left to right: everyday desk days through to the morning of a big presentation.
Serum goes on the mid lengths and ends, never the roots. Near the scalp it just looks like day-four hair.
You do not need all 21. Pick two or three that suit your hair length and try them once on a quiet Sunday, when nothing is riding on the result. After that they take a couple of minutes and you stop thinking about them.
It helps to keep the basics in one place too: thin elastics in your hair color, a satin scrunchie, five good pins, and one claw clip that actually grips. That small kit covers almost everything in this list.
Save this post for the next morning you wake up late and want your hair sorted before the coffee finishes.
💡 Quick Tip
Nearly all of these hold better on second-day hair. If you wash at night, work a little dry shampoo through your roots before bed. It gives the strands enough grip by morning that pins and clips stay where you put them.