
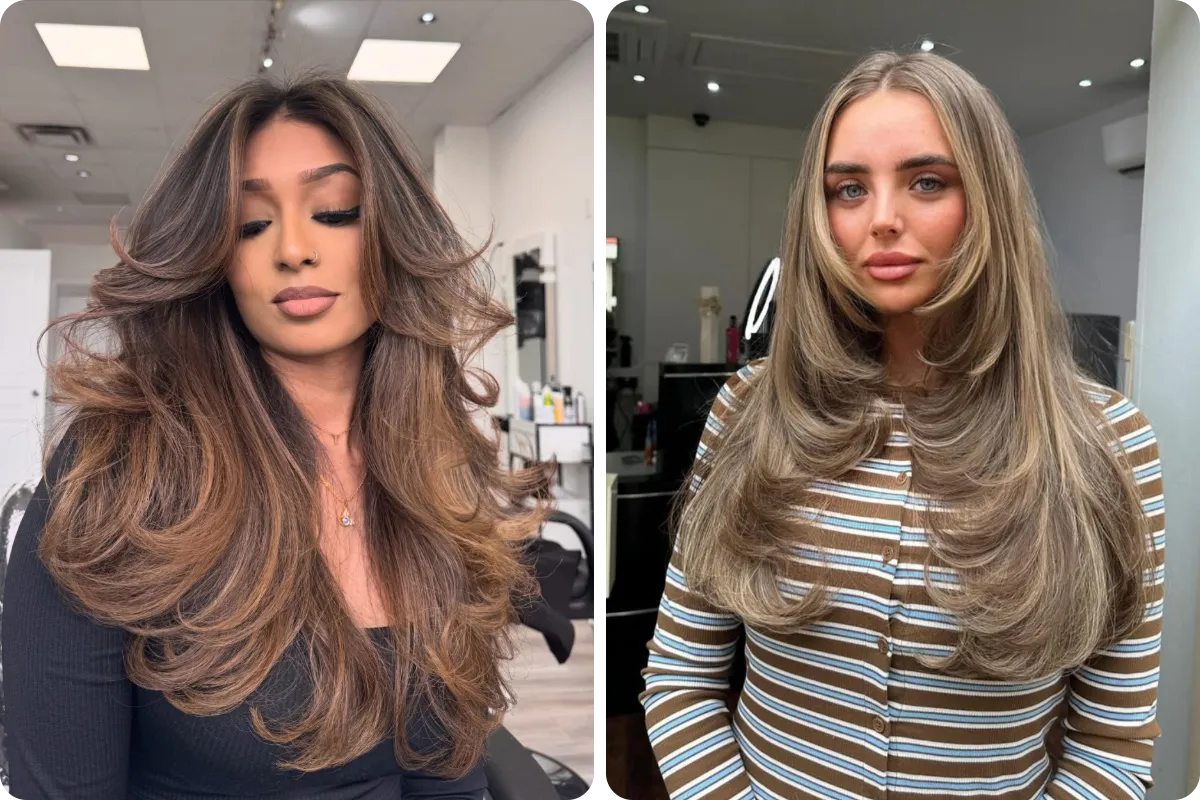
Long hair has a habit of going flat at the bottom. It grows, it gets heavy, and by the time it passes your chest the ends hang in one straight line with nowhere to go. Layers fix that, but only when they are placed for your hair instead of copied from a photo with no explanation attached.
That is what this roundup is for. Every one of these 26 long layered hair ideas came from a real salon photo, and each one is broken down by where the layers start, how far apart they sit, and how much movement shows once the hair is finished. Some cuts open up around the face. Some leave the top untouched and only change the last few inches. A few are built for thick hair that widens into a triangle at the bottom, and others protect fine hair that cannot afford to lose any density.
Scroll through, save the ones that match the kind of movement you want, and bring them with you to your appointment.
1. Center Part Layers With a Bright Face Frame That Flicks Back
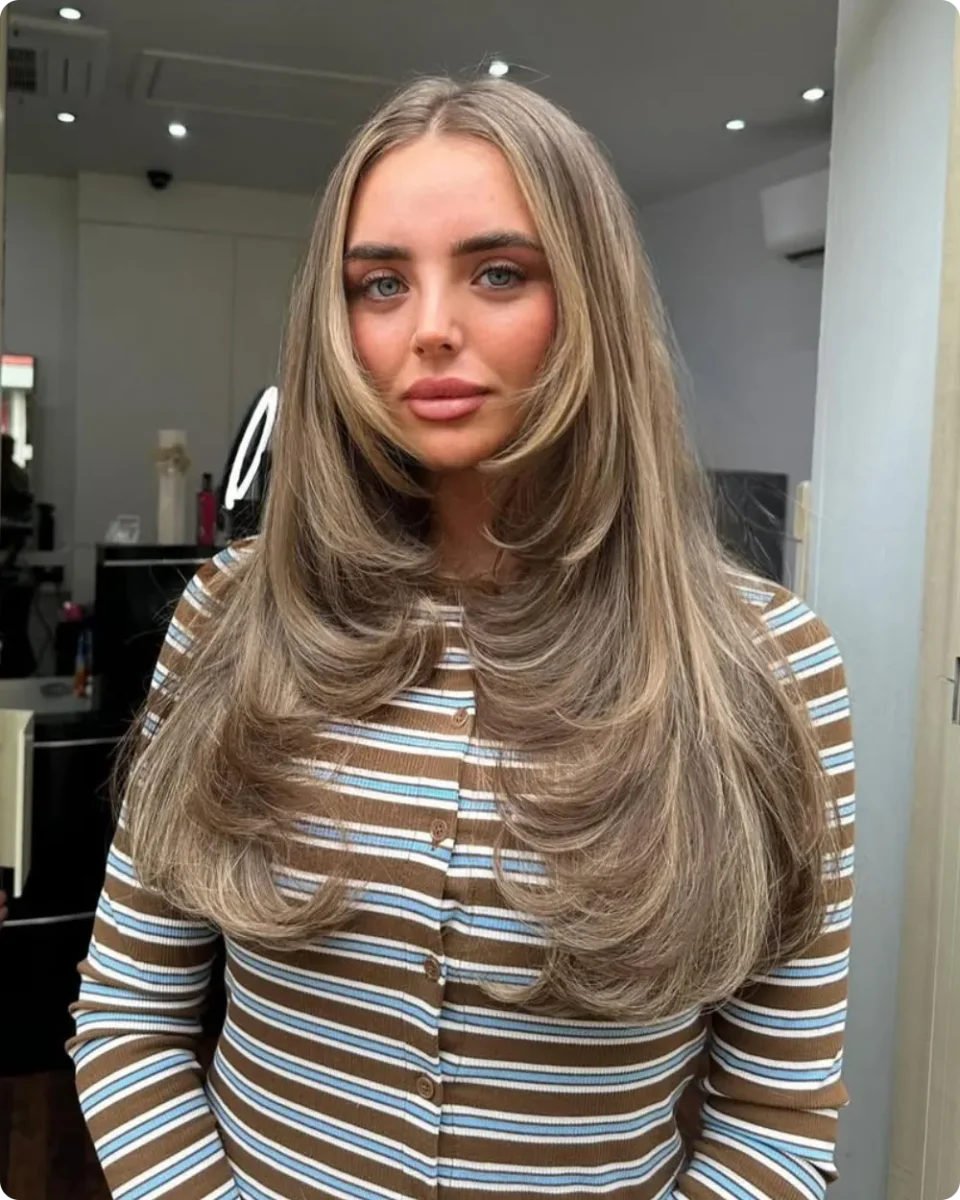
The lightest pieces sit right at the front, and that placement is what makes this read as movement instead of just long hair.
What is doing the work:
- A center part that lets the shortest layer break around the cheekbone
- Face-framing sections styled back and away, so they lift instead of lying flat
- Wide, soft bends through the mid-lengths rather than tight curls
- Ends kept thick, so the length still looks full at the bottom
Ask your stylist to start the front layers high and keep the back long. That gap between the two is where the swing comes from.
2. Ash Brown Long Layers With Ends That Flick Outward
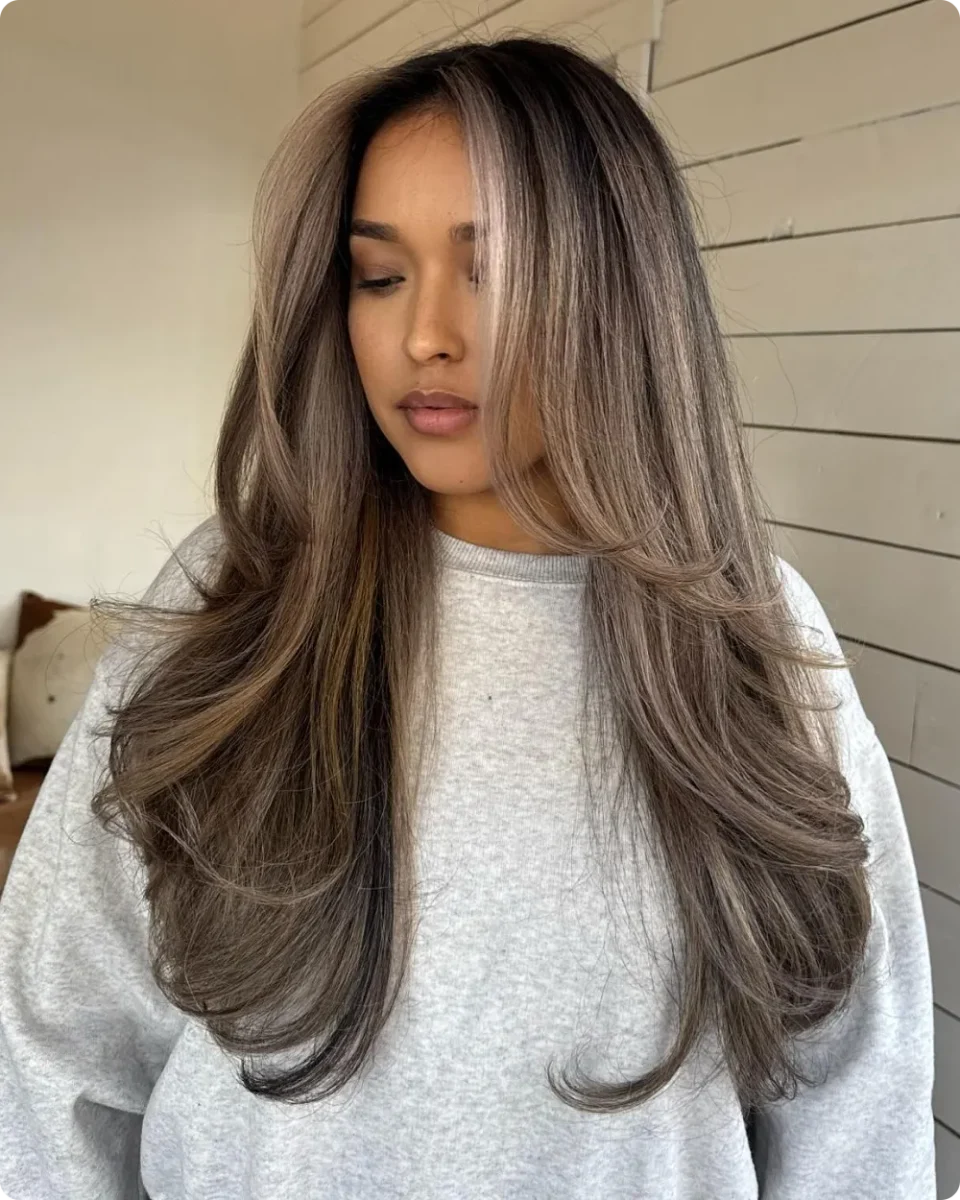
Ash and mushroom brown tones can flatten out fast, so the shape has to carry the look. Here it does, because almost every layer ends in an outward flick instead of curling under.
The part: pushed off to one side, with a long piece falling across the forehead.
The layer length: the shortest pieces land near the collarbone, then drop in long steps all the way down.
The finish: brushed out, not defined. The curls are loosened until they look like one big wave.
The result is a cut that keeps full length but never hangs in a straight sheet.
Rough dry until hair is about 80 percent dry, then split it into four sections.
Take each section over a large round brush and roll it away from your face.
At the very ends, turn the brush outward and hold the heat there for a few seconds.
Let everything cool fully before you brush through, or the flick drops out.
3. Deep Side Part and Barrel Curls on Long Black Layers
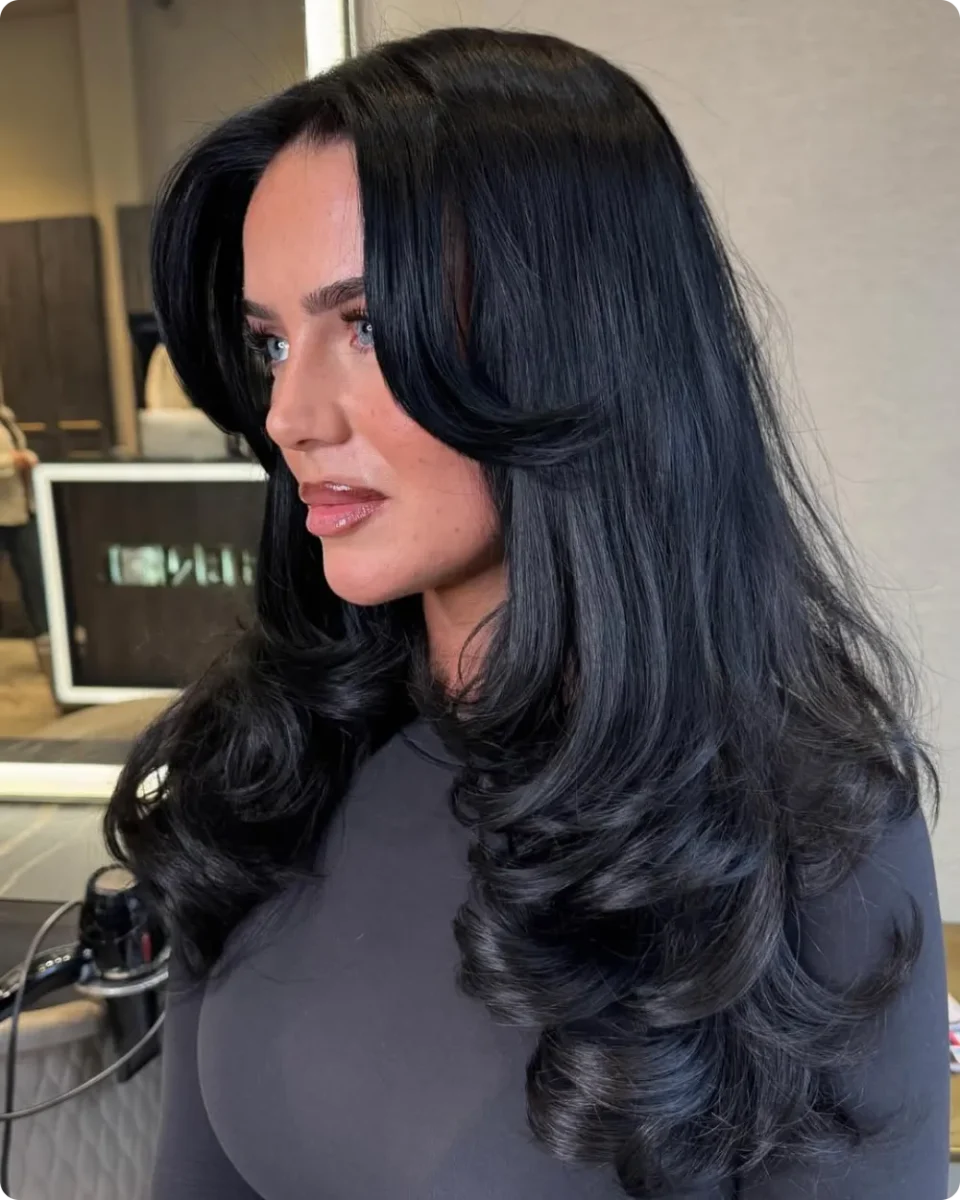
Black hair shows every line of a cut, and this one uses that to its advantage. The root stays smooth and shiny, then all the volume gets saved for the bottom third.
There are really two choices happening at once, and they work because they pull in opposite directions.
Sleek up top: a deep side part with one wide swooping piece that sweeps across and back. Nothing fluffy near the roots.
Full at the bottom: thick barrel curls that sit at the collarbone and below, brushed out just enough to blend into each other.
Keep in mind that curls this size need a large iron and real cooling time. Rush the cool down and you lose the shape by lunch.
Start the curl below the ear so the top stays flat and glossy.
Pin each curl up while it cools to hold the round shape.
Use a shine spray, since dark hair reads dull without it.
Curling from the roots down, which kills the sleek side part.
A small barrel, which turns the ends into ringlets instead of waves.
Heavy cream on the ends, which drags the curl straight down.
4. Textured Black Shag With a Full Wispy Fringe
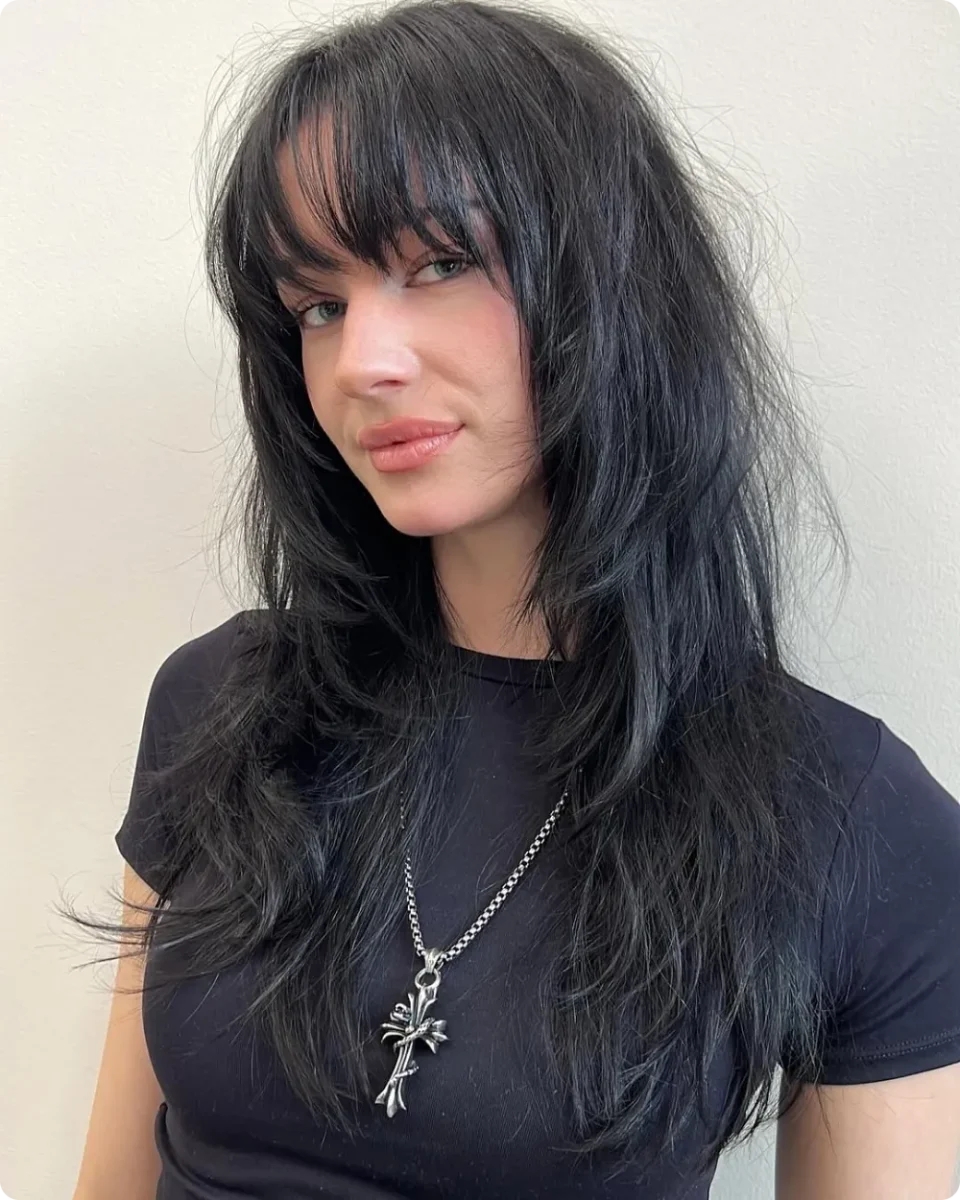
Nothing here is smoothed down, and that is the whole point. The layers are cut short enough to sit at the cheekbone, then keep stacking all the way to the ribs, so the hair breaks into separate pieces instead of hanging in one solid curtain.
The fringe is cut soft and slightly parted, with enough length at the sides to blend straight into the face-framing layers. That blend is what keeps it from looking like bangs stuck onto a long haircut.
Styling is mostly hands and a texture spray. Scrunch it while damp, leave it alone, and resist the urge to brush it out.
Worth knowing before you book: a fringe like this needs a trim every three or four weeks, and heavily razored ends can read thin if your hair is already fine.
Long black hair cut to one length, no fringe.
Ends sit in a heavy, flat line across the back.
Same length, but short layers open up the sides.
Ends split into pieces that move when you turn your head.
5. See-Through Bangs With Layers Only at the Ends
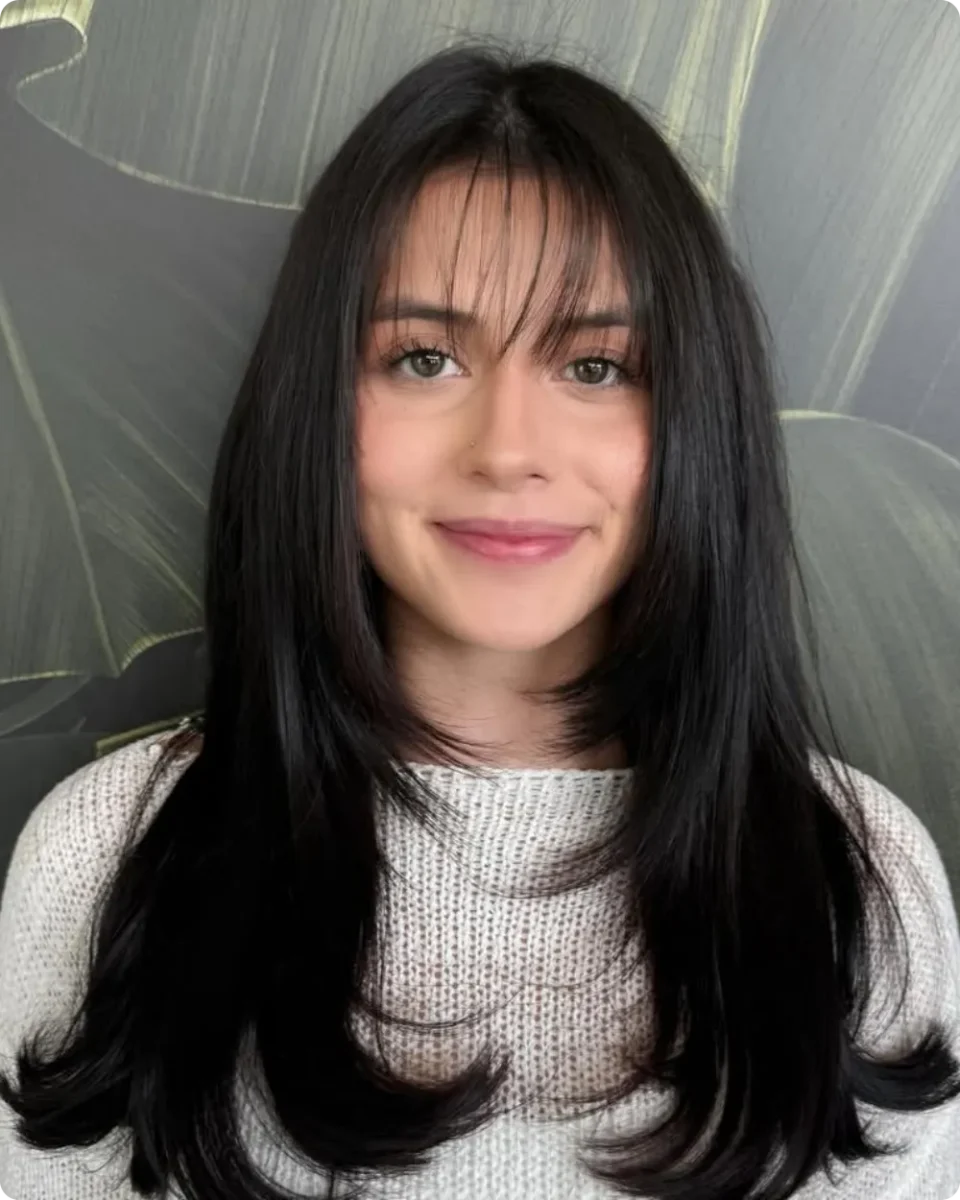
Bangs this fine sit on the forehead like a shadow, thin enough to see skin through them. Behind them, the cut stays surprisingly simple. The length runs long and thick, and the only real layering happens in the last few inches, where the ends turn outward on both sides.
📌 Good To Know
Wispy bangs are the easiest kind to walk back. As they grow, they blend into the face-framing pieces on their own, so you are never stuck waiting through an awkward middle stage.
For anyone nervous about losing thickness, this is the version to save. You keep a full, heavy bottom line and still get a soft edge around the face and a bit of lift at the ends.
6. Long Sliced Layers With a Sweep Across One Eye
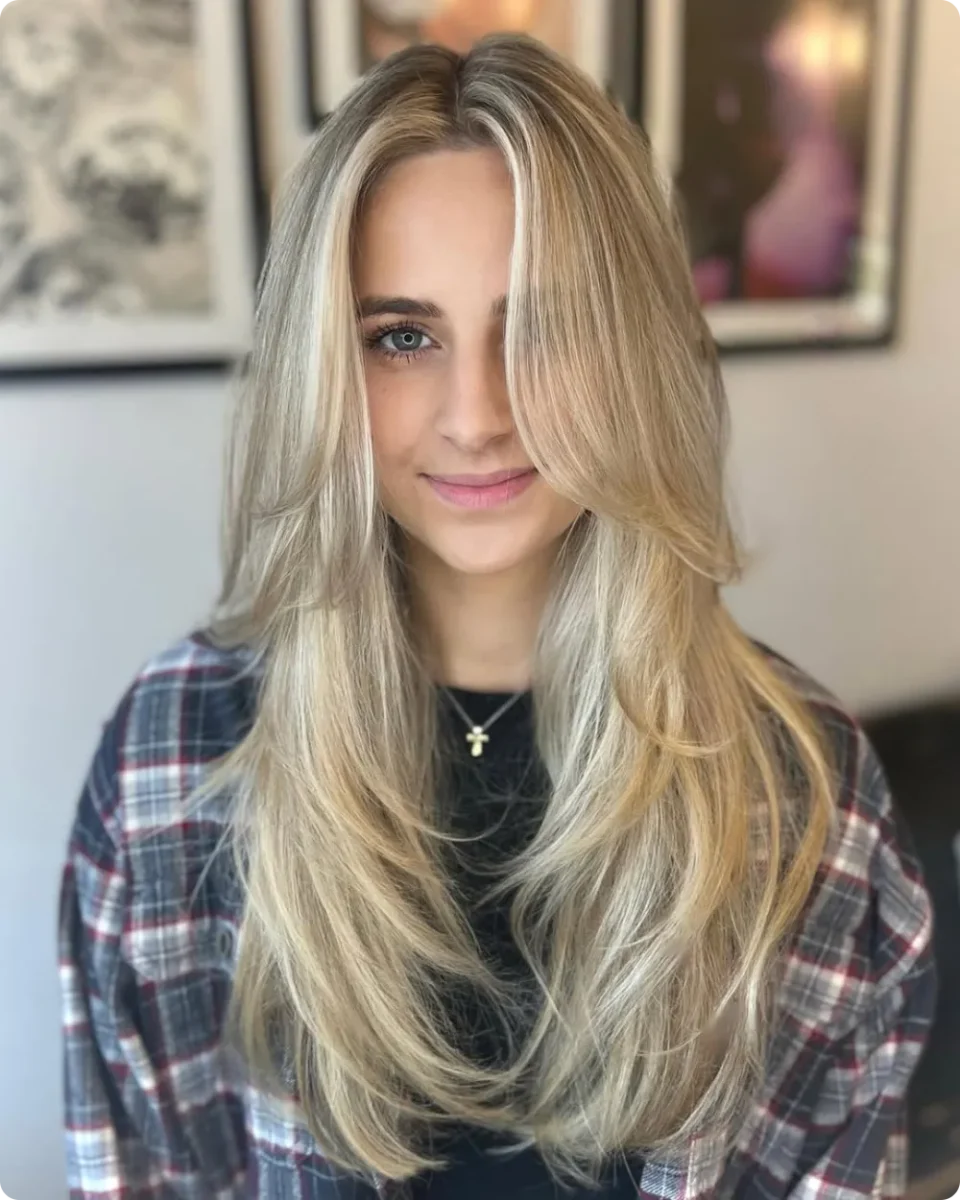
Most of the movement in this cut comes from one long piece sweeping down across the face. It falls from a center part, crosses the cheek, and lands well past the chin, which gives the front softness without cutting anything short.
Behind it, the layers are sliced long and thin. The ends taper instead of stopping in a blunt line, so bright blonde hair still looks light at the bottom rather than blocky.
One honest caution: ask for the tapering to stay subtle. Too much of it on fine hair leaves the ends looking wispy rather than soft.
7. Curtain Layers With Caramel Ribbons Through the Front
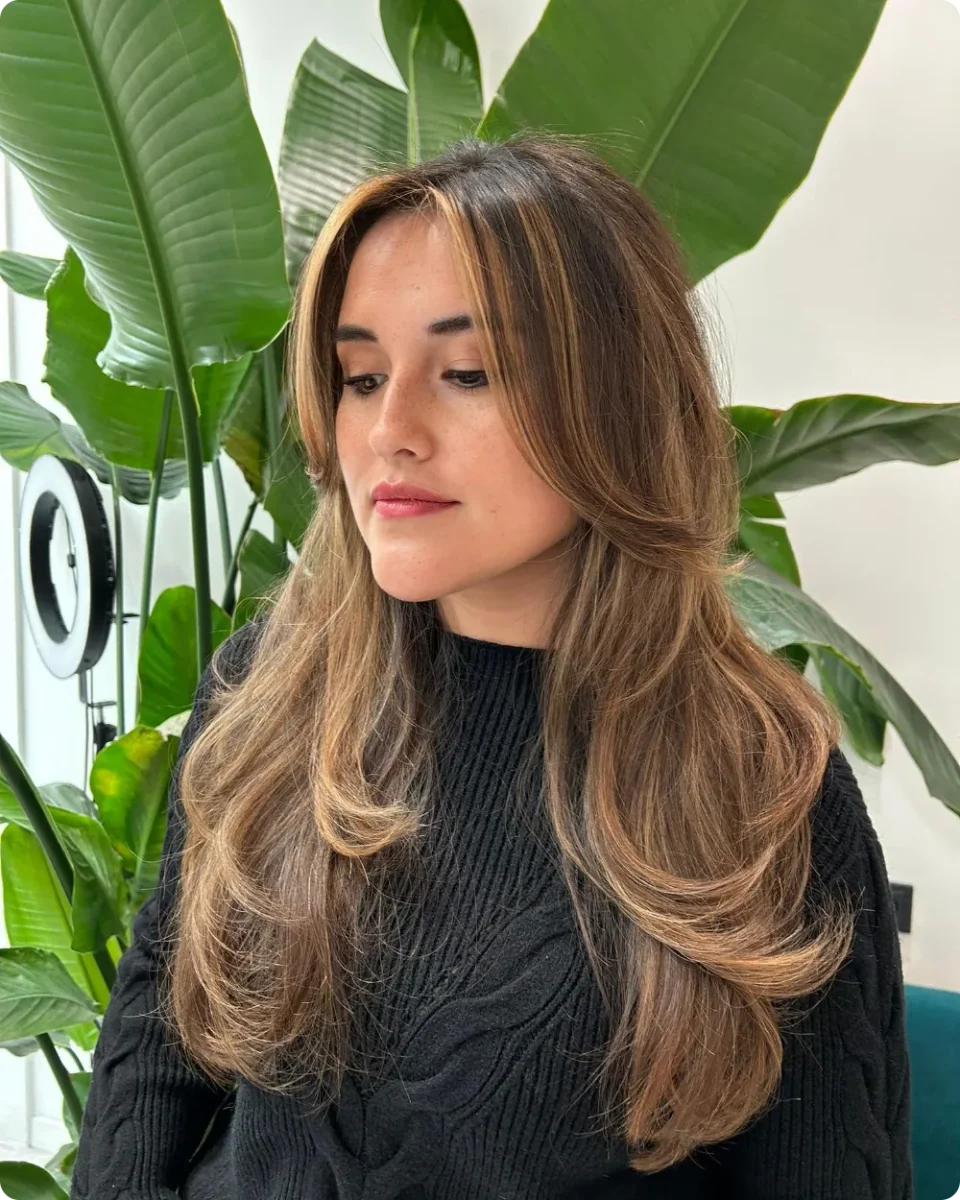
Split down the middle, the two front sections curve away from each other like open curtains. That is the shape doing the heavy lifting, but the color placement is what makes it read clearly in photos.
Look at where the warm caramel pieces sit. They run through the top of the curtain layers and along the parting, so every bend catches a lighter streak and the layers separate visually instead of blending into one brown mass.
The ends are dried under with a round brush, which keeps a full, rounded bottom while the front still opens up.
Bring a photo like this to your appointment and ask for the color and the cut to match each other. Layers alone can disappear on dark hair without a little contrast running through them.
Lighter pieces placed on the curtain layers act like a highlighter pen on the cut. You see the movement even when the hair is standing still.
8. Long Steps From Chin to Waist on Thick Brunette Hair
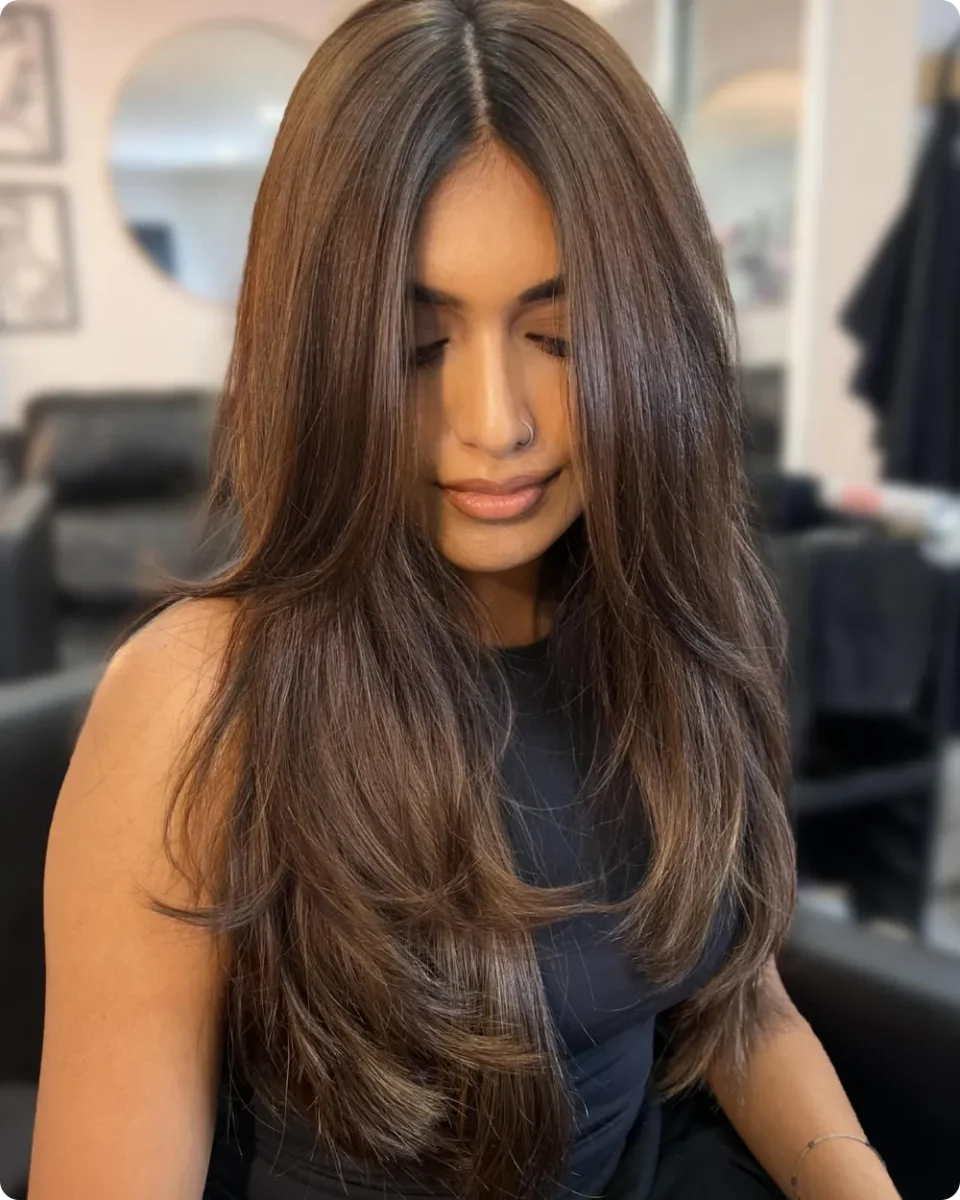
Thick hair can turn into a heavy triangle once it passes the shoulders. This cut solves it by taking weight out in steps rather than all at one level.
| Layers in steps, like here | One long layer only |
|---|---|
| Weight comes out at three or four levels down the length. | Weight only comes out near the ends. |
| Each step flicks out on its own, so you see several lines of movement. | The bottom moves, the middle stays flat. |
| Good pick for thick or coarse hair that widens at the bottom. | Better for fine hair that needs all the density it has. |
The first step lands close to the chin, the next around the collarbone, then two more further down. Everything else stays long, so the cut never shortens her actual length.
9. Copper Waves With Layers Hidden Under the Top Section
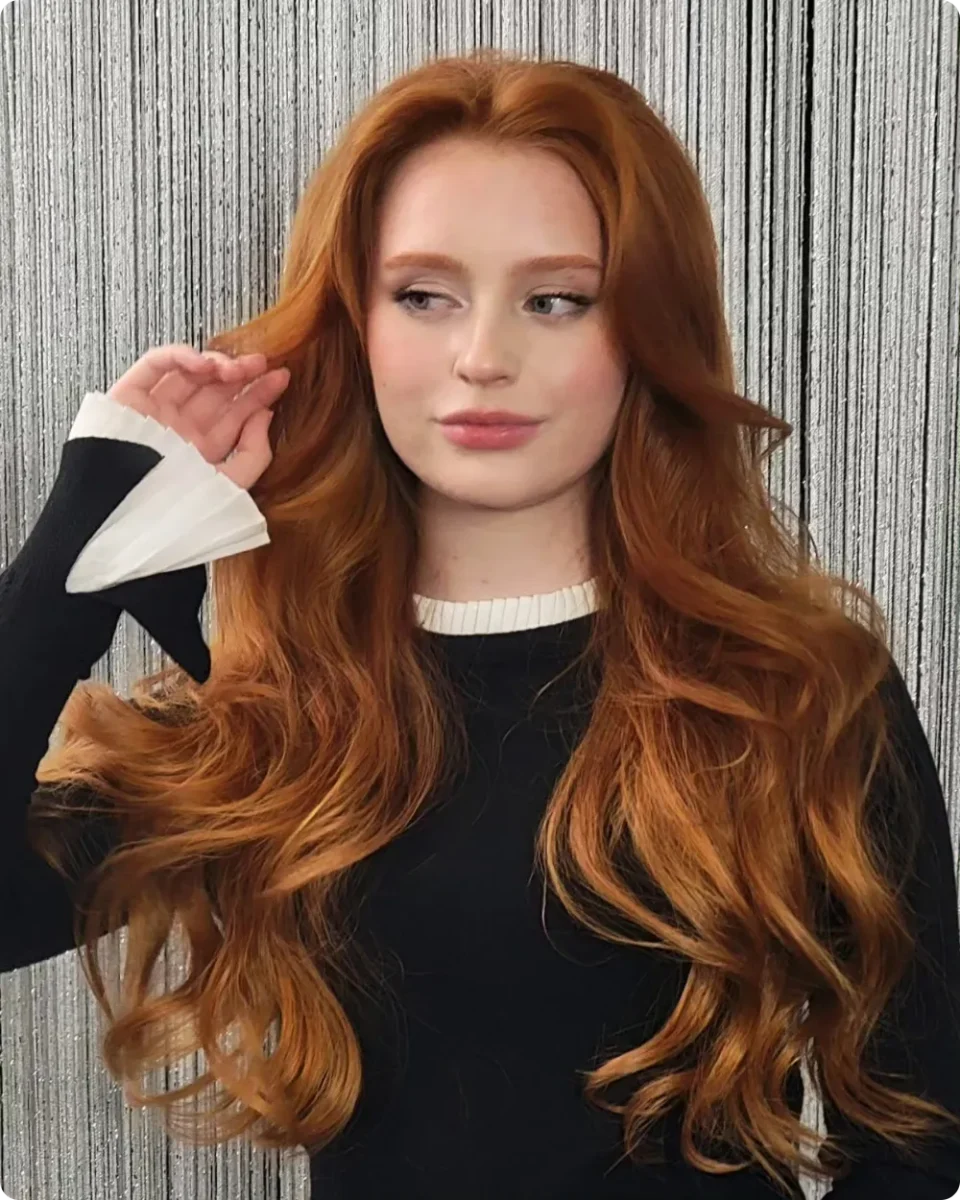
At a glance this looks like one length with a big wave through it. Look at the sides and you will spot the giveaway: shorter pieces curving in near the cheek, with the rest falling long and loose below.
Where the layers sit: mostly underneath and around the face, not through the crown. The top section stays smooth and unbroken, which keeps the copper shade looking rich and glossy.
How the wave is set: loose S bends starting below the ear, brushed out so the ends separate into big soft spirals.
Why it suits red hair: heavy layering can make warm tones look patchy. Keeping the top solid protects the color while the hidden layers still create swing underneath.
Recreate this look
10. Blowout Layers With a Soft Swoop Across the Forehead
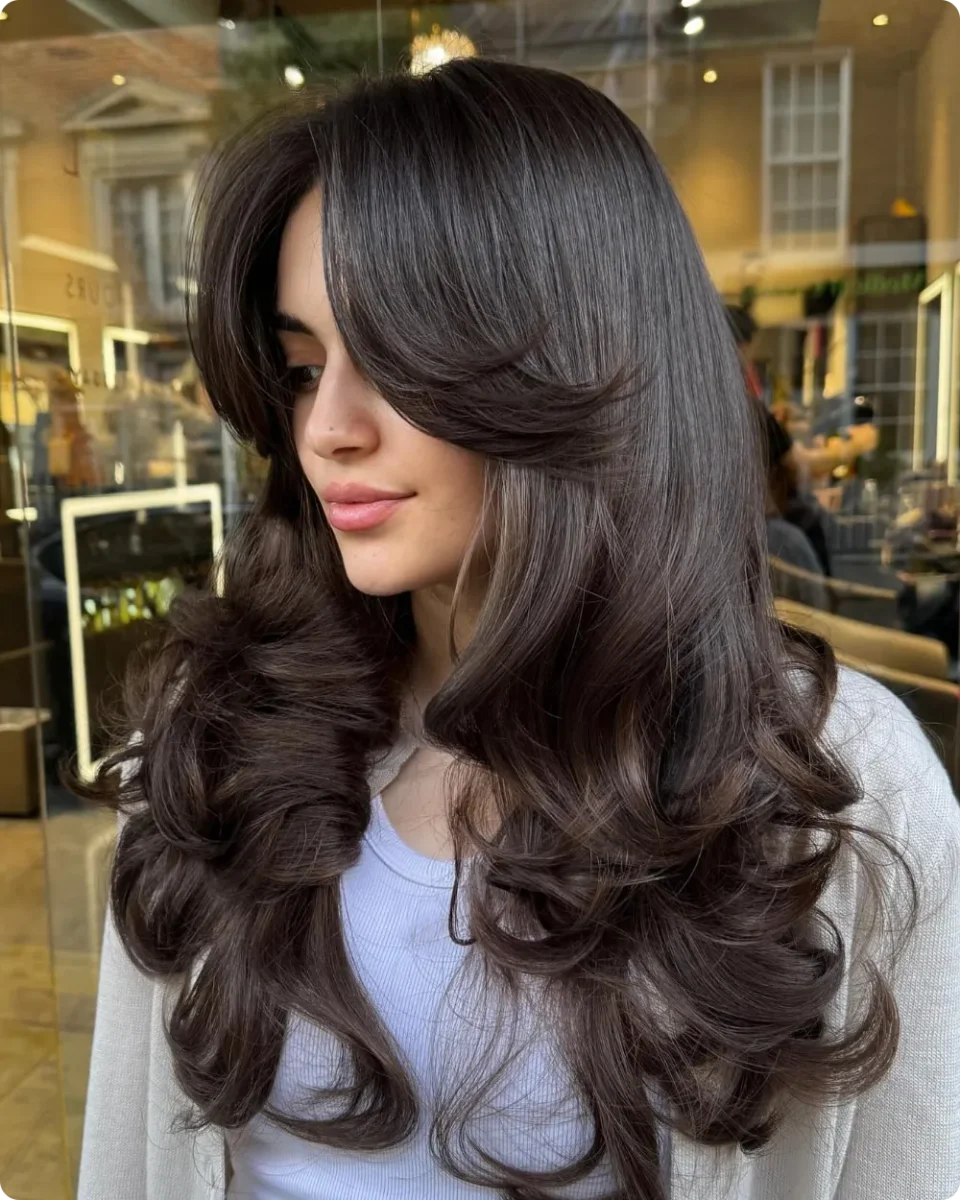
Volume here does not wait until the ends. It starts at the crown, carries through a long swooping piece that curves over the forehead, and finishes in thick rolled curls near the ribs.
The front layer is the piece to point out to your stylist. It falls from a side parting, arcs across the brow, and lands somewhere around the collarbone, which acts like a soft fringe without any short cutting.
Below that, the layers are long and rounded, all set in the same direction. That is why the curls stack into each other instead of separating into strands.
This is a styled look, so be honest with yourself about upkeep. It takes a big round brush, a set of rollers or a large iron, and about half an hour.
11. Curtain Bangs With Thin Sparkle Strands Threaded Through
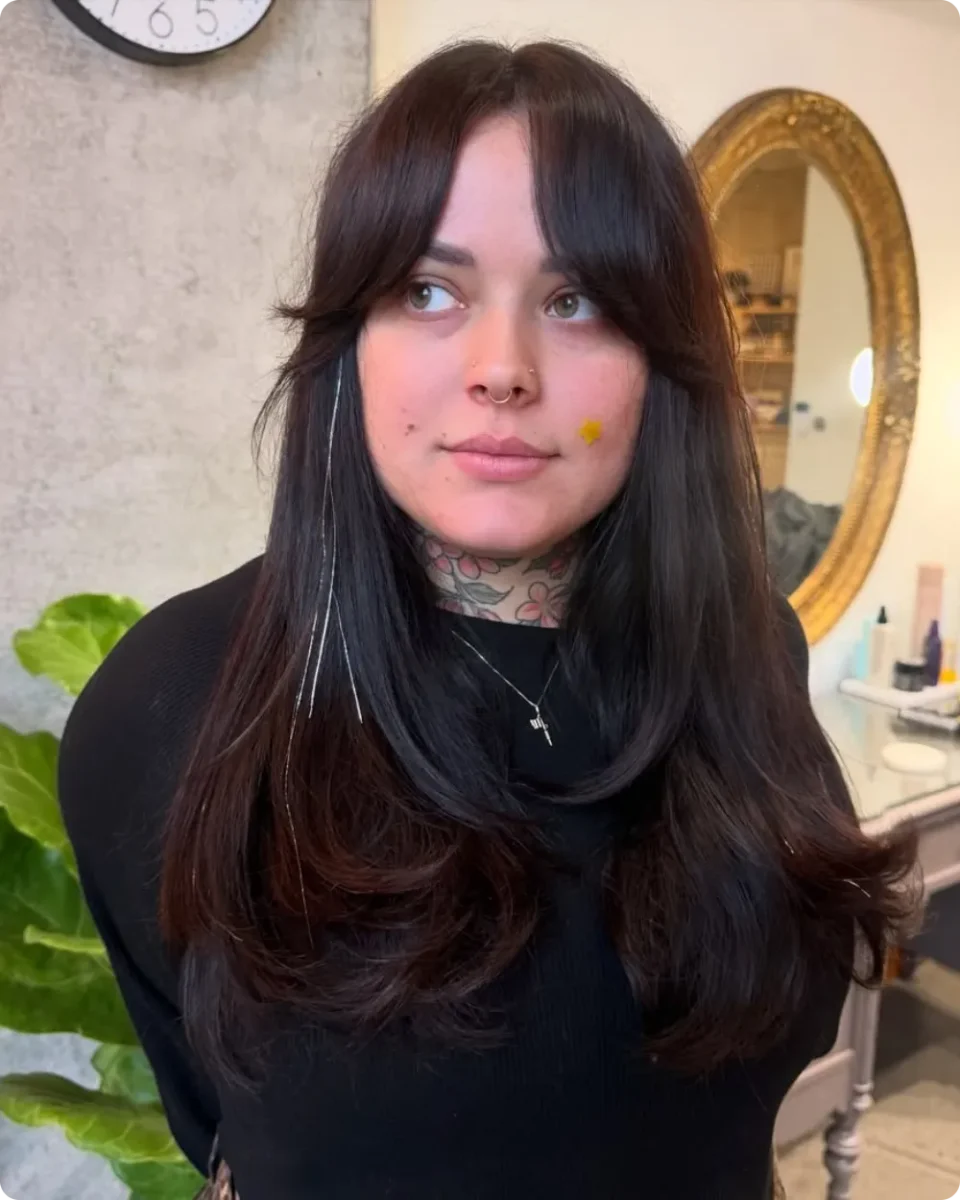
Curtain bangs get most of the attention in this one, but look at the left side of her hair. Fine silver strands run down through the layers and catch the light as the hair moves.
- Bangs part in the middle and sweep out to both cheekbones
- Layers stay long, with the shortest around the jaw and the rest flowing to mid-back
- Ends turn outward in a loose flick rather than curling under
- Sparkle strands sit on one side only, which keeps them from looking costumey
Tinsel strands are tied to individual hairs and last a few weeks. Worth asking about if you want something noticeable at your appointment without cutting more length off.
- ▸Curtain bangs work best when they are cut long enough to blend into the layer below.
- ▸Dry them first, straight down, then split and brush them back once they are nearly dry.
- ▸Skip heavy product on the fringe, since even a little weighs it flat against the forehead.
- ▸Placing sparkle strands to one side reads softer than spreading them all over.
12. Undone Waves and Choppy Layers That Look Air Dried
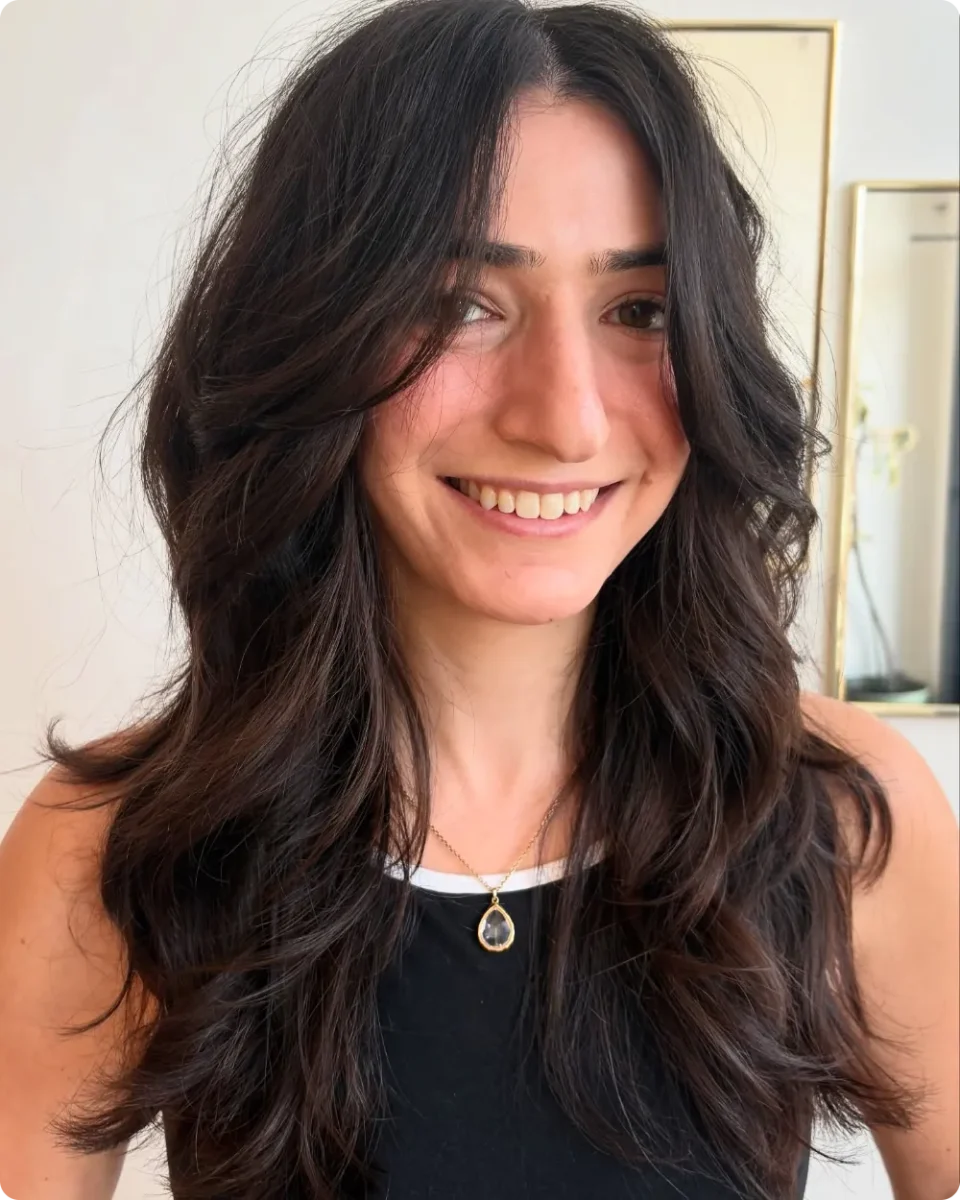
Barely brushed, slightly wild, and still clearly cut with a plan. The layers are choppy and uneven on purpose, with pieces around the face breaking at different lengths instead of lining up neatly.
Texture like this hides a lot, which is part of why it appeals. Second day hair works fine, the part can shift wherever it wants, and a stray piece across the face reads as part of the look.
Ask for a soft, lived in layer with no sharp lines. If your hair is naturally a bit wavy, this may be the lowest effort cut in the whole roundup.
13. Symmetrical Face Framing That Curls Away on Both Sides
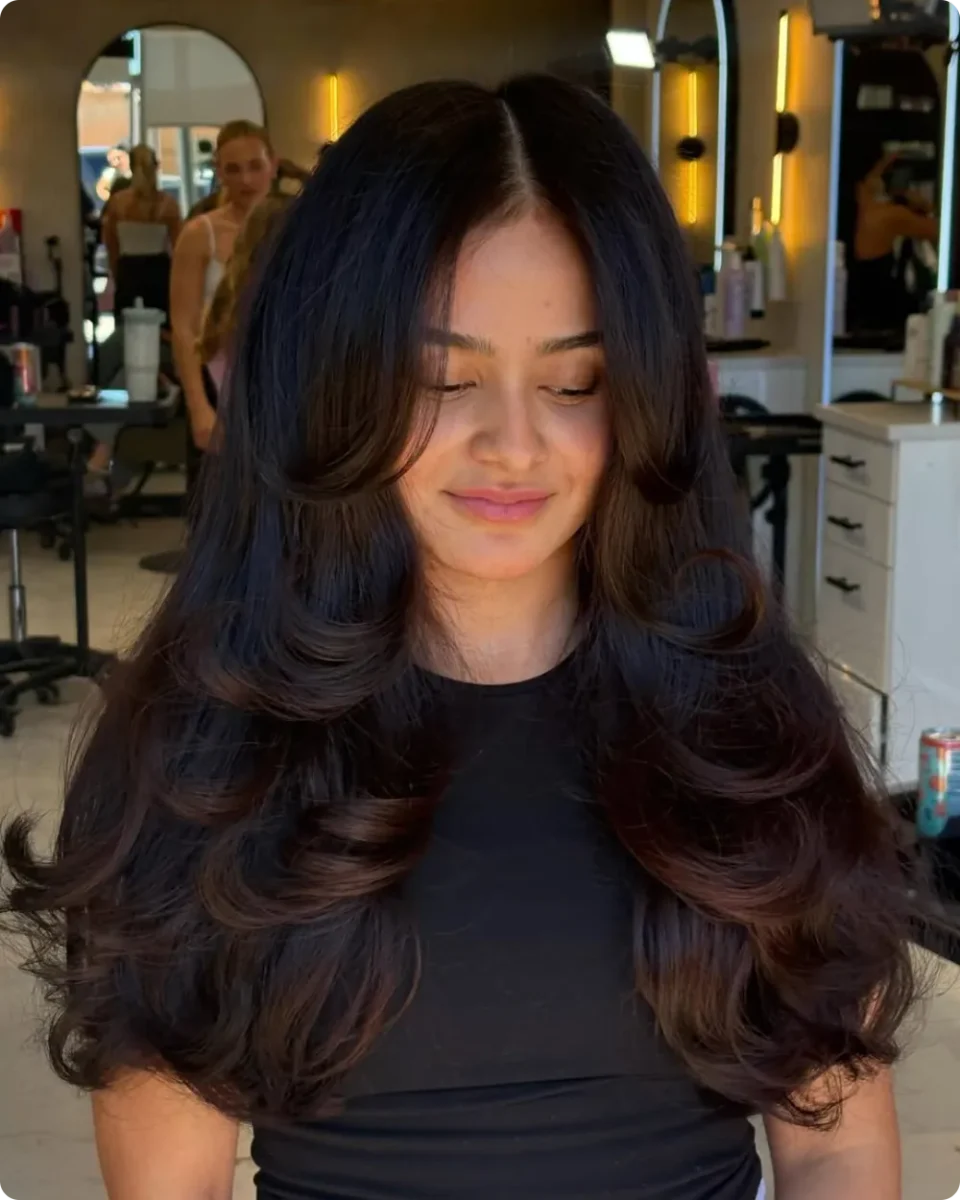
Both sides match here, and that even placement is the trick. A clean center part splits the hair, then the shortest layer on each side hooks back at the jaw in a mirrored curl.
Follow the shape down and you can count the tiers: the jaw curl, a longer bend at the collarbone, then big rolled ends near the ribs. Each one turns away from the face, which opens everything up instead of closing it in.
Warm brown running through the ends keeps the layers visible against near black roots.
💡 Quick Tip
Matching layers on both sides only look right if your part stays in the same place every day. If you switch your part around a lot, ask for the front pieces to be cut slightly uneven so they still work either way.
14. Long Bangs and Big Barrel Waves on Dense Black Hair
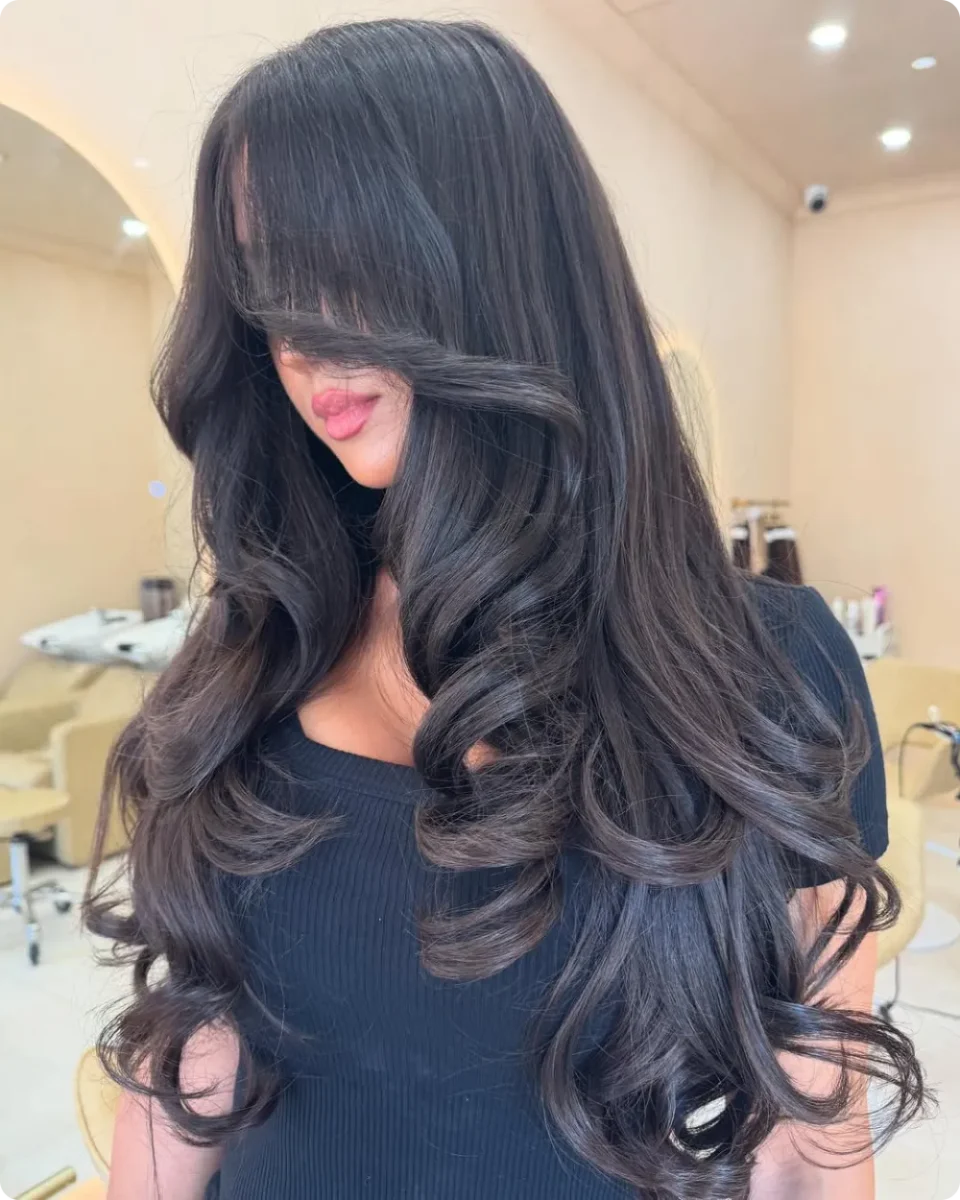
Bangs cut past the eyes, waves the size of soda cans, and length running well past the chest. Nothing about this is subtle, and it works because the proportions stay balanced.
Hair this heavy needs layers cut through the middle or the weight pulls the waves straight within hours. The bangs also do something useful: they break up the sheer amount of dark hair around the face, so the whole thing feels lighter than it is.
15. Full Fringe With Straight Layers Fanning Out Below
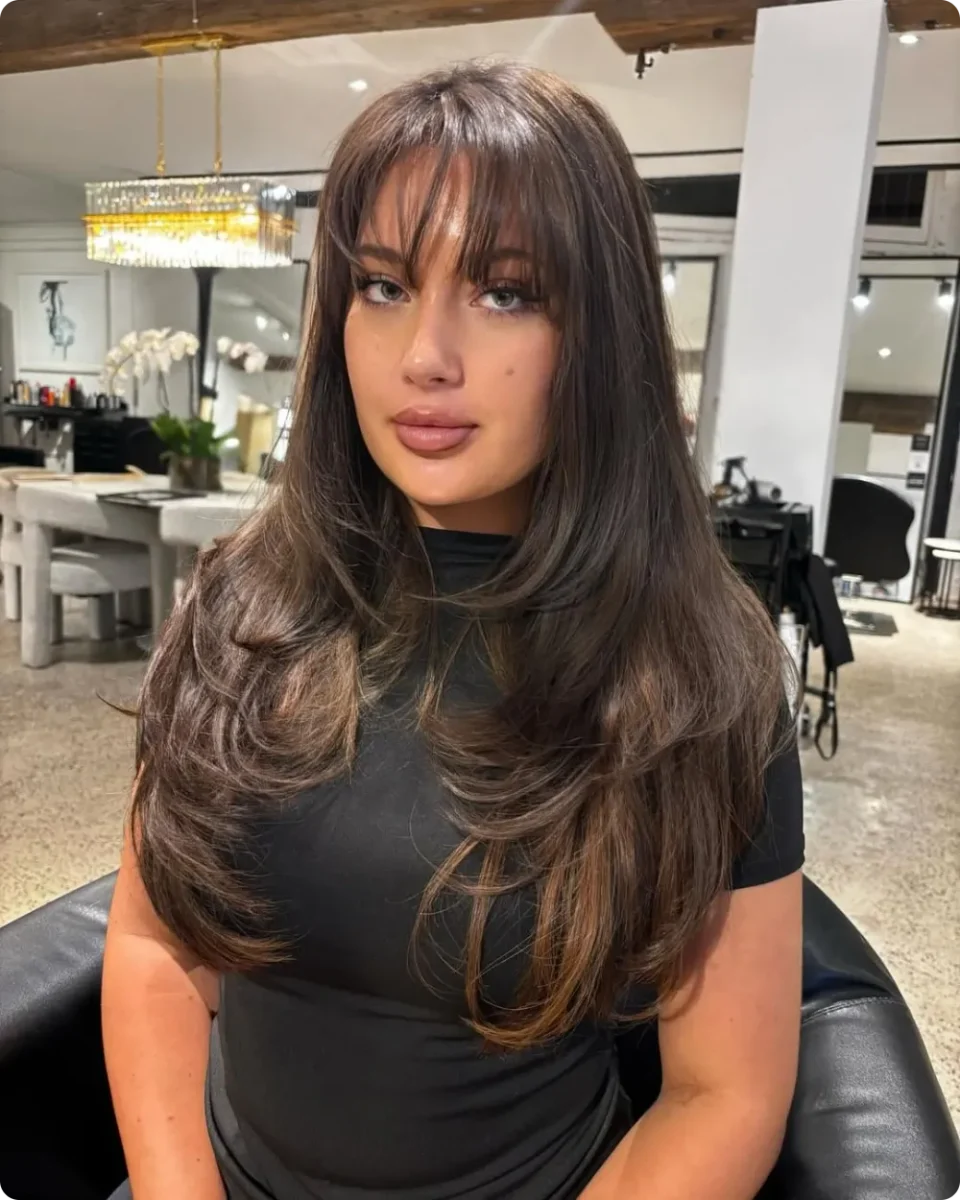
Not every layered cut needs curls to show movement. Here the hair is mostly straight, and the layers still read clearly because each one flips out slightly at the very tip.
Up top: a wide fringe that covers the forehead and blends into longer pieces at the temples.
Through the sides: layers starting just under the chin, then repeating every few inches down the length.
At the bottom: ends turned outward with a flat iron, one section at a time.
Color: subtle warm strands near the front that make the layer edges easier to see.
Straight styling shows every uneven line, so this one depends on a careful cut more than a clever blowout. Bring a photo and ask for visible, separated layers rather than a soft blend.
Flip only the last inch outward, so the length still hangs straight.
Work in thin sections, since thick ones bend unevenly.
Trim the fringe on a regular schedule to hold the shape.
Flipping every layer the same amount, which looks stiff.
Shine serum on the fringe, since it separates into strips.
Asking for heavy thinning shears near the ends.
16. Copper Wolf Cut With a Heavy Fringe and Shaggy Sides
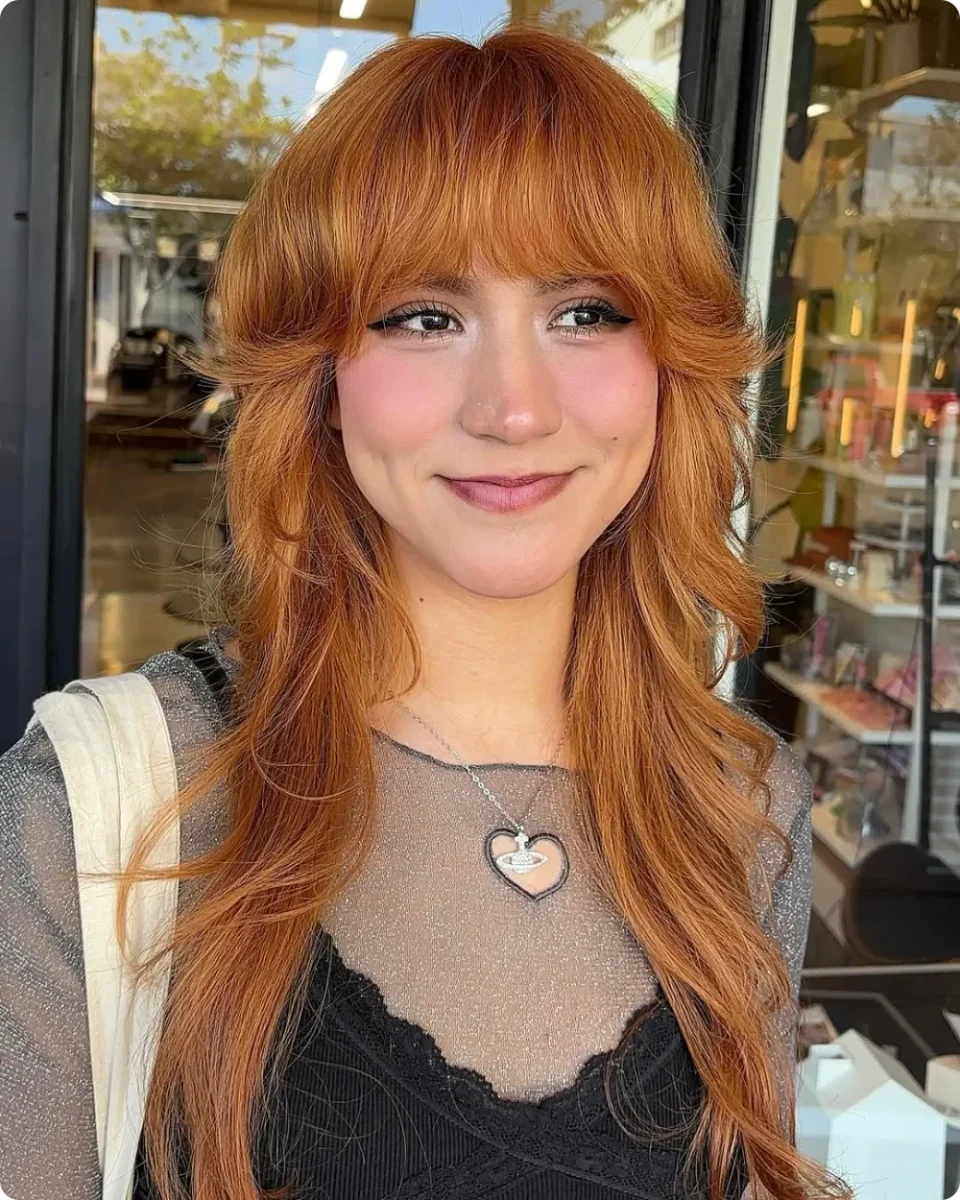
Heavy fringe, shaggy sides, and bright copper all in one cut. The fringe sits right at the brows and stays fairly full, while the layers underneath break into pieces that get shorter as they reach the face.
What keeps it from looking messy is the length in back. Everything past the shoulders stays long and mostly untouched, so the short shaggy sections at the top read as a deliberate shape rather than a grown out trim.
Short, piecey layers at the top and long untouched length at the bottom give you two different speeds of movement in one haircut.
Go in knowing this is a commitment. Once the sides are cut this short, growing them back into a smooth long layer takes months.
17. Honey Blonde Layers With a Wide, Flipped Out Bottom
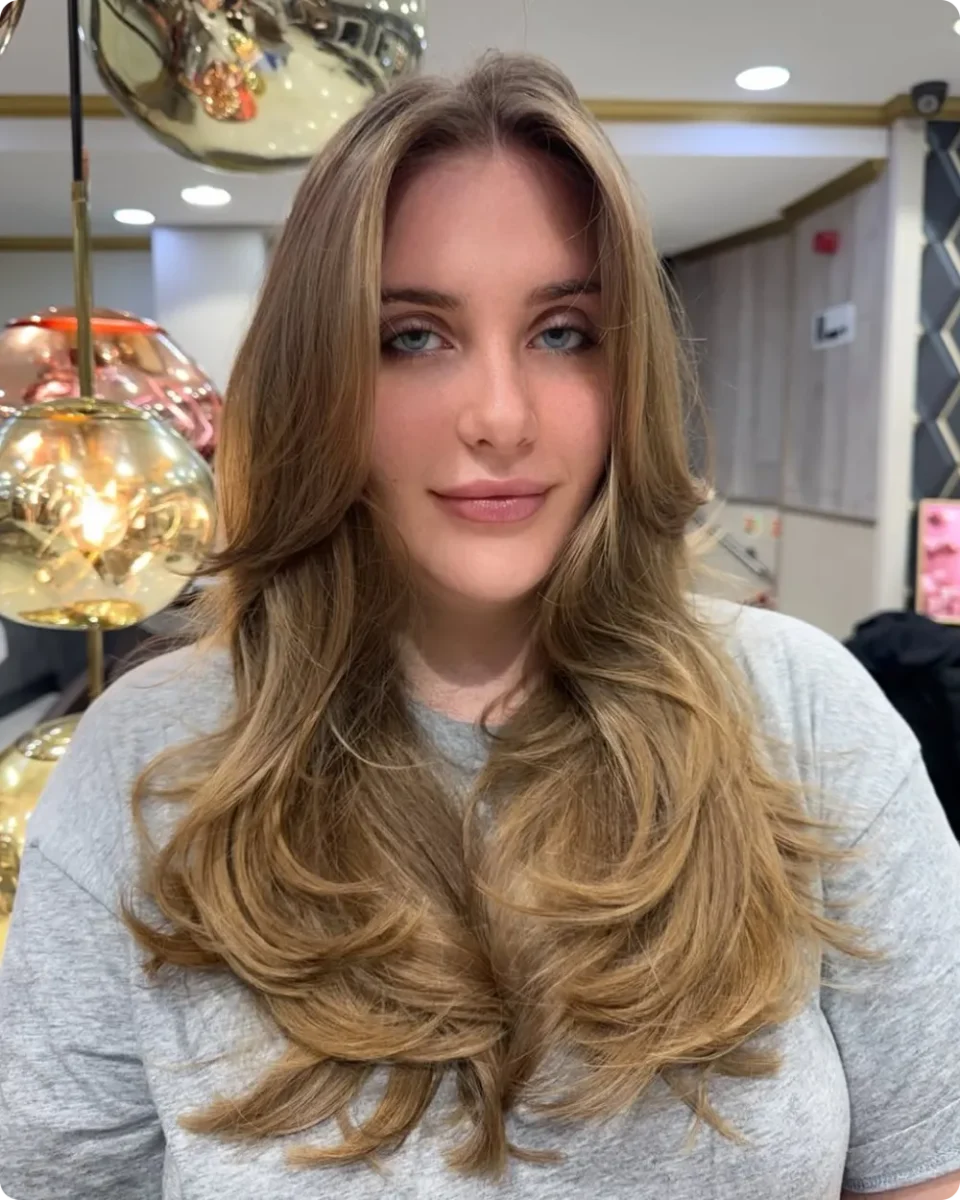
Ends this full usually come from layers that were kept long on purpose. The shortest pieces here start around the jaw, sweep back off a center part, and everything below that stays heavy.
Then the bottom is flipped outward in wide sections, which spreads the ends sideways and gives the whole shape a soft fan.
Golden ribbons run through the front pieces and along the ends, so the flicks catch light and the layers stop blending into each other.
Recreate this look
18. Feathered Layers With Wispy Pieces Across the Cheek
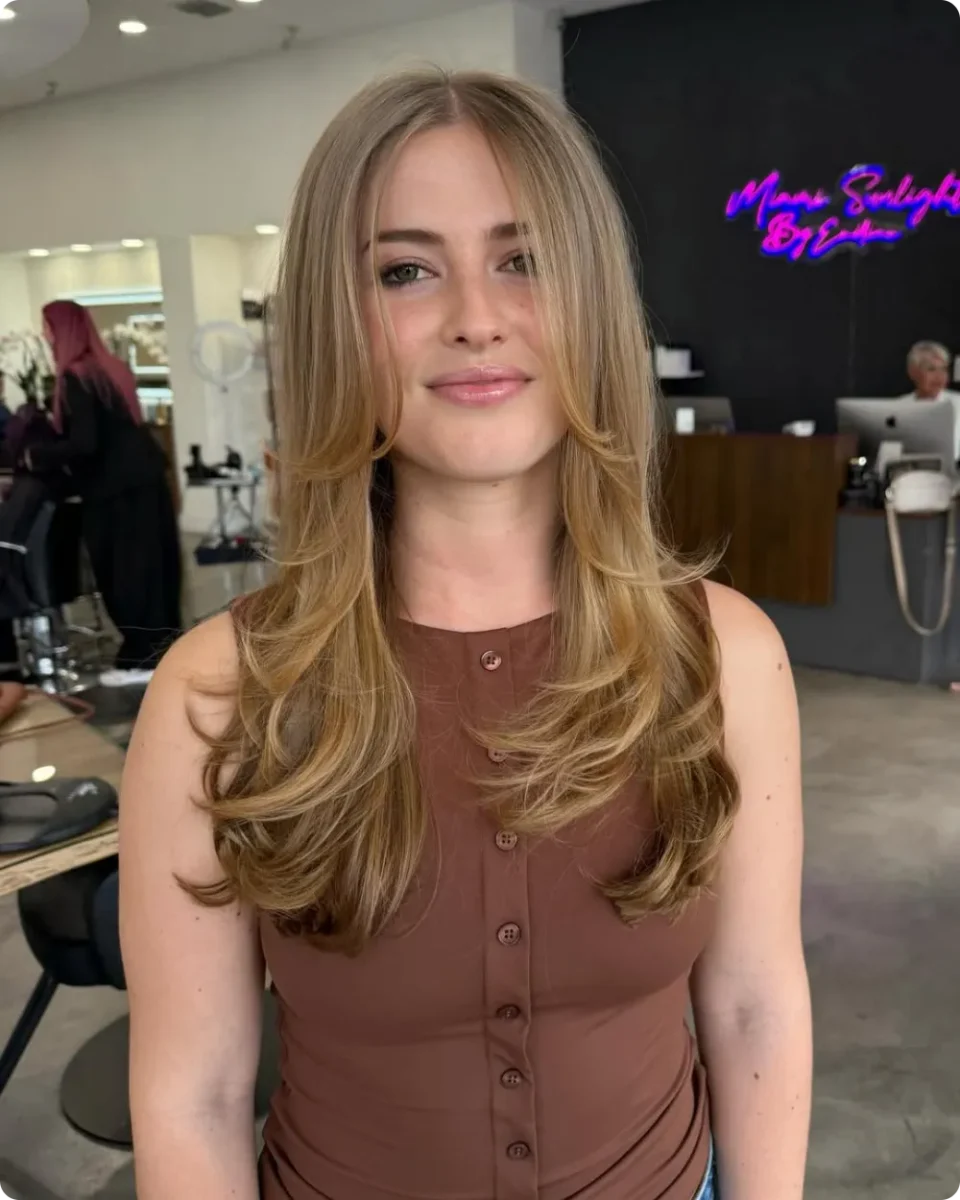
The thin pieces falling over her cheek are the smallest detail here and the easiest one to ask for. They come from the front layer being cut soft at the edge rather than straight across, so a few strands stay loose while the rest sweeps back.
Behind them, the layers start high near the cheekbone and feather down the sides in narrow steps. The ends curl outward in a loose flick, which keeps the bottom light instead of blunt.
Ask for face-framing that begins at the cheekbone, and point to the spot on your own face so there is no guessing.
Use the word feathered for the edge. It tells your stylist you want a soft, wispy finish instead of a hard line.
Say you want to keep your overall length. Feathering happens at the sides, so the back should barely change.
Small detail, big difference. It softens the front without costing you a single inch at the bottom.
19. Waist Length Black Hair With Curls Only in the Last Third
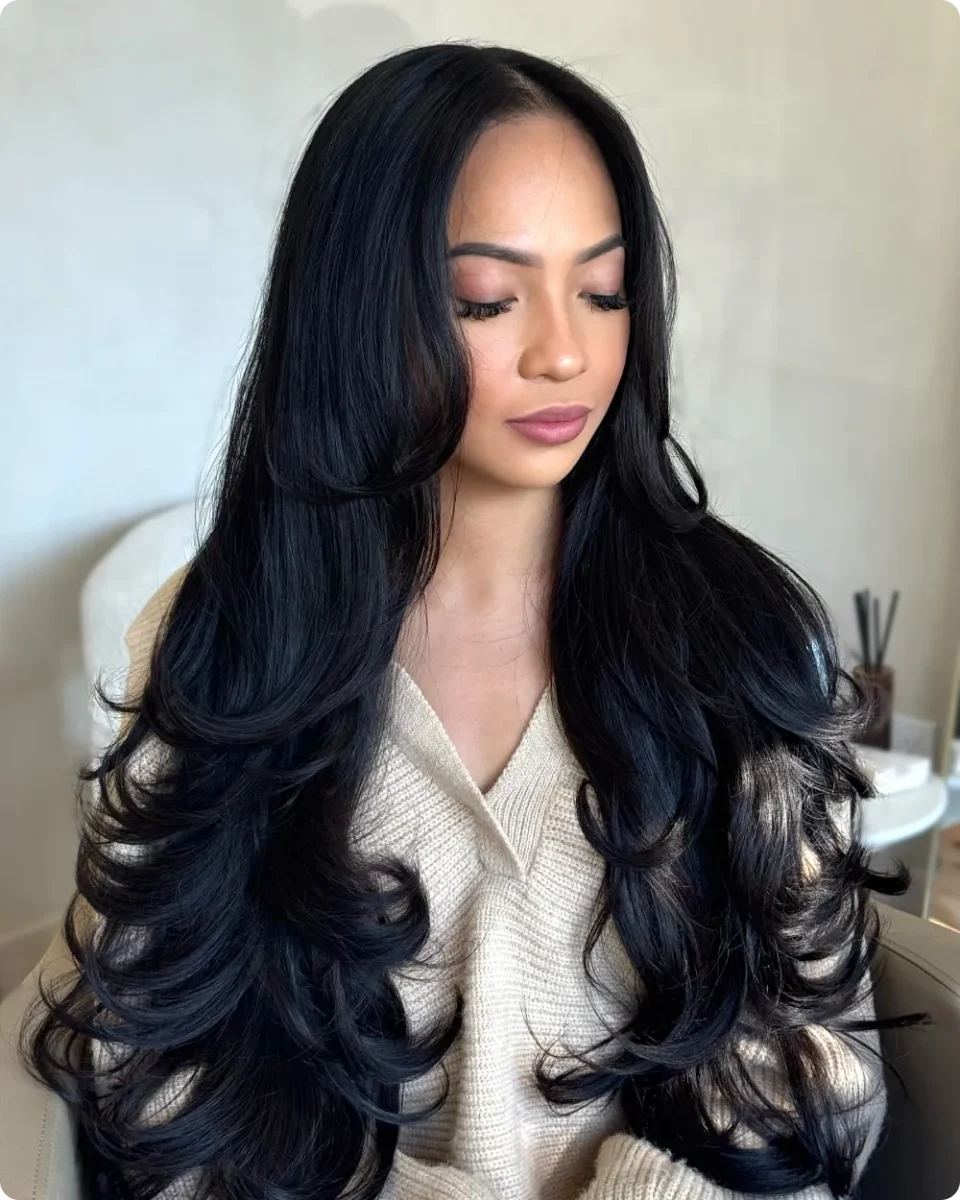
Length is the point of this one. The hair runs past the ribs, the top two thirds stay smooth and flat, and everything happens at the bottom.
That bottom section is set in tight, defined spirals that stack side by side across the whole width. Because they all sit at the same height, the ends look like a full ruffle rather than scattered waves.
The layers are cut long and hidden underneath, which protects the length while still letting the ends separate into individual curls.
| Curl the last third only | Curl from the roots down |
|---|---|
| Your length stays visible, since the top is smooth. | Hair looks shorter, because curls eat up inches. |
| Takes about fifteen minutes on long hair. | Takes twice as long and uses more heat. |
| Roots keep their shine, which matters on black hair. | Curls near the scalp can look frizzy up close. |
20. Bronde Layers With a Deep Bend at the Cheekbone
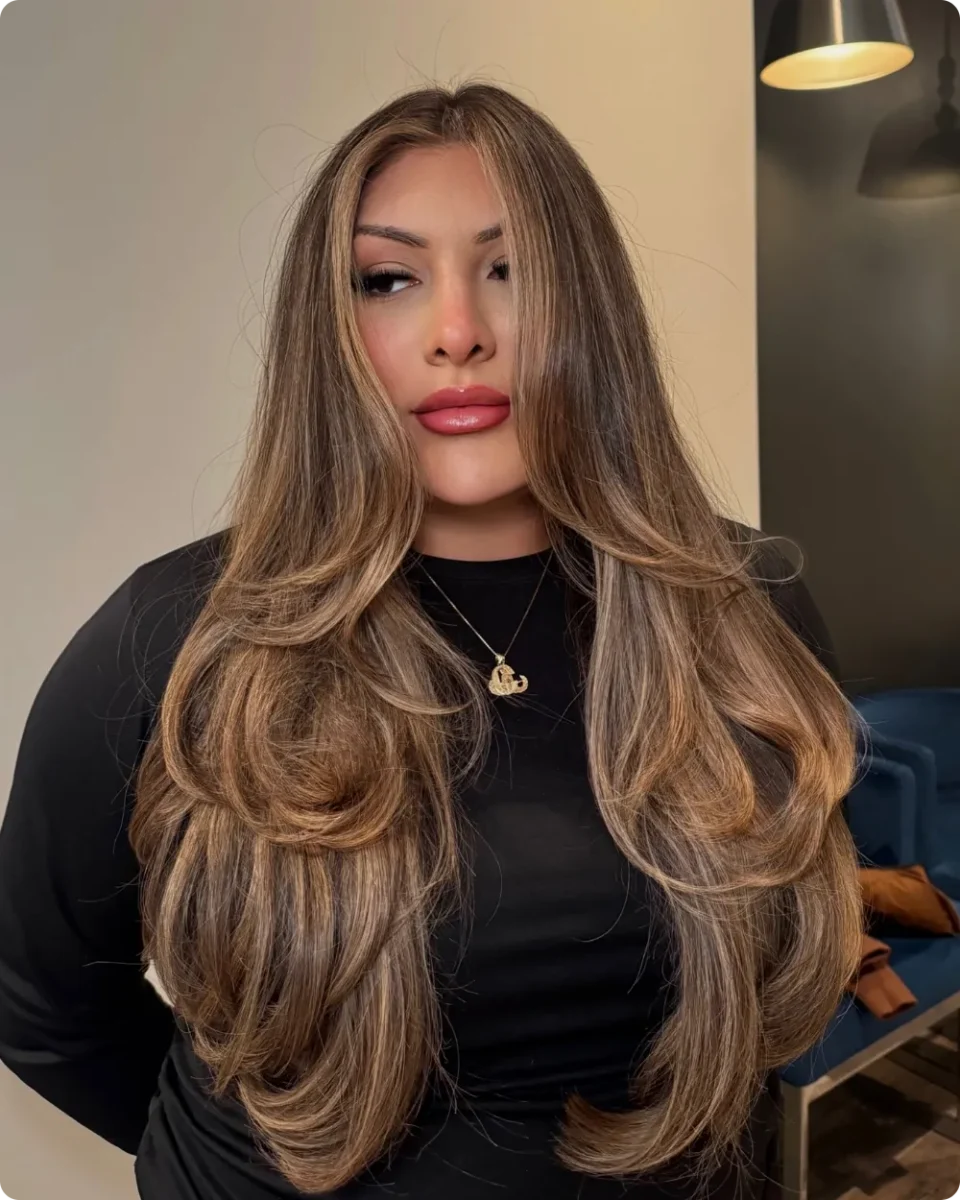
The front pieces here bend sharply just below the cheekbone, then continue long past the chest. That single kink is what gives the face its shape, and it comes from the layer being cut short enough to hold a curve.
Notice how thin the lighter strands are. They sit close together near the face and spread out further down, so the whole length looks lit from the front.
Everything below the bend falls in long, loose S waves with almost no defined curl at the tips.
A styling note worth keeping: that bend holds better if you clamp the iron flat at the cheekbone and turn it back, rather than wrapping the hair around the barrel.
21. Chestnut Layers That Only Show Below the Shoulders
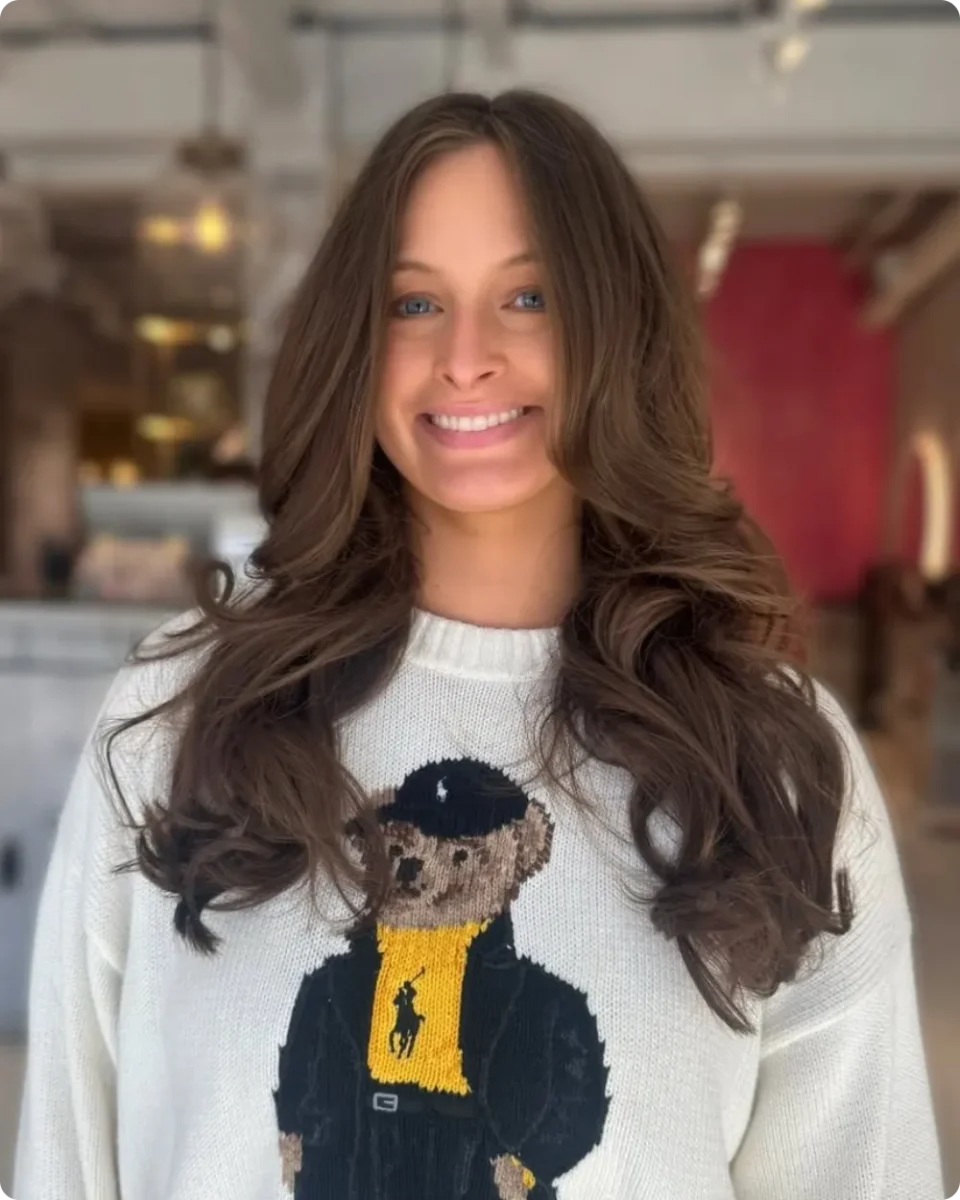
Plenty of women want movement without changing how their hair looks around the face. This is that version.
The top is left completely alone. No fringe, no face-framing, no short pieces at the cheek. The part runs down the middle and the hair falls flat from the roots to about shoulder height.
Below that, the layers kick in and the ends break into soft waves that turn in different directions.
📌 Good To Know
Ask for layers that begin at shoulder level or lower. Nothing gets cut near your face, so if you decide you hate it, you are only waiting for the bottom few inches to grow rather than a fringe.
This is the low risk pick of the roundup. You keep the hair you already know how to style and just add some motion where it was hanging flat.
22. Auburn Butterfly Layers Cut in Sharp Tiers
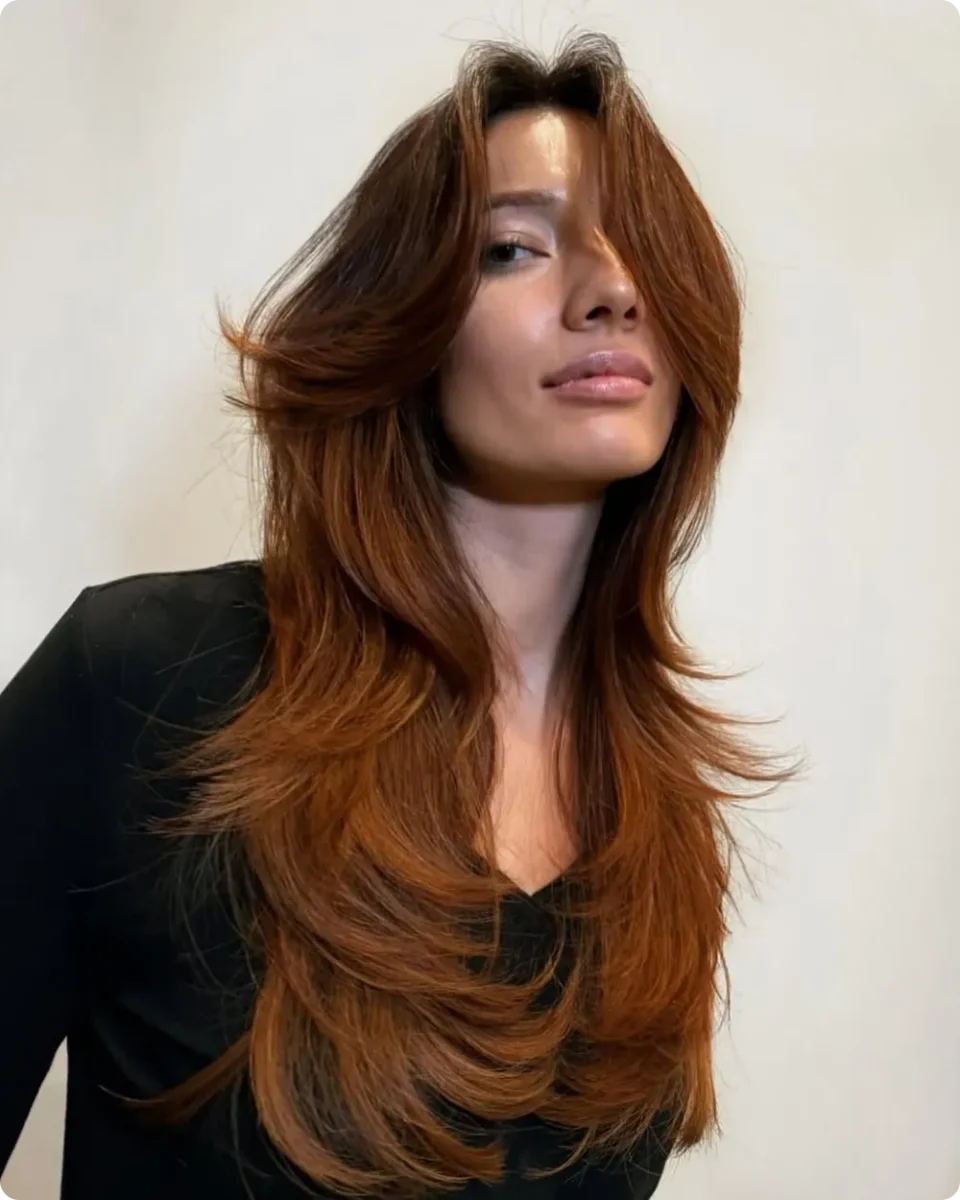
Layers this defined are cut in separate tiers rather than blended into one another. You can trace each level as it fans out and stops, then the next one starts below it.
The top tier sits around the jaw and sweeps back off a center part. Below that, three or four more tiers step down toward the waist, each one wider than the last.
Warm auburn helps enormously here. Every tier edge catches a different amount of light, so the steps stay visible even in a plain photo against a bare wall.
Long auburn hair with soft blended layers.
The shape reads as one smooth curtain from every angle.
Same length, cut into four clear tiers instead.
Each tier flicks out on its own, so the shape looks built rather than grown.
23. Long Layers on Fine Blonde Hair Without Losing Density
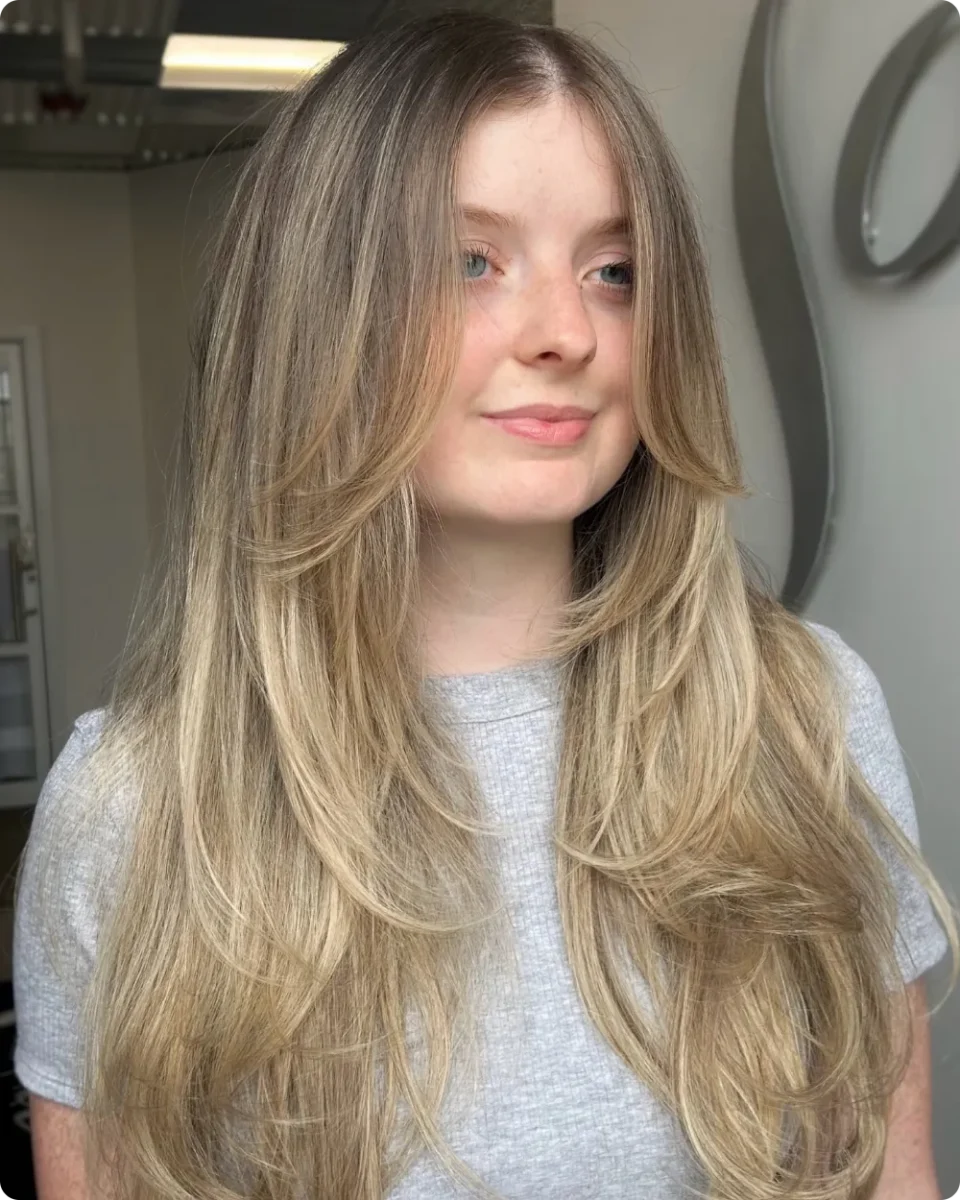
Fine hair and layers have a complicated relationship. Cut too many and the ends go stringy. Cut none and everything hangs flat. This falls right in the middle.
- Layers start low, closer to the chest than the chin
- The bottom line stays wide, so the hair keeps a full outline
- Only the front sections are shorter, sweeping back from a middle part
- Ends are blow dried outward in big soft sections to add width
⚠️ Watch Out
On fine hair, ask your stylist to avoid thinning shears through the ends. Once density is removed from the bottom, the hair looks thinner than before and there is no quick fix while it grows back.
The lesson is placement, not quantity. A few well placed layers give fine hair more movement than a dozen shallow ones.
24. Soft Brown Layers With a Long Side Swept Fringe
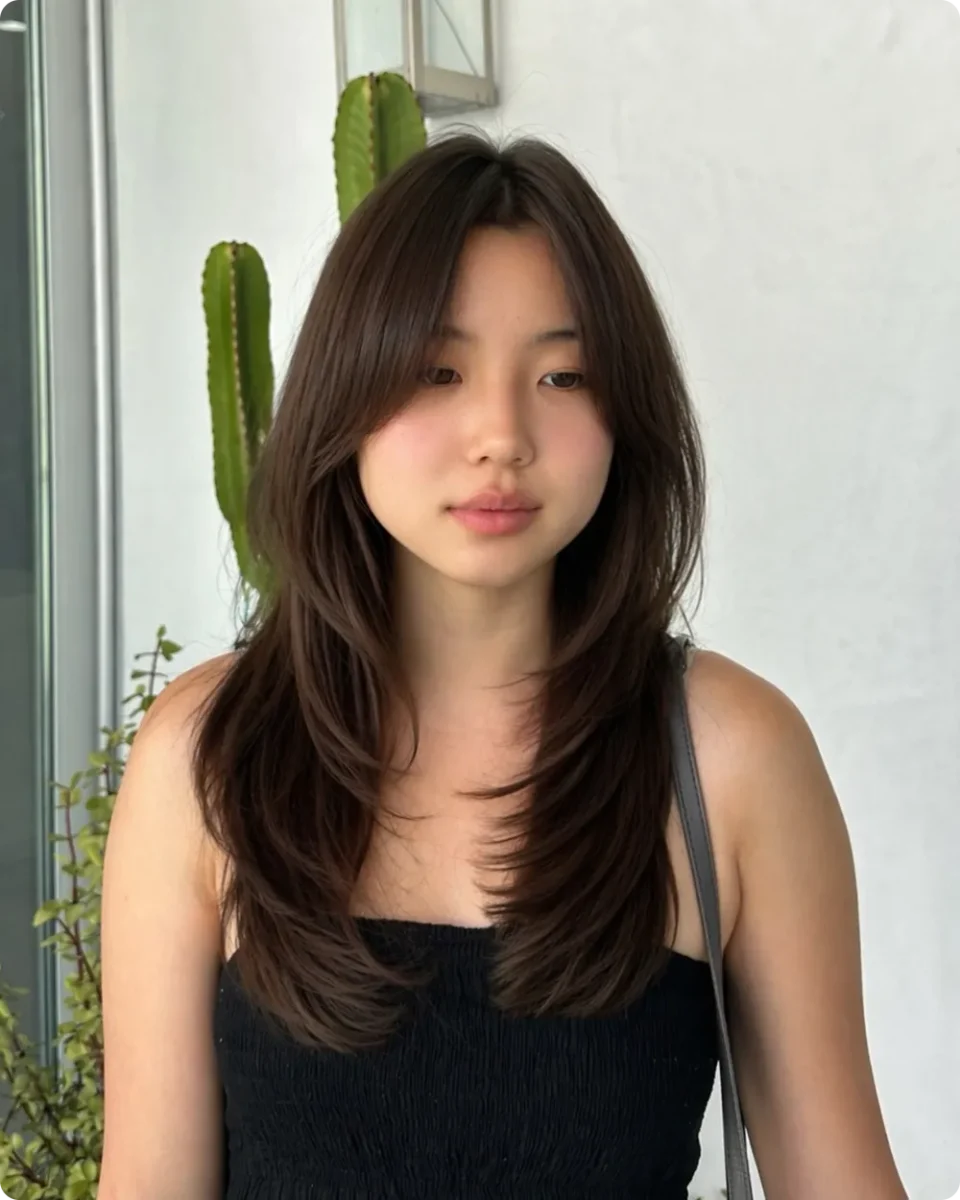
A long fringe falls from the side here and blends straight into the layers below, so there is no hard line anywhere on the face. The whole front reads as one continuous sweep from the part down to the collarbone.
The fringe: cut long enough to reach past the cheekbone, then brushed to one side.
The layers: start at the jaw on the short side, then step down in even increments.
The ends: flipped out in broad sections, with the flick strongest at the very bottom.
The color: one soft brown with no contrast, which makes the cut itself do all the talking.
This is a good reference for anyone who wants the face-framing effect of a fringe without commitment. Grow it two inches and it simply becomes another layer.
25. Strawberry Blonde Layers Left Loose and Barely Styled
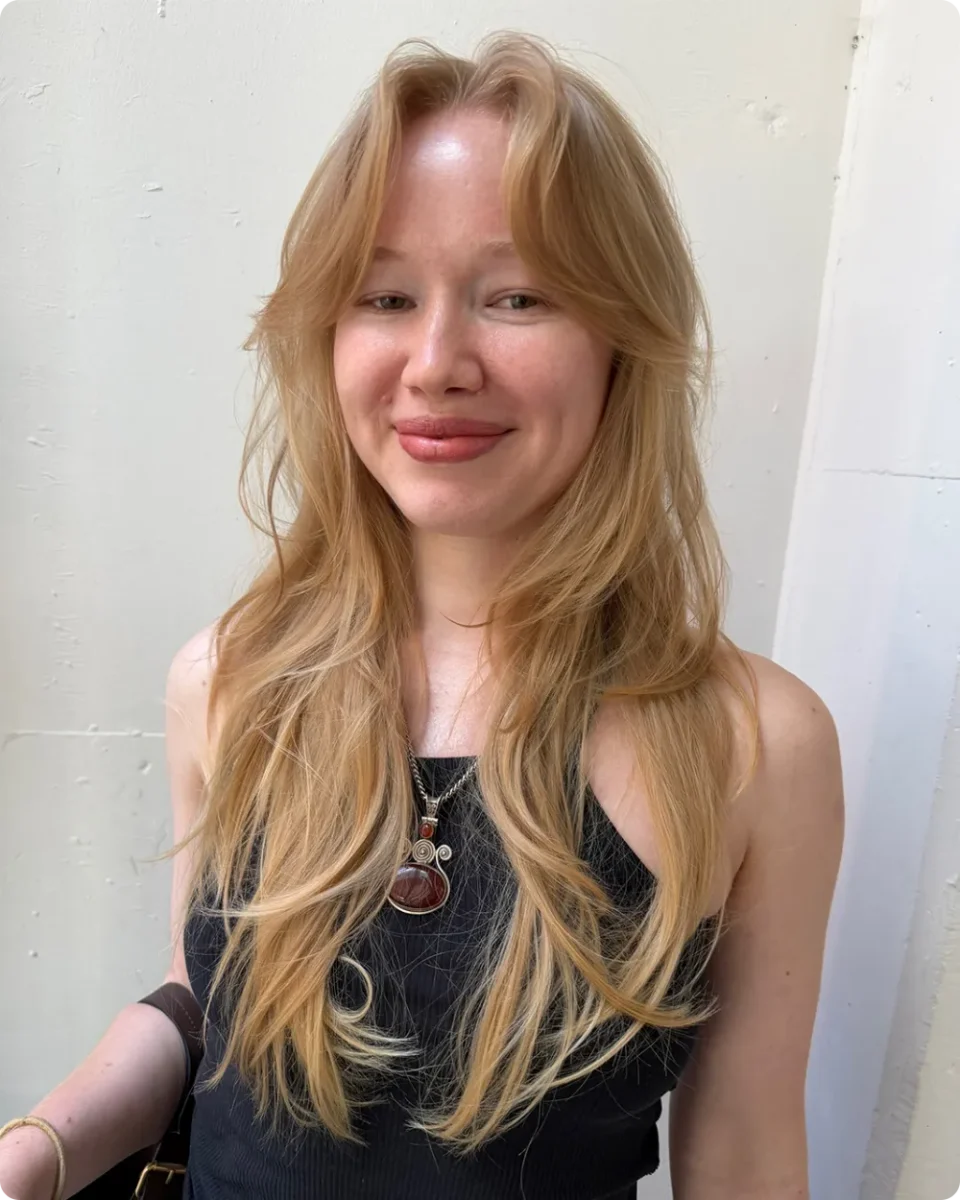
Very little heat went into this one, and that is what makes it useful as a reference. The hair looks close to how it dries on its own, with a slight wave through the mid-lengths and ends that separate into thin, uneven points.
The layers around the face start high, near the cheekbone, and drift down past the shoulders in soft steps. Because nothing is curled or smoothed, you see the actual cut rather than the styling.
Work a light mousse or sea salt spray through damp hair with your fingers, not a brush.
Split the hair down the middle and let it dry without touching it again.
Once dry, twist two or three face pieces around a finger so they keep a bend.
If your mornings are short, this is the entry to save. The cut carries the look, so you are not tied to a round brush every day.
26. Bouncy Caramel Layers With Volume Across the Whole Length
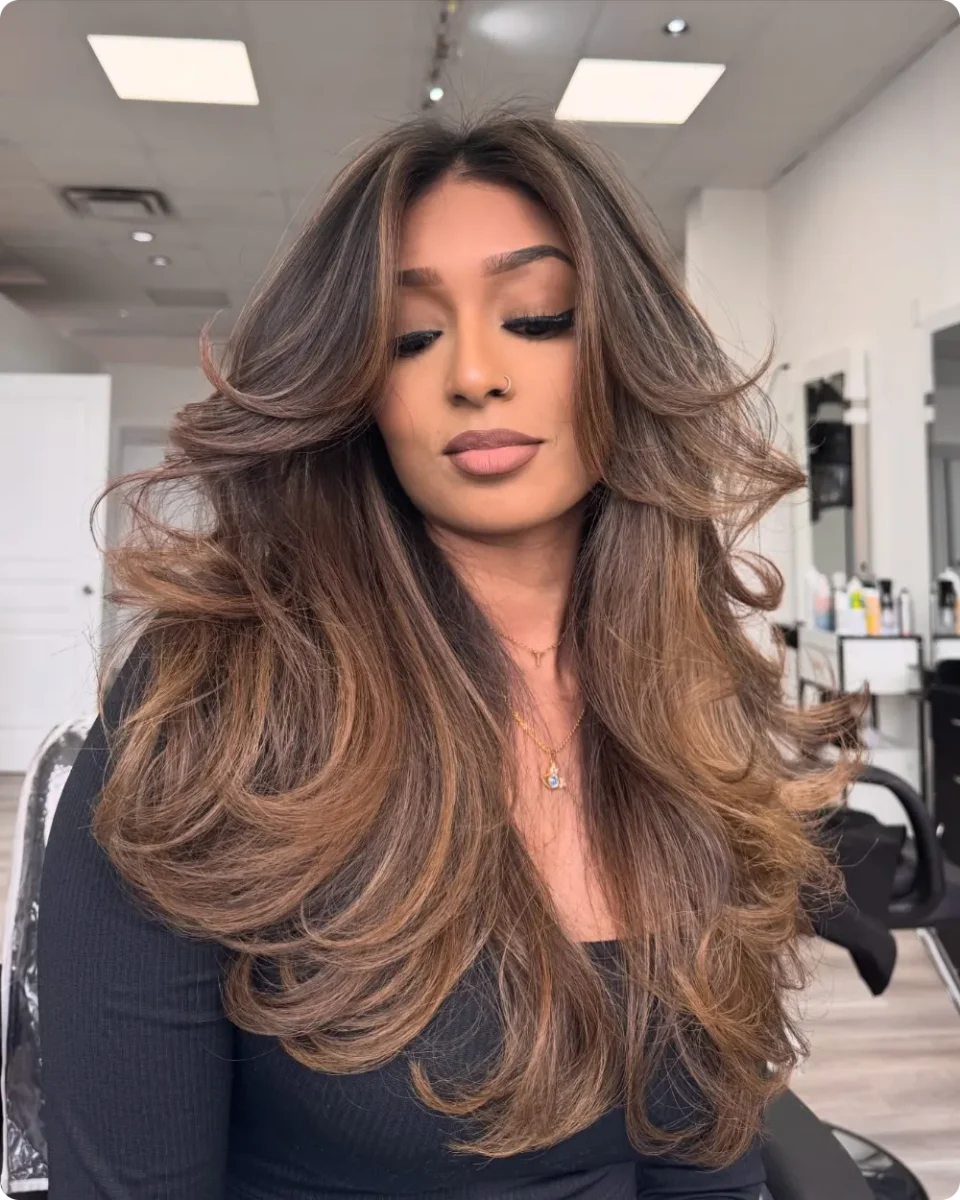
Nothing is left flat in this one. The lift starts at the roots, carries through curved layers at the cheek, and keeps going until the ends roll out near the waist.
What creates the width: every section is dried or curled away from the center, so the hair spreads outward on both sides instead of falling down the back.
Where the layers land: the shortest curve sits at the cheekbone, then the rest step down at regular gaps all the way to the bottom.
What the caramel does: the lighter pieces run along the outer edge of each curl, tracing the shape and making the volume easier to read.
The catch: big hair like this wants a lot of length underneath. If your ends are thin, the bottom will not hold this much shape.
Book a full blowout for the first time and watch how your stylist sections it. Copying the sectioning at home matters more than the tools you own.
When every layer turns away from the face, the hair builds width at the sides instead of length at the back, which is why this reads as volume rather than just long hair.
The best haircut conversations start with a picture and one specific sentence. Point to the spot on your own face where you want the shortest layer to land. Say whether you want your length protected or your ends lightened. Mention if you have tried layers before and hated how thin they felt at the bottom. A good stylist can work with all of that.
Save the long layered hair ideas here that match the movement you are after, then pull them up in the chair. Pin this post for the next time you are thinking about a change.
Before you sit in the chair