
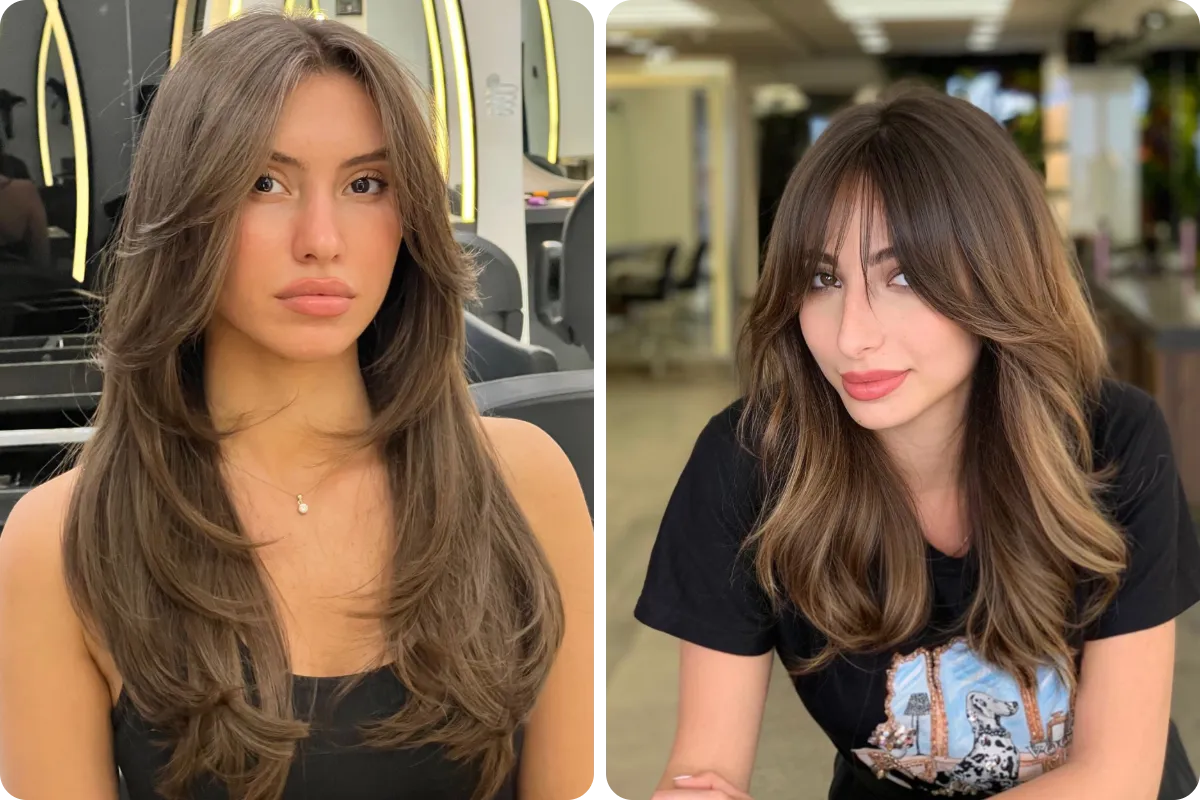
Most women decide they want this cut about six months before they actually book it. The hesitation makes sense. Bangs sit right in the middle of your face, they grow back slowly, and every photo online seems to show the same girl with the same hair.
So this roundup goes wider. The 18 curtain bangs ideas below cover fine hair and thick hair, straight and curly, shoulder length lobs and lengths past the chest. Some are barely visible splits that disappear into long layers. Others are full, heavy fringes that cover the whole forehead. There is a curly version cut dry, a beachy blonde shag, a glossy blowout with the front curled back, and a ponytail that proves you can still tie your hair up afterward.
Each one comes with what to ask for at the salon and how to handle it at home, because the cut is only half the job. Save the ones that match your hair type, not just the ones that look nice, and you will walk into your appointment knowing exactly what to say.
1. Soft Blonde Shag With Wispy Middle Part Bangs
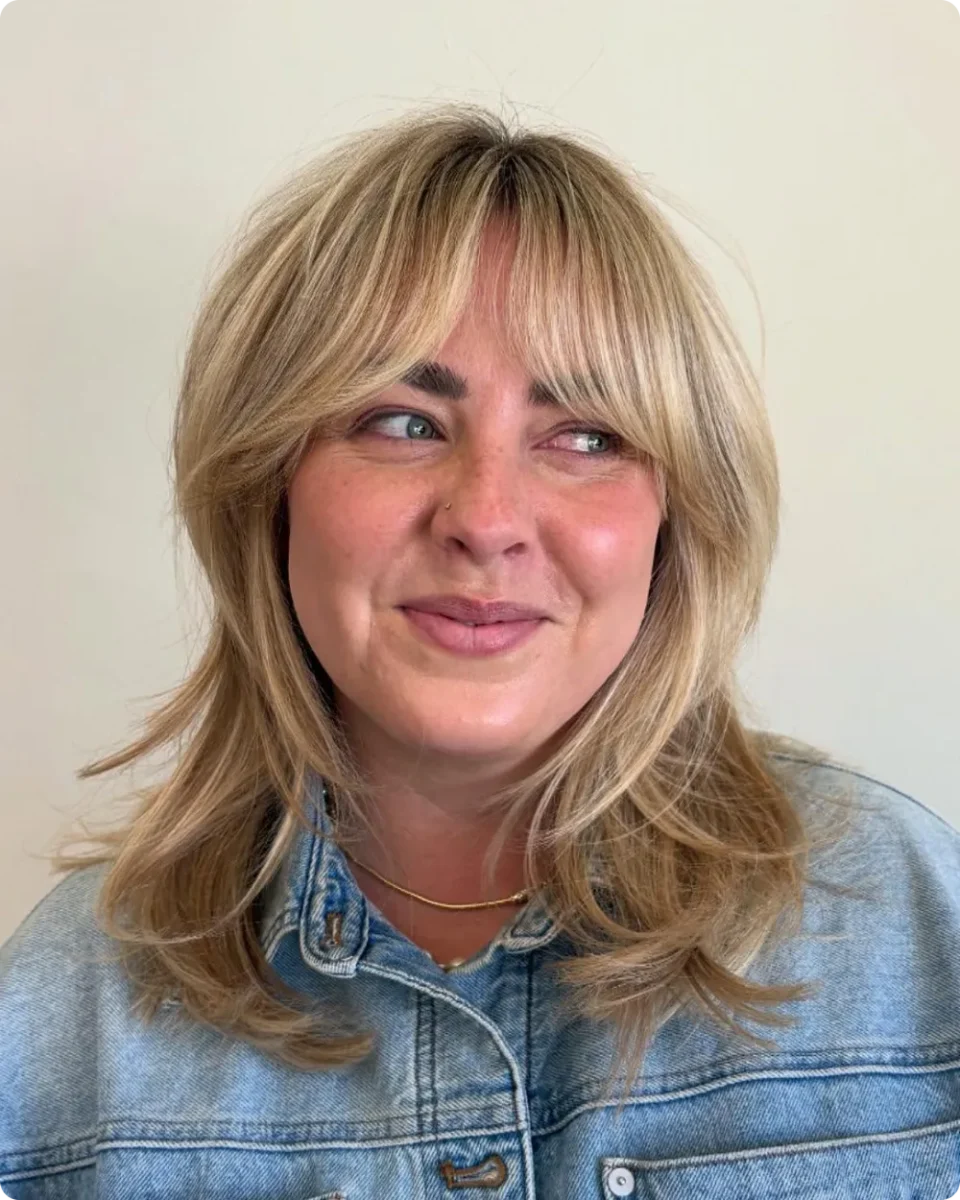
Notice how the bangs here never really stop. They start at the eyebrow and melt straight into the layers along her jaw, so there is no hard line anywhere on her face.
What makes it work:
- The fringe is cut thin and feathery instead of blunt, so it sits light on finer hair
- Brighter blonde pieces land right at the front, which lifts the whole face
- The ends flick outward instead of curling under, giving it that shaggy seventies shape
Air dry, then bend the ends away from your face with a round brush for about ten seconds a side. The rougher it dries, the better it looks.
2. Long Caramel Waves With a Sweeping Cheekbone Fringe
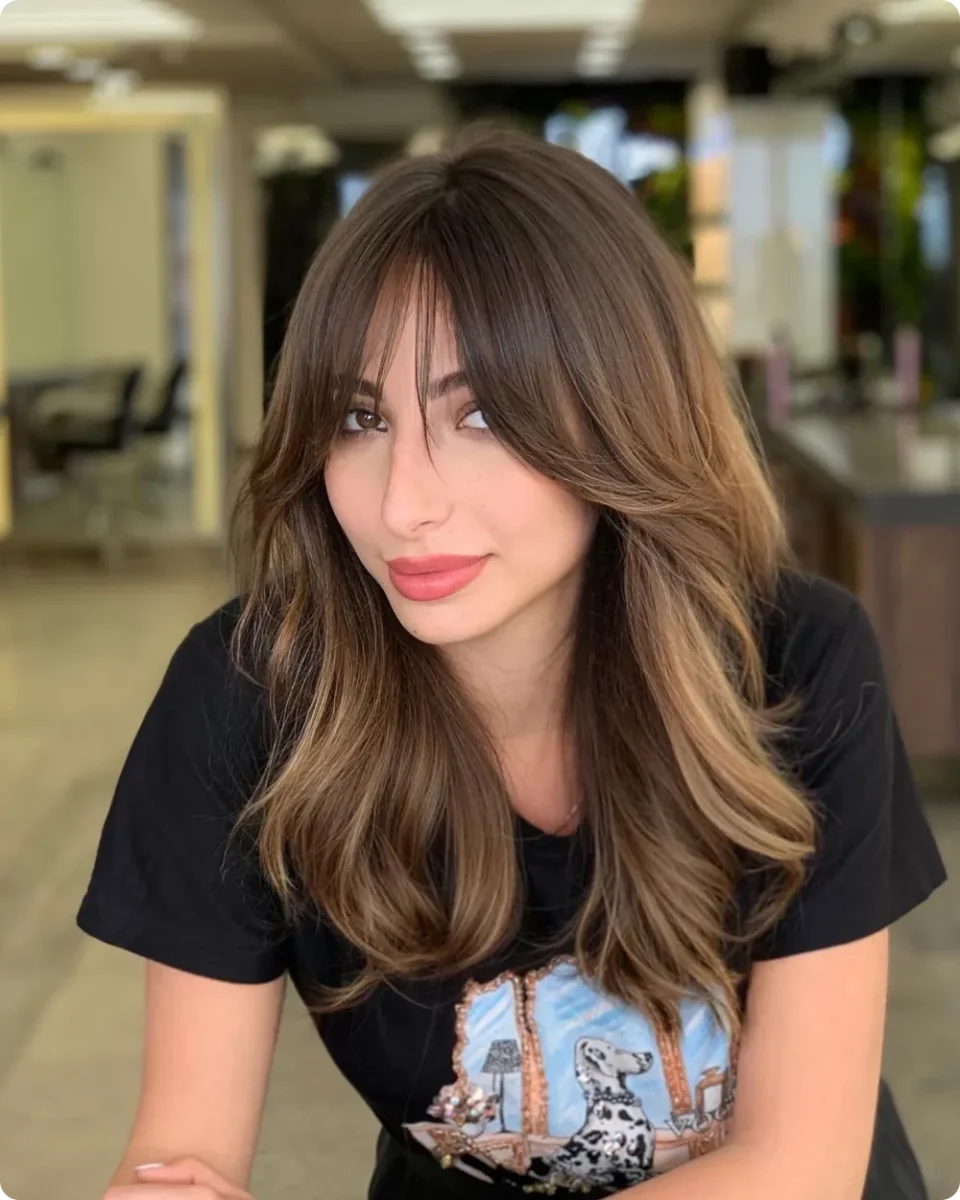
Length is the safety net here. The shortest piece still reaches her cheekbone, so on a day the cut feels like too much, it tucks behind an ear and disappears.
The lighter caramel sitting at the very front is doing quiet work too. It catches light along the fringe and keeps the shape looking soft against the darker brown underneath.
Worth saying out loud at your appointment: ask for a fringe that starts around the cheekbone and connects into face framing layers, not a short separate piece sitting on its own.
Rough dry the front with your fingers pushing the hair forward, so the fringe does not dry flat to your forehead.
Wrap the two front sections back and away from your face with a round brush. Hold each one for a few seconds before you let go.
Let it cool, then shake the waves loose with your hands so the fringe separates and falls open down the middle.
3. Full Dark Fringe on Thick, Flicked Out Hair
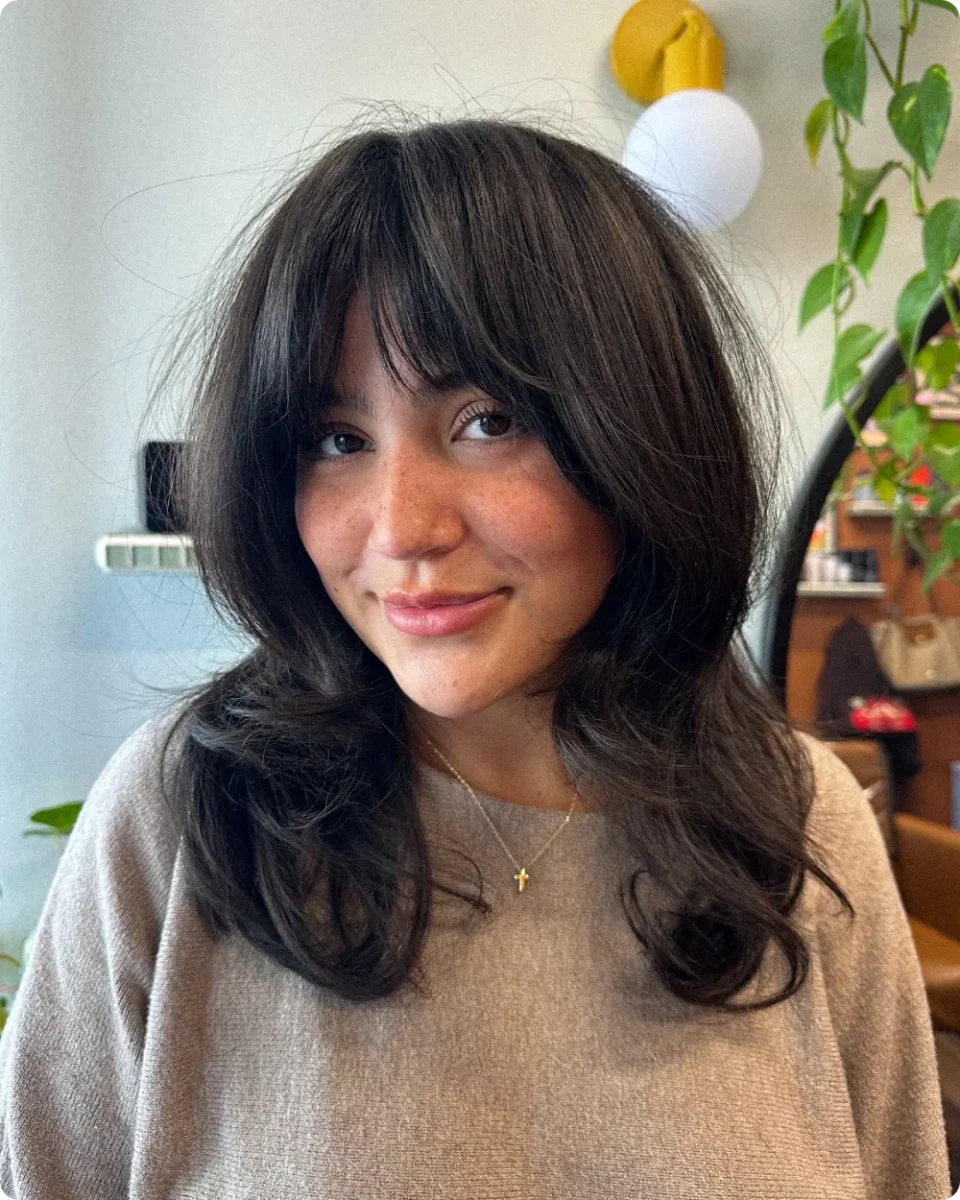
Thick hair gets told it cannot handle a fringe, and this photo is the argument against that. Hers is dense and covers most of the forehead, split with a soft arch in the middle rather than a sharp parted line.
The real trick is happening underneath. Weight has been taken out behind the fringe so it can bend forward instead of sitting like a slab, and the ends of her hair flick out to balance all that volume up top.
Dark hair shows every flat spot, so a quick shot of dry shampoo at the roots of the fringe on day two keeps the bend alive.
Ask for weight removed behind the fringe, not off the surface.
Keep the lengths flicked out so the volume sits evenly, top and bottom.
Cutting the centre too short. Thick hair springs up further than you expect once it dries.
Flat ironing it straight down. The bend is what keeps a heavy fringe looking soft.
4. Ash Brown Butterfly Layers With a Long Curtain Fringe
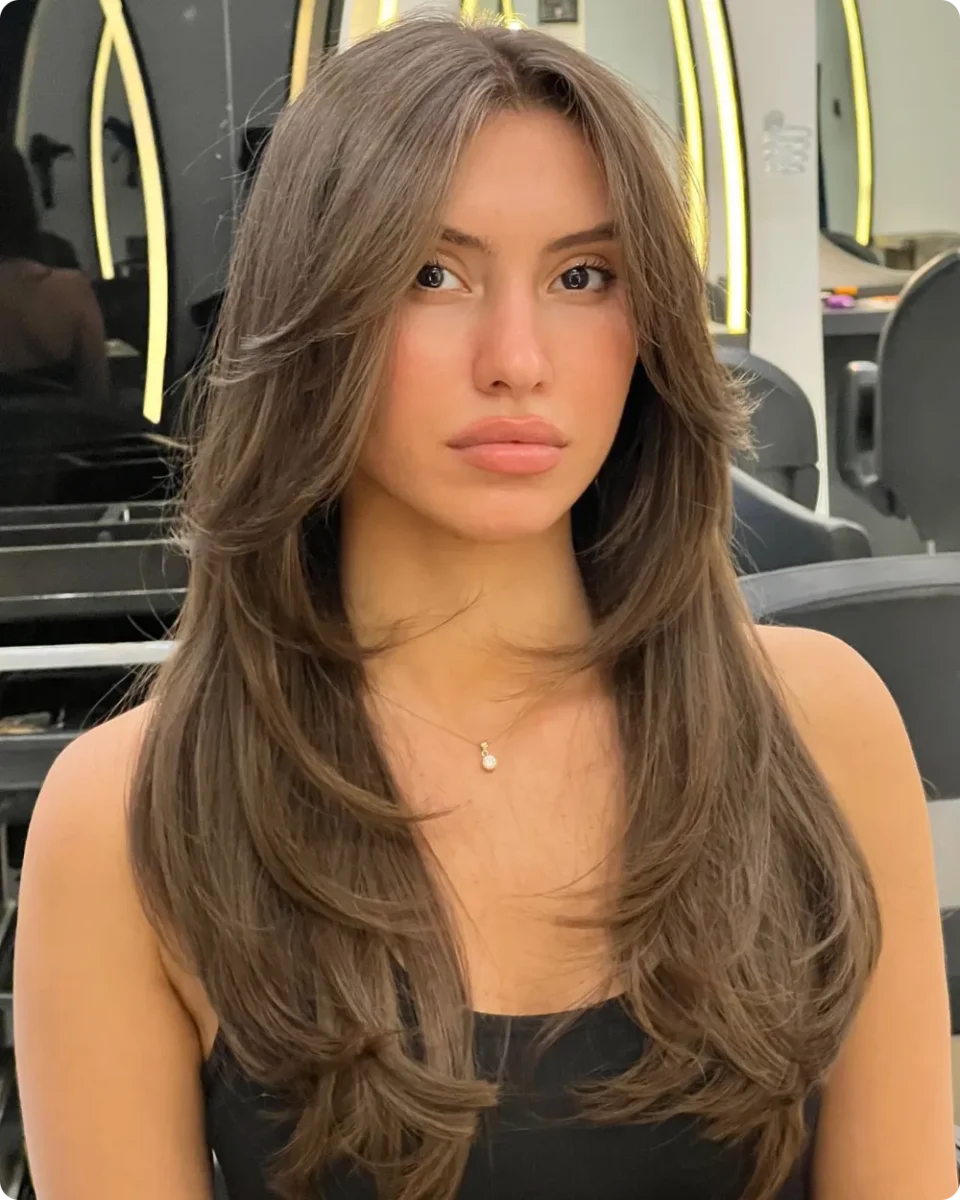
Count the layers here and you can see the whole plan. The shortest piece sits right at her cheek, the next one lands near the jaw, and each layer under that gets longer until it reaches the ends.
That stacking is what turns a fringe into a full shape instead of a separate piece stuck on the front. The cool ash brown helps as well, because there is no warm shine competing with the cut.
What to ask for at the salon
Book a trim every ten to twelve weeks. Once the front layers catch up to the rest, the shape flattens out and the fringe stops doing its job.
5. Glossy Black Blowout With Bangs Curled Back
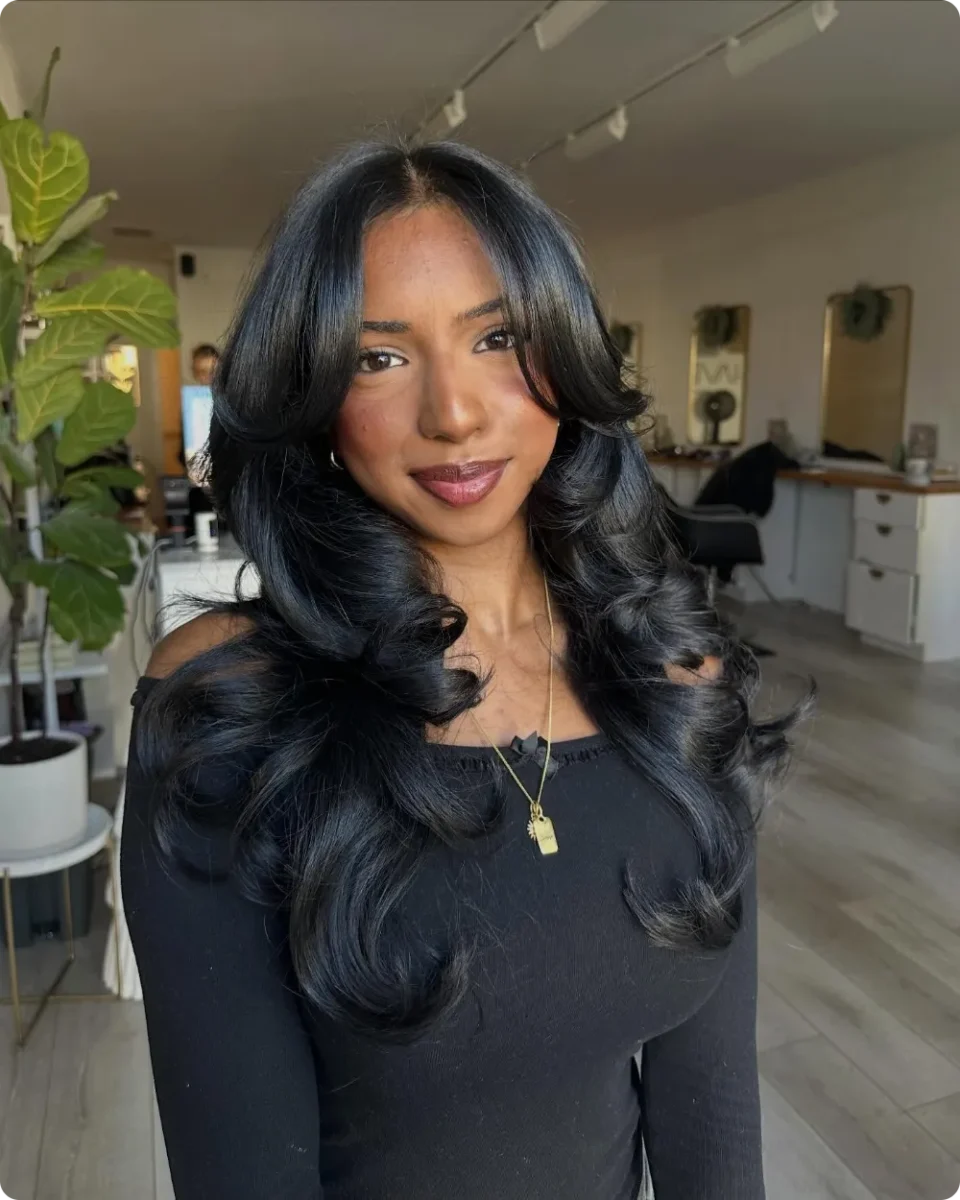
Every piece across the front bends away from her face, and that one direction is the entire look. Her fringe does not hang down. It curves back toward her ear and joins the big rounded curls sitting below it.
Black hair reflects a lot of light, so any dent or crease shows up. Slow, wide sections are your friend here, and a cool shot at the end of each curl locks the bend in place.
They sit flat on the forehead, cover the brows, and make the whole front look heavy.
They open up around the brows, lift at the root, and flow into the curls underneath.
Same haircut, two very different results. The brush direction decides which one you get.
6. Grown Out Curtain Bangs Blended Into Long Brown Waves
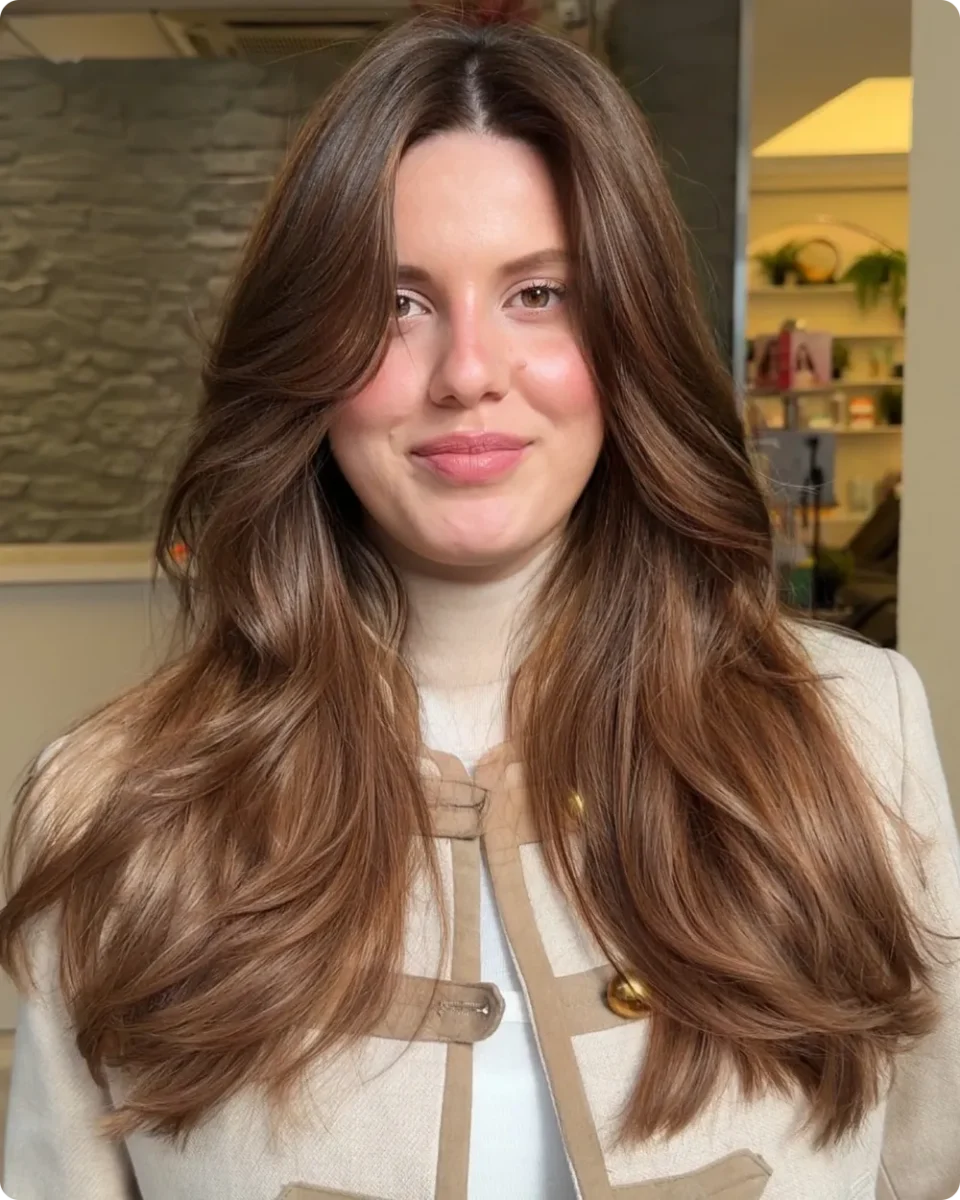
Not every version of this needs a visible fringe line, and that is good news if you are still nervous about the cut.
Look closely at the front here. The shortest pieces reach past her chin and sit inside a soft middle part, so it reads as long layers from a distance and as curtain bangs up close. Warmer ends pull the eye down the length instead of up to the forehead.
This is the one to save if you want to test the shape before committing to something shorter.
| Long and blended, like this | Short and defined |
|---|---|
| Shortest piece hits the chin or lower | Shortest piece hits the brow or cheekbone |
| Tucks behind your ears on an off day | Stays on show whether you style it or not |
| Air dries fine most mornings | Usually needs two minutes with a brush |
| Grows out with no awkward stage | Needs a trim every four to six weeks |
7. Long Mushroom Brown Layers With a Full Brow Skimming Fringe
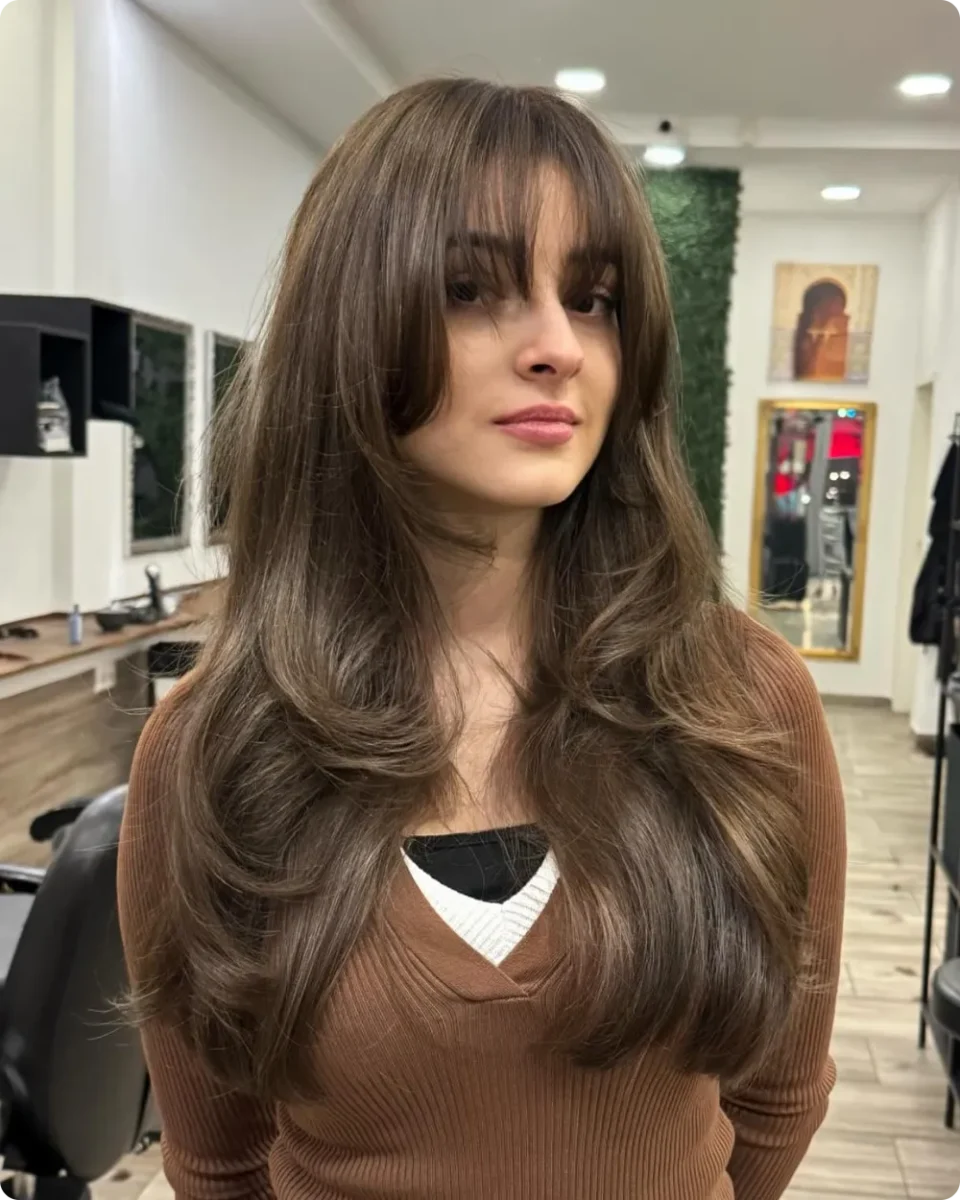
Here is the version that sits closest to a real fringe. It covers the forehead almost fully and stops right at the brows, then splits into two softer wings that carry down past her cheeks.
Underneath, the length is long and heavily bent at the ends. That weight matters. A full fringe on top of flat, thin lengths can look top heavy, but big rounded ends keep the balance sitting low.
A fuller fringe needs volume at the ends to match it. Balance the weight top and bottom and the whole shape holds together.
8. Golden Blonde Bangs Parted Right in the Centre
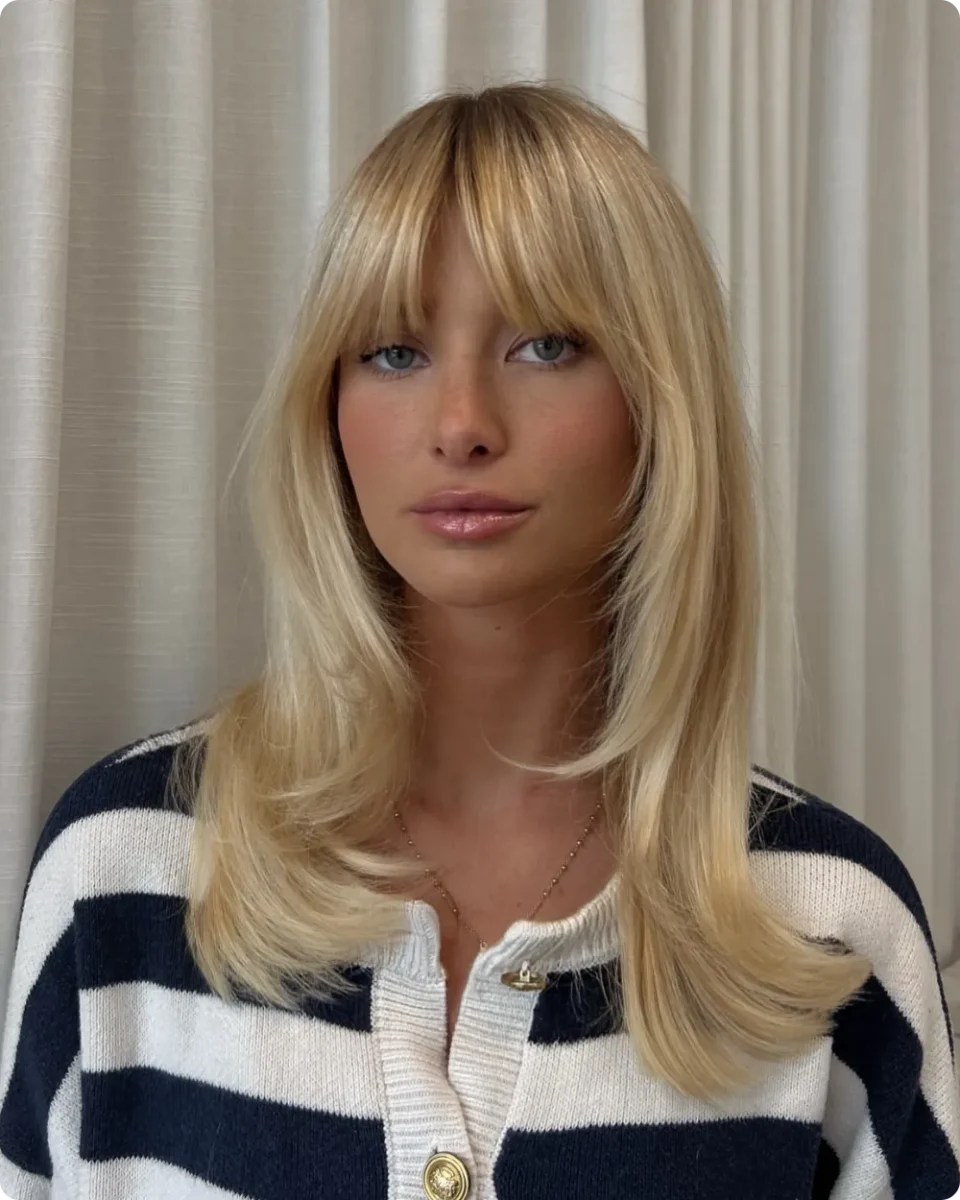
That clean split down the middle of the fringe is the detail to copy. Both sides fall at an even length, brushing the brows, then angle out as they travel down toward her collarbone.
Three things holding it up:
- Bright gold through the top layer, which makes the fringe stand out against the rest
- A blunt enough cut across the front that the shape stays visible, with only slight thinning at the ends
- Ends flicked out at the shoulders so the eye keeps moving down
Keep the middle dry when you wash. The centre section falling forward is the whole look, and product build up at the roots is what kills it.
⚠️ Watch Out
A centre split shows every bit of oil. Bangs sit against your forehead all day, so they get greasy faster than the rest of your hair. Rinsing just the front in the sink between washes keeps the part clean without drying out your lengths.
9. Strawberry Blonde Side Swept Bangs on Straight Fine Hair
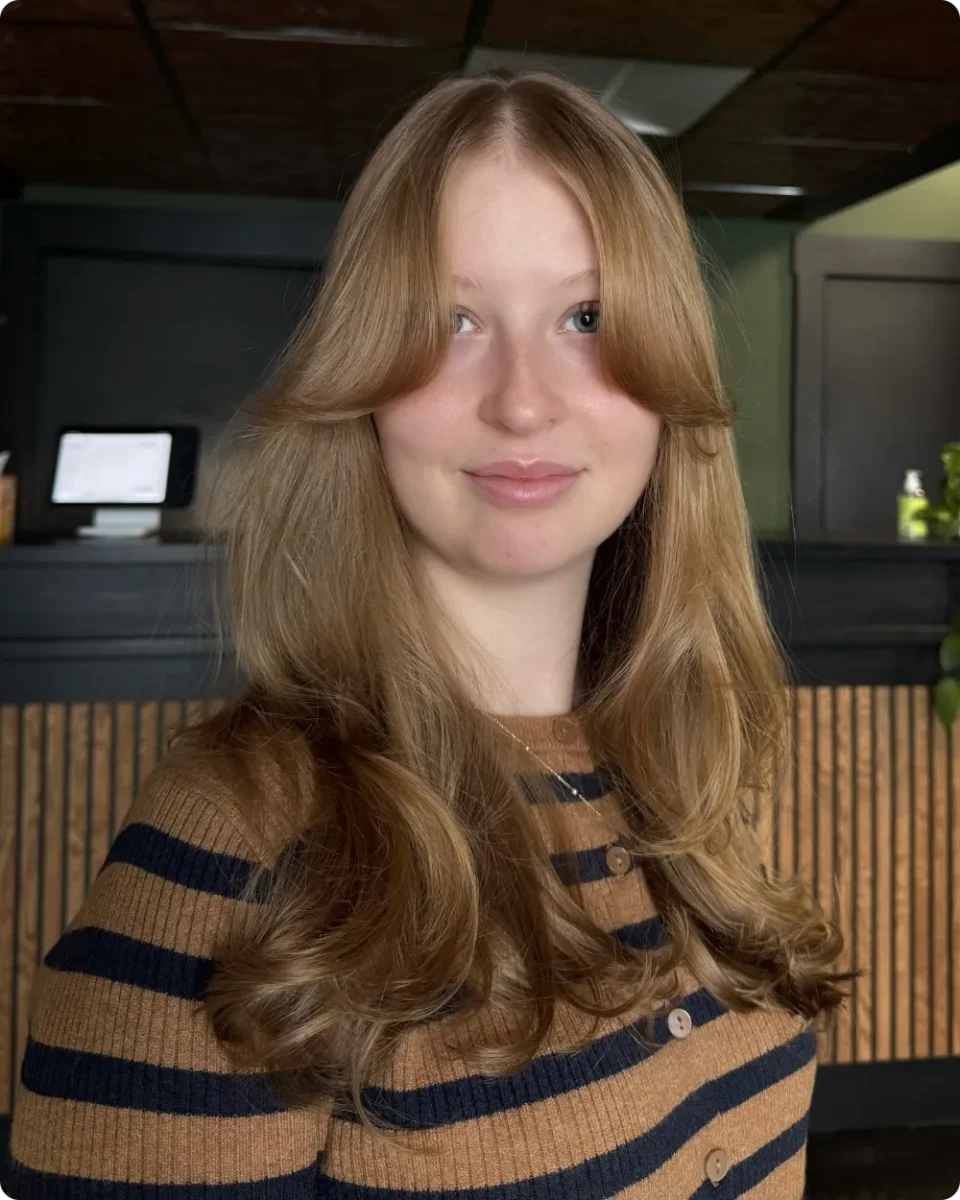
Fine hair does not always want a middle part, and this photo shows the fix. Her fringe is pushed heavily to one side, with the longer half sweeping across her forehead and joining the hair behind her ear.
The result is more coverage on one side and more skin on the other. On straight fine hair that uneven split reads as fullness, since all the weight is pooled in one place instead of split evenly in two.
Warm strawberry tones help as well, catching light at the front where the sweep lands.
10. Copper Rose Layers With Bangs That Sit Over One Eye
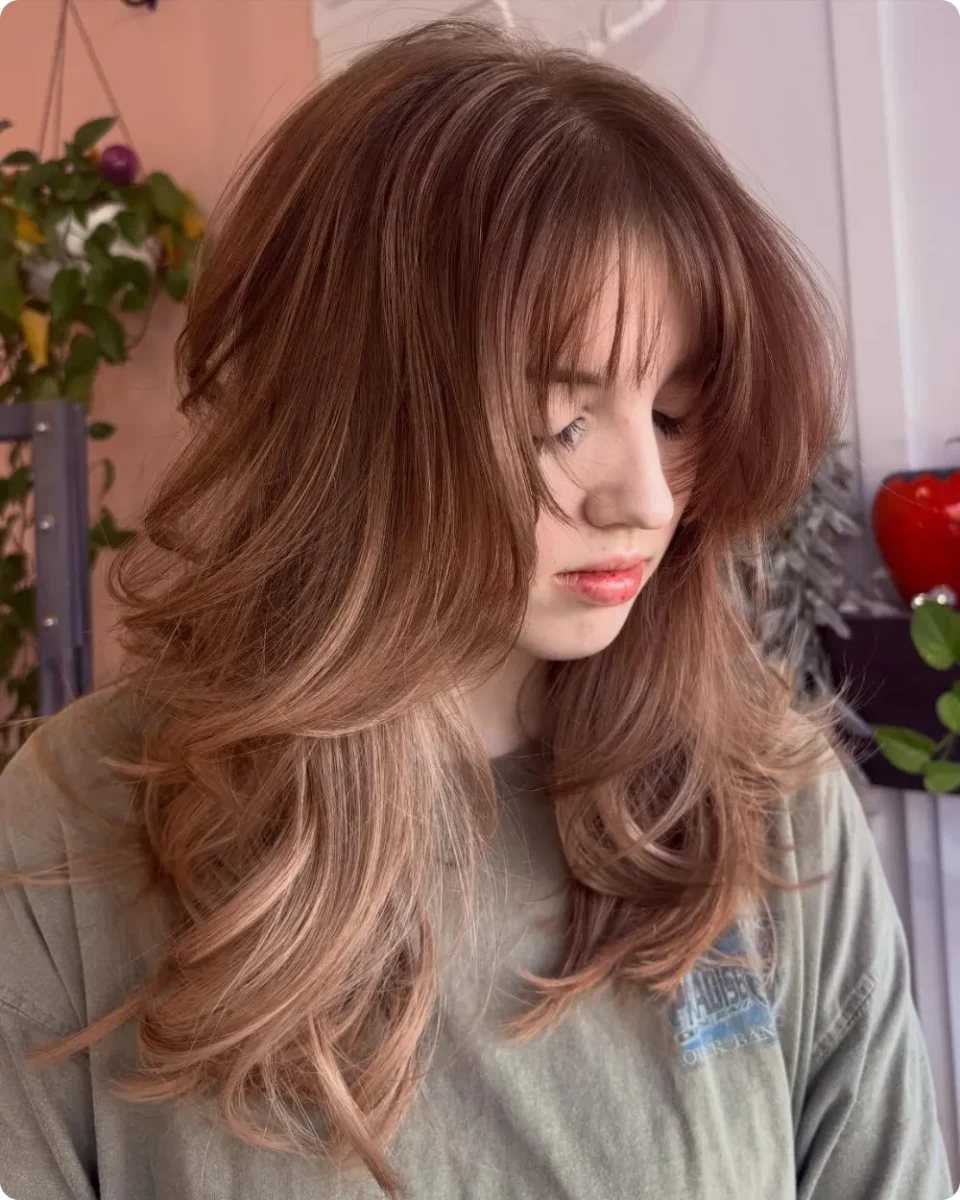
Colour is carrying half of this look. The roots are a deep copper brown and the ends fade into a pinkish sandy blonde, so every layer edge shows up as a different tone.
Her fringe is longer than most in this roundup. It drops past the eyebrow and grazes the top of one cheek, which gives the whole thing a softer, sleepier feel.
The layers behind it are cut in big rounded steps and flipped outward, so the shape stays full all the way to the ends instead of thinning out.
| Where it sits | What it does |
|---|---|
| Above the brow | Opens the face up, shows the most skin |
| At the brow | The classic split, easy to part down the middle |
| Past the brow, like this one | Softer and moodier, falls over one eye |
| Cheekbone or lower | Barely reads as a fringe, tucks away easily |
11. Beachy Blonde Shag With a Wide, Airy Fringe
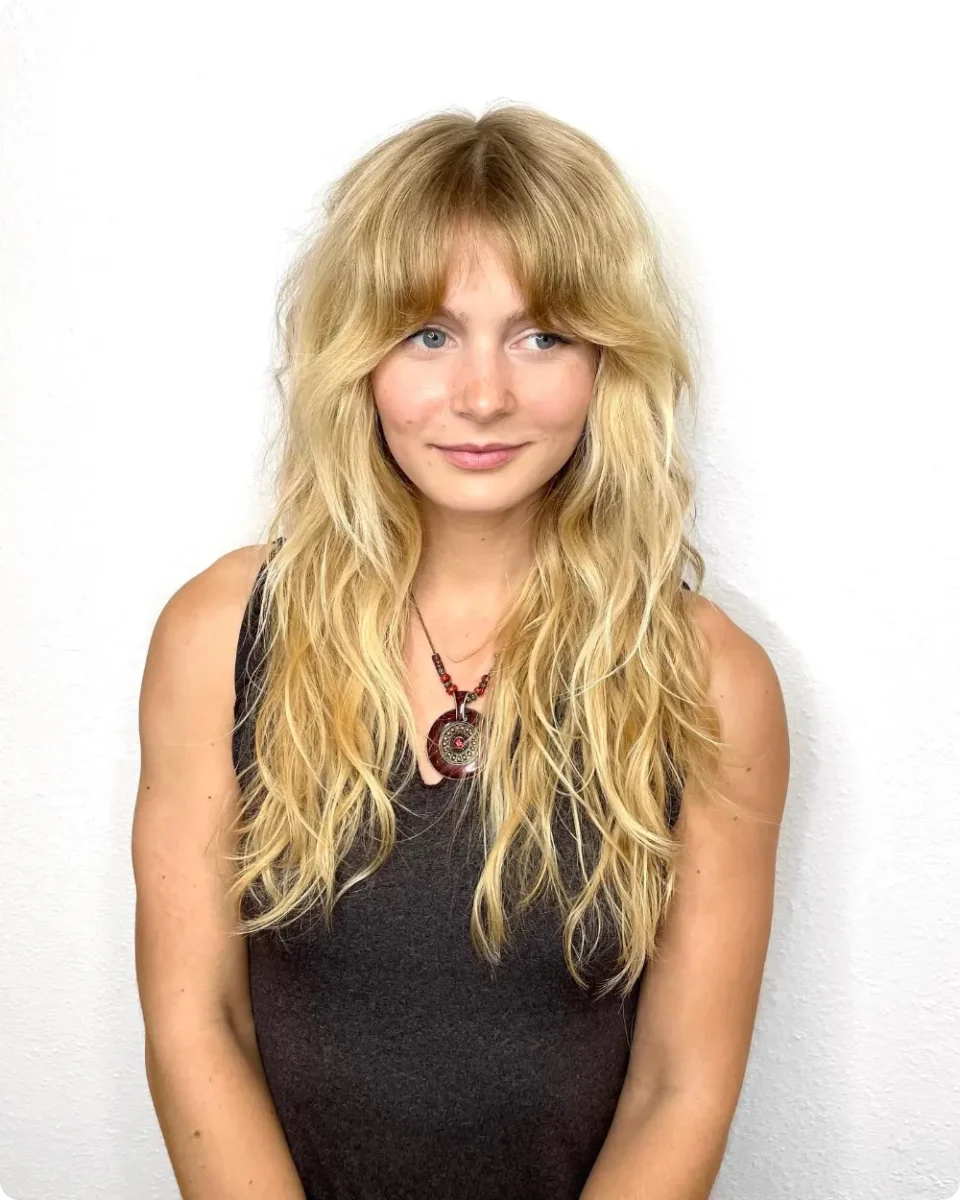
Texture is doing the styling here, not a curling iron. Her hair looks sea dried and slightly rough, with pieces that separate on their own.
The fringe is cut wide, reaching almost to her temples, and left thin enough to see through. It parts loosely in the middle rather than in a sharp line, and the sides feather down into shorter face framing bits around the jaw.
Work a salt spray or texture spray through damp hair, focusing on the mid lengths and ends.
Scrunch with your hands while it dries, but leave the fringe alone. Salt spray on bangs makes them stiff and clumpy.
Dry the fringe separately with a small brush, straight and soft, so it stays smooth against all that texture.
Two different finishes on one head, which is exactly why it looks good.
12. Wavy Blonde Lob With Short, Piecey Bangs
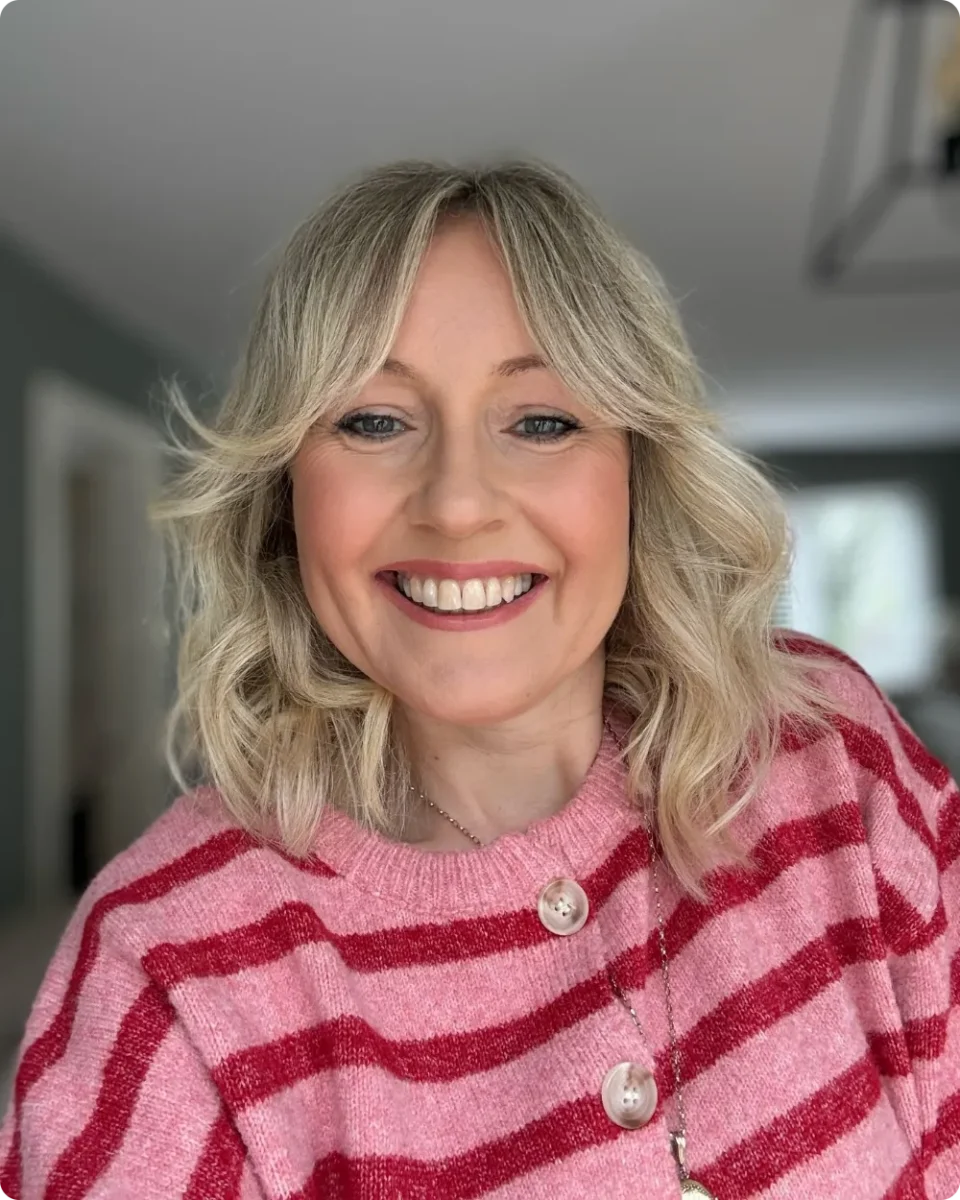
Proof that this cut works well past your twenties. Her hair sits just below the shoulders, waved loosely, with cool blonde and darker beige tones mixed through so it never looks flat.
The fringe is on the shorter side, sitting just above the brows and broken into separate pieces that flick outward at the corners. Nothing about it is heavy, which keeps the whole thing looking light around the eyes.
Shorter bangs on wavy hair need a small amount of cream, not hairspray. Stiff bangs age a look faster than grey ever will.
Ask for the ends point cut so the fringe breaks into pieces instead of sitting as one block.
Keep a bit of movement in the lengths. Waves and short bangs balance each other.
Cutting them straight across in one line. On wavy hair that edge never stays flat.
Heavy hold spray on the front. It clumps the pieces back together.
13. Dark Waves With Long Bangs Swept Off the Forehead
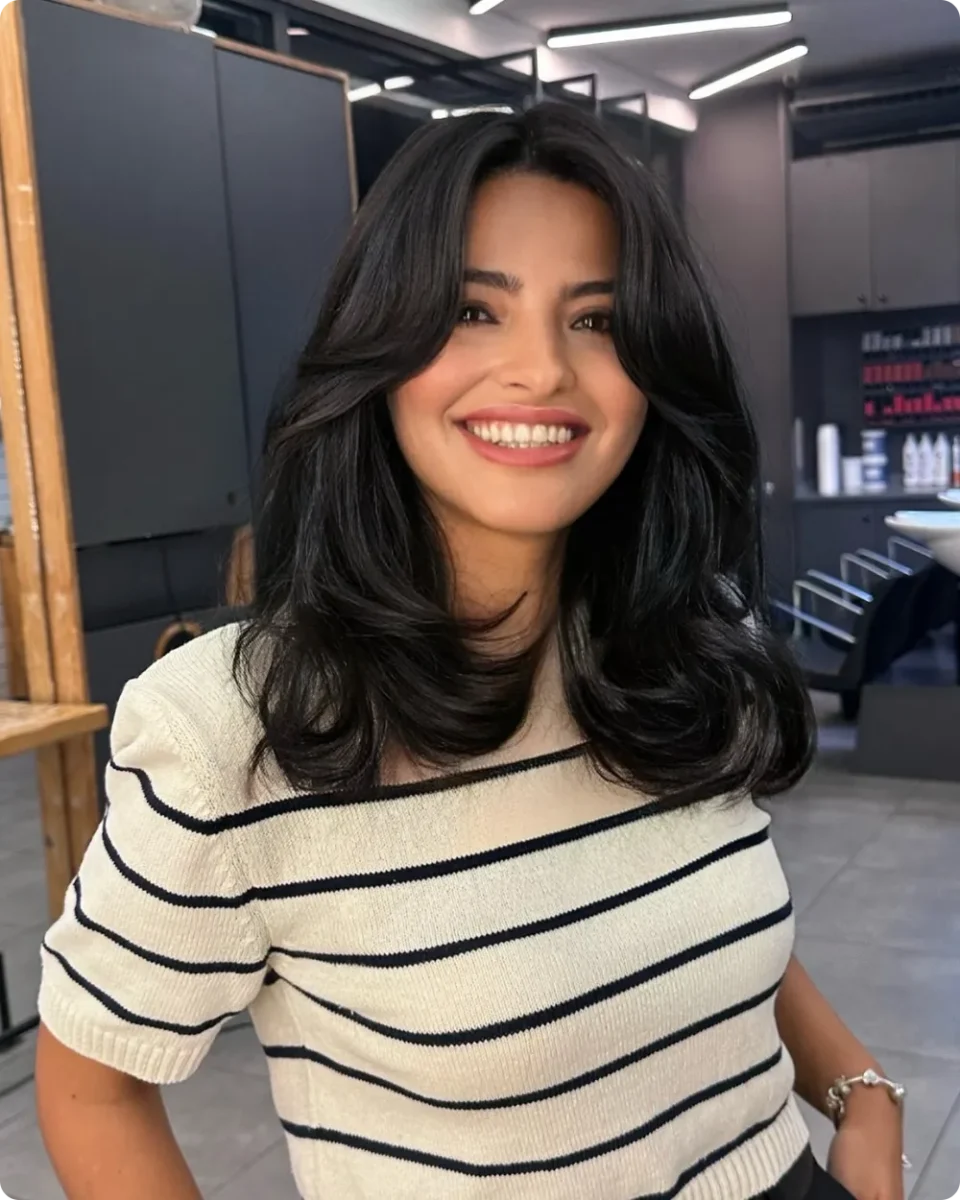
Almost nothing sits on her forehead here. The front pieces start above the brow but get lifted and swept sideways, so they land against her cheek instead of hanging down.
That is the version to save if you want the softness of a fringe without losing your forehead. It also means the cut works pushed back into a clip on the days you cannot be bothered.
Three ways to wear this same cut
One cut, three moods. That flexibility is why longer bangs are the safer first try.
14. Chocolate Brown Layers With a Heavy, Rounded Fringe
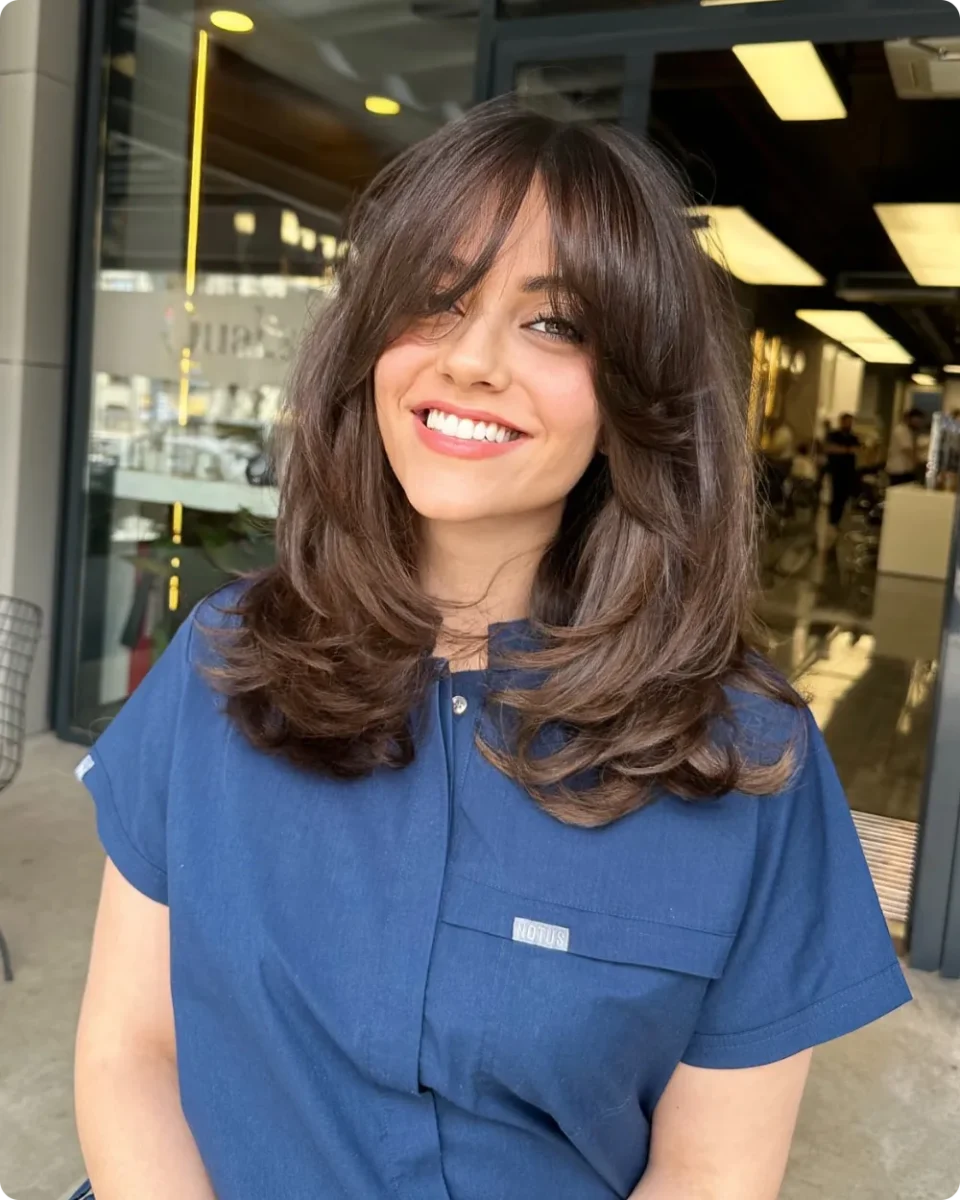
Density is the story in this one. Her fringe is thick and full across the whole forehead, curving down at the outer corners to meet the layers at her cheek.
Then look at where the volume sits. The layers flick out in wide, rounded bends starting around her chin, building width low down rather than at the roots.
That low volume is deliberate. A heavy fringe plus root lift would push the shape upward and make the head look rounder.
15. Bronde Collarbone Cut With a Barely There Front Split
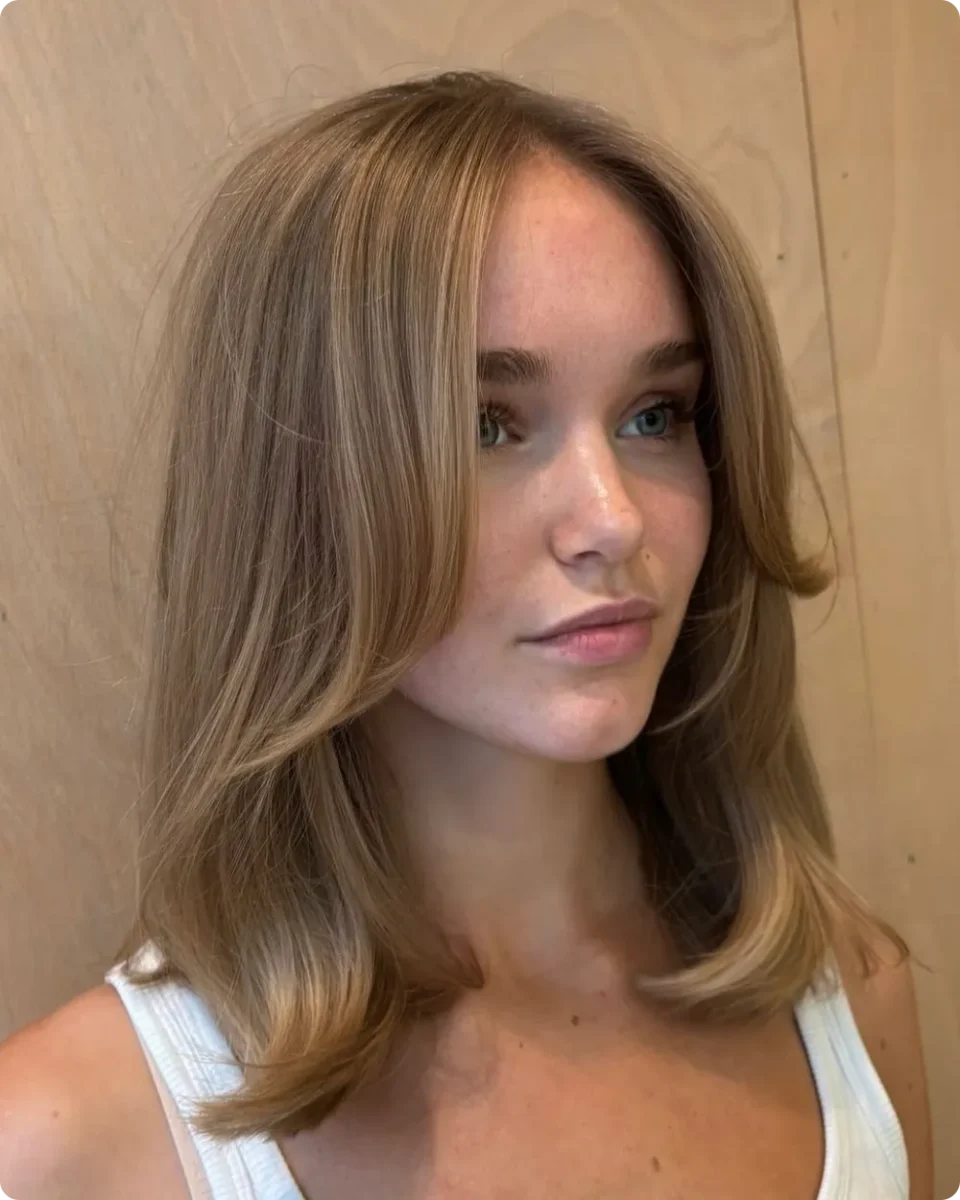
Skeptical readers, this is your entry. The fringe here is so subtle you might not register it as one at first glance.
What is actually happening: the front sections are cut a few inches shorter than the rest, parted slightly off centre, and bent back so they curve around the cheek. No fringe line, no forehead coverage, just shape.
The ends of the lob flick out in the same direction, which ties the front pieces into the rest of the cut instead of leaving them floating.
📌 Good To Know
Nervous about the cut? Ask for the shortest front piece to land at your chin. You get the curve and the movement around your face, and if you hate it, it blends back into your layers within a couple of months instead of sitting on your forehead while it grows.
16. Curly Brunette Lob With Bangs Cut Into Ringlets
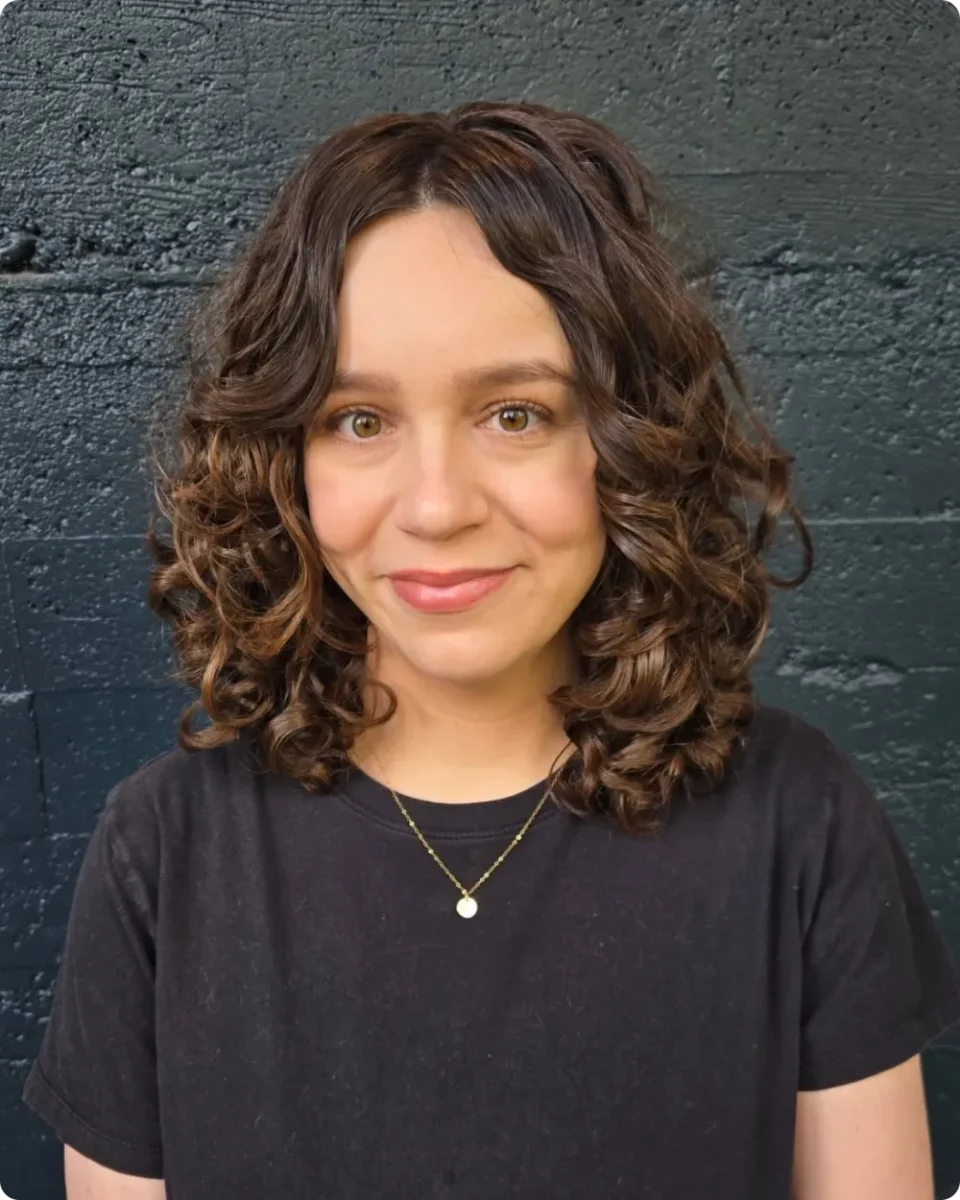
Curly hair belongs in this conversation, and here is what it looks like done right. Her front curls spring back to sit around the temples, opening into a soft arch across the forehead instead of a straight line.
The cut respects the curl pattern. Nothing is stretched flat, nothing is thinned out at the ends, and the ringlets at the front are the same size as the ones falling past her shoulders.
Cut dry. That is the one rule. Wet curls drop several inches, and a stylist guessing at the shrinkage is how curly bangs end up two inches too short.
Looks right in the chair, then dries up short and sits well above the brows for months.
Every curl is cut where it actually falls, so the length you see is the length you keep.
17. Textured Brown Lob With Bangs Left Rough and Undone
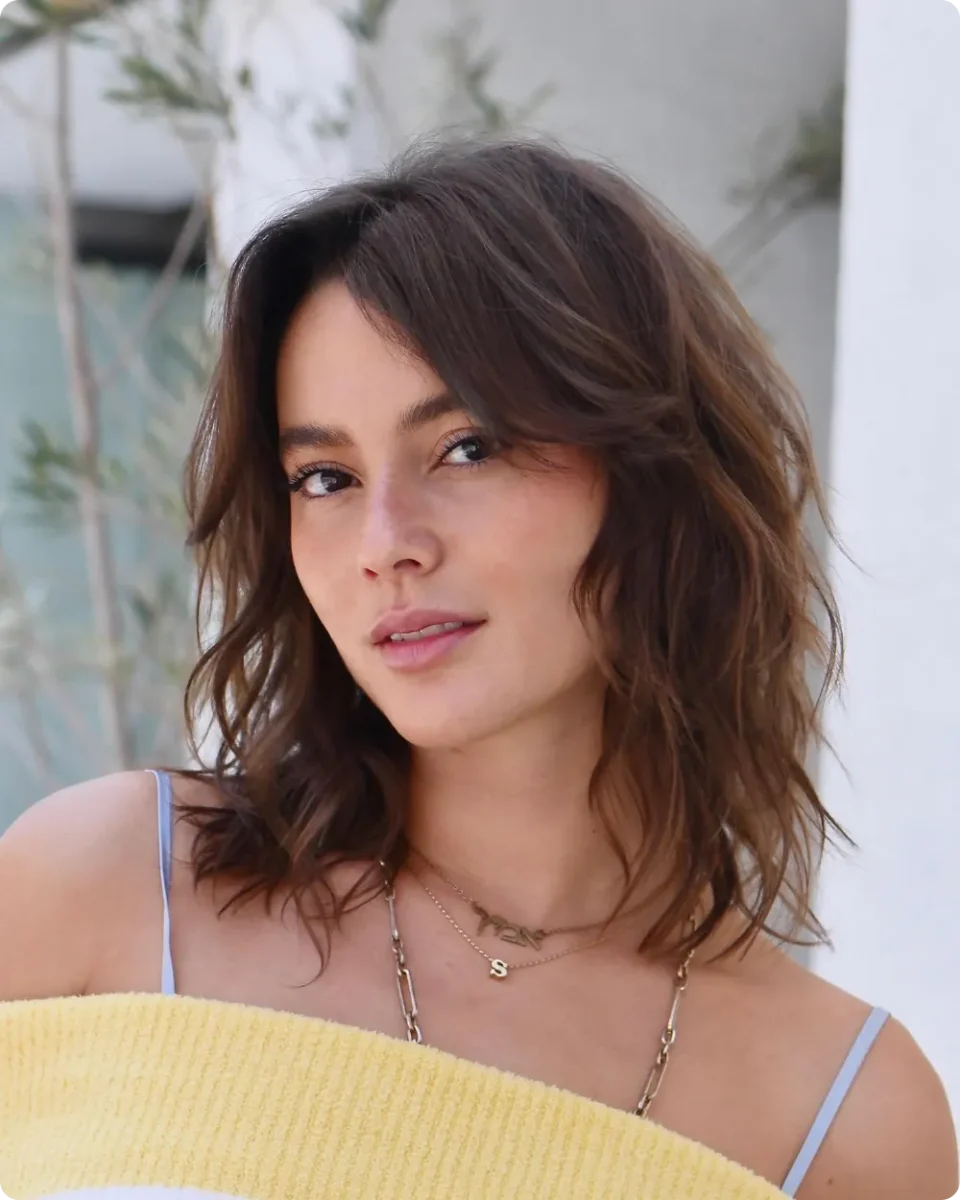
Nothing here is smoothed down, and that is the point. Her fringe falls in uneven sections, some shorter and lifting off the forehead, others long enough to reach her cheekbone.
The pieces to notice:
- A wide, low part that lets the front fall naturally instead of being forced into place
- Gentle bends through the mid lengths, more air dried than curled
- Ends left slightly ragged, which stops the lob from looking too neat against the messy front
Skip the round brush entirely on this one. Rub a pea sized amount of cream between your palms and press it through the ends, then leave it alone.
Bangs do not have to be even to look good. Uneven lengths across the front read as movement, and movement is what keeps a simple lob from looking plain.
18. Ash Brown Ponytail With Bangs Left Out at the Front
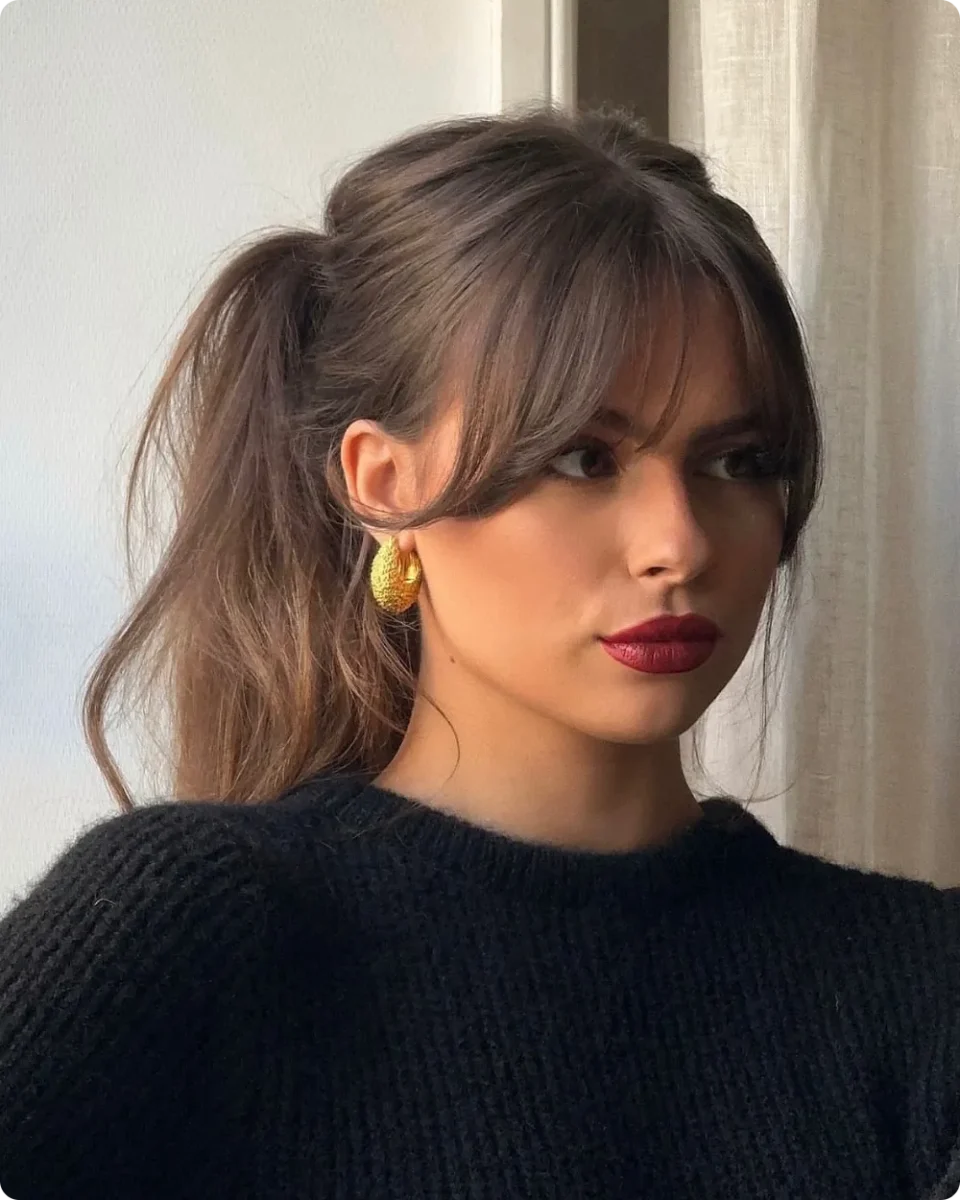
Last one, and it answers the question most women ask before booking the cut. Yes, you can still tie your hair up.
Her ponytail is pulled back loose and low, with the fringe left down and a few longer strands falling beside her ears. Those loose pieces do the same job the fringe does when her hair is down, keeping something soft against her face so the pulled back look does not turn severe.
This is worth knowing if you work out, work in a kitchen, or just live in a ponytail three days a week. Bangs do not take that option away from you.
Clip the fringe forward and out of the way before you gather anything, so it does not get caught in the elastic.
Tie the ponytail loosely and leave a little slack at the crown. Pulled too tight, it drags the bangs backward at the roots.
Pull out one strand in front of each ear to match the fringe, then give the front a quick bend away from your face.
The honest takeaway after all 18: there is no single version of this cut. What works on thick dark hair looks nothing like what works on fine strawberry blonde, and both are right.
Still deciding? Start long. A fringe that reaches your cheekbone or chin gives you the shape without much risk, and you can always go shorter at your next trim. Bring two or three photos to your stylist instead of one, so they can see the pattern in what you keep picking.
Save this for the next time you are looking for curtain bangs ideas before an appointment.
💡 Quick Tip
Book a fringe trim, not a full cut, for your first follow up. It takes ten minutes, most salons charge little or nothing for it, and it stops you from sitting through an awkward stage while you wait for a proper appointment.