
Most of us walk into the salon with a rough idea and walk out with something slightly different. Hair color words are slippery. Caramel, honey, mocha, and sand all sound similar out loud, and they land nothing alike on a dark base.
That gap is what this post is for. Dark brown hair with highlights can look like almost anything, from a barely there shine to wide blonde streaks, and the difference comes down to three choices. How light the pieces go, where they sit on your head, and whether the tone leans warm or cool.
The 18 looks below cover the full range. Some keep the roots deep and save all the brightness for the ends. Some put nearly everything around the face. A few skip blonde entirely and use copper or rose instead. Each one comes with what to ask for and what the upkeep actually involves.
Scroll through, find the one that matches what you really want, and take it with you.
1. Deep Root Shadow Melting Into Warm Golden Ends
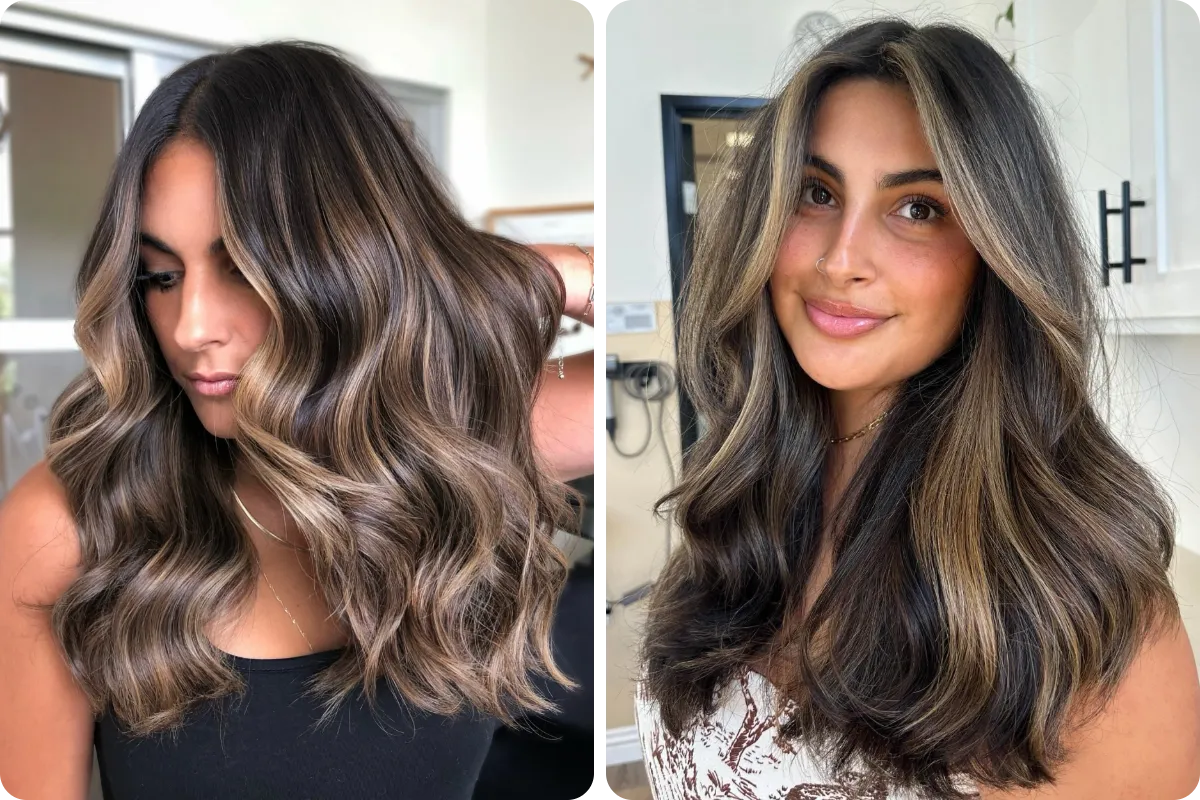
Deep shadowy roots keep this from reading as a full blonde job, which is exactly why it still works on a dark brown base.
What’s happening here:
- The root stays untouched for a few inches, so grow-out softens instead of forming a line
- The brightest pieces sit right at the front, framing the cheekbones
- Most of the gold lives on the ends and the underside of the waves
- No stripes anywhere, the color shifts a little at a time
Waves do real work in this photo. Loose S-bends fold the dark and the light into each other, so the whole thing looks soft rather than blocky. Ask your stylist for a smudged or shadowed root with hand-painted lightening through the mid-lengths, and mention that you want the front pieces brightest.
2. Fine Caramel Ribbons on Glossy Chocolate Brown
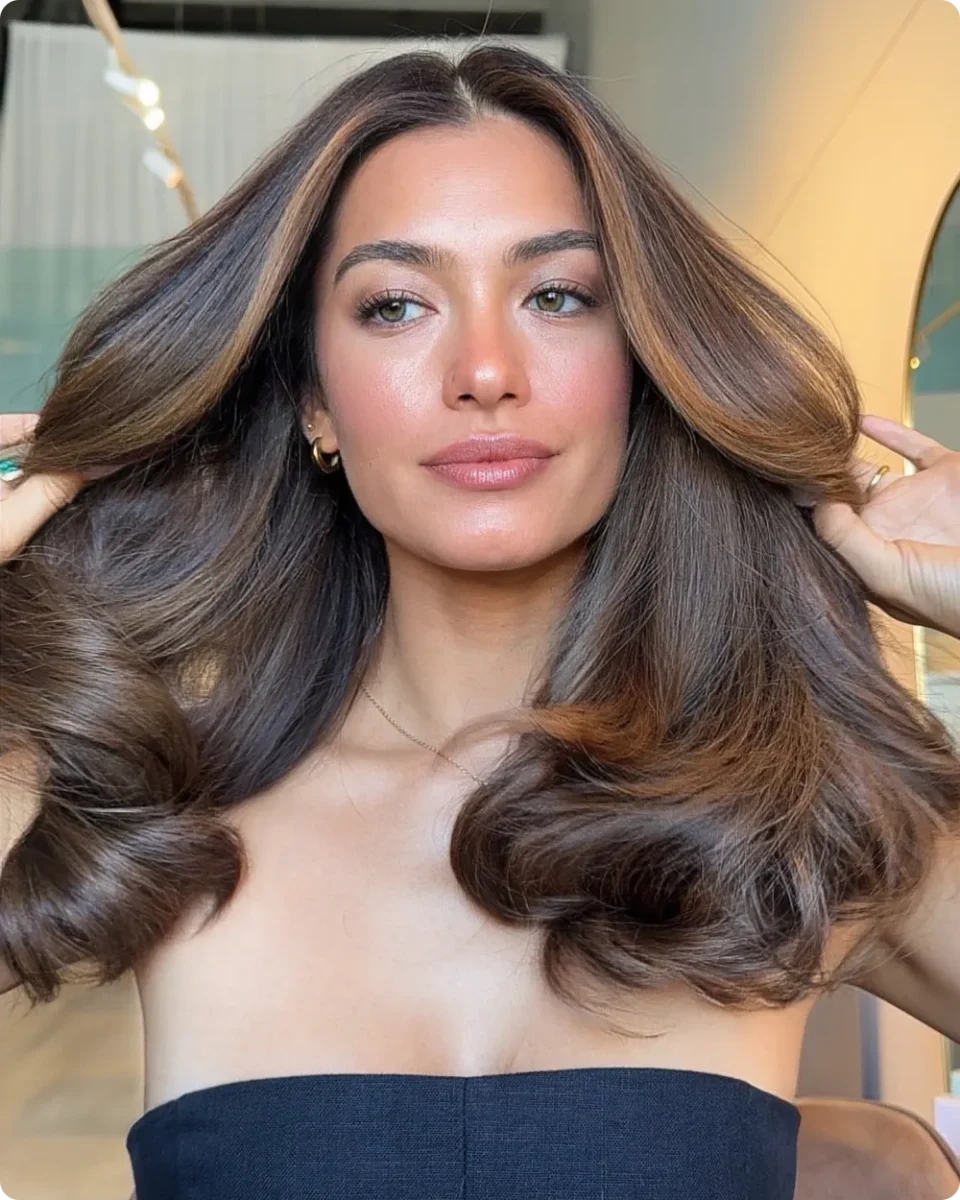
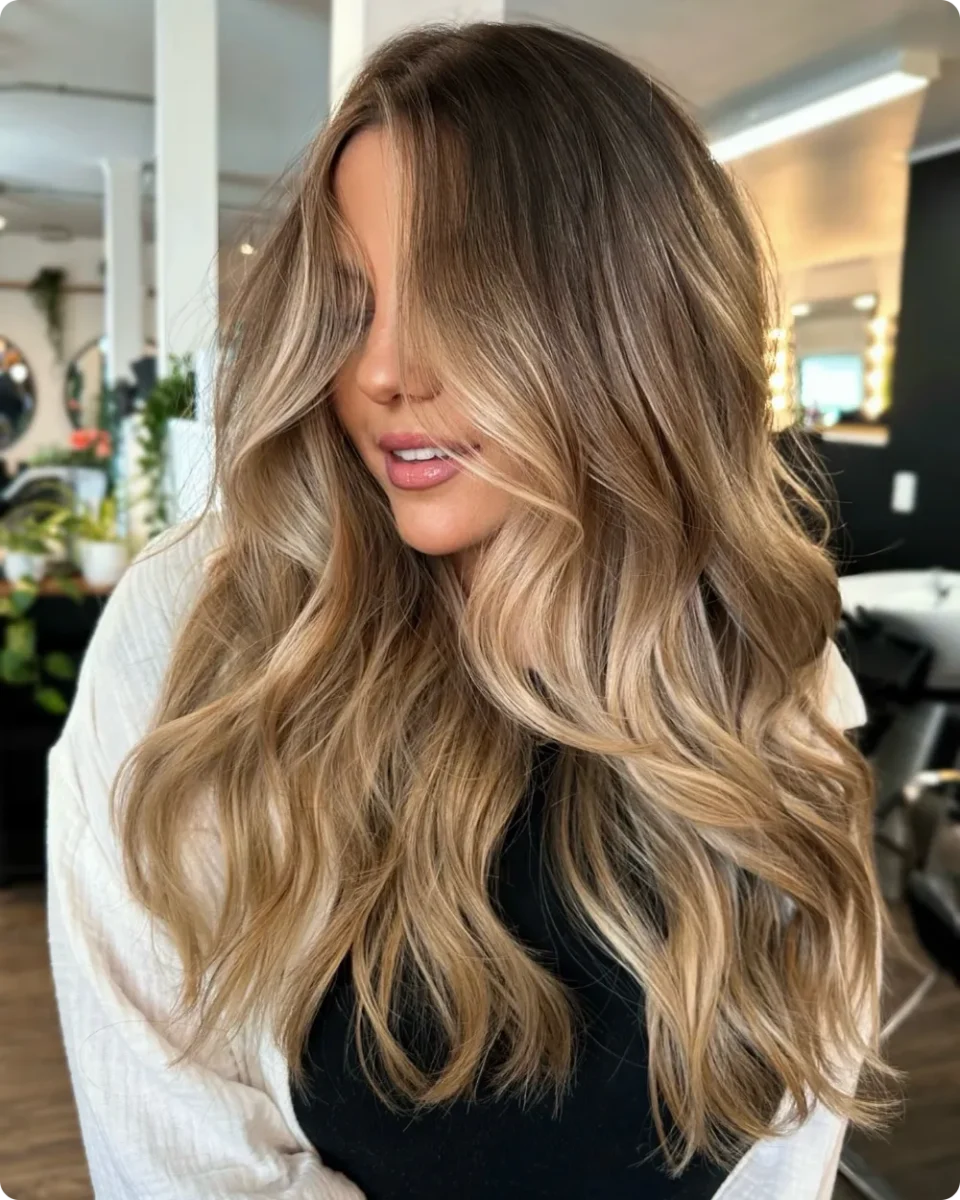
Shine is doing half the work in this one. The base is a rich chocolate brown, and the highlights are thin warm ribbons sitting only a shade or two lighter, so they catch the light without pulling the whole head lighter. A big bouncy blowout shows them off because the surface layers are the ones carrying the color.
Tone: warm caramel with a golden lean, not ashy
Width: thin, closer to a few strands than a thick section
Placement: top layers and either side of the part, where light naturally lands
Low contrast like this grows out quietly, so it suits anyone who only makes it to the salon every few months.
| Thin ribbons | Thicker pieces |
|---|---|
| Reads as shine and movement | Reads as clear color change |
| Grows out with almost no line | Needs a touch-up sooner |
| Best seen on smooth, blown-out hair | Shows up even on textured styles |
3. Honey Pieces Painted to Follow the Curl Pattern
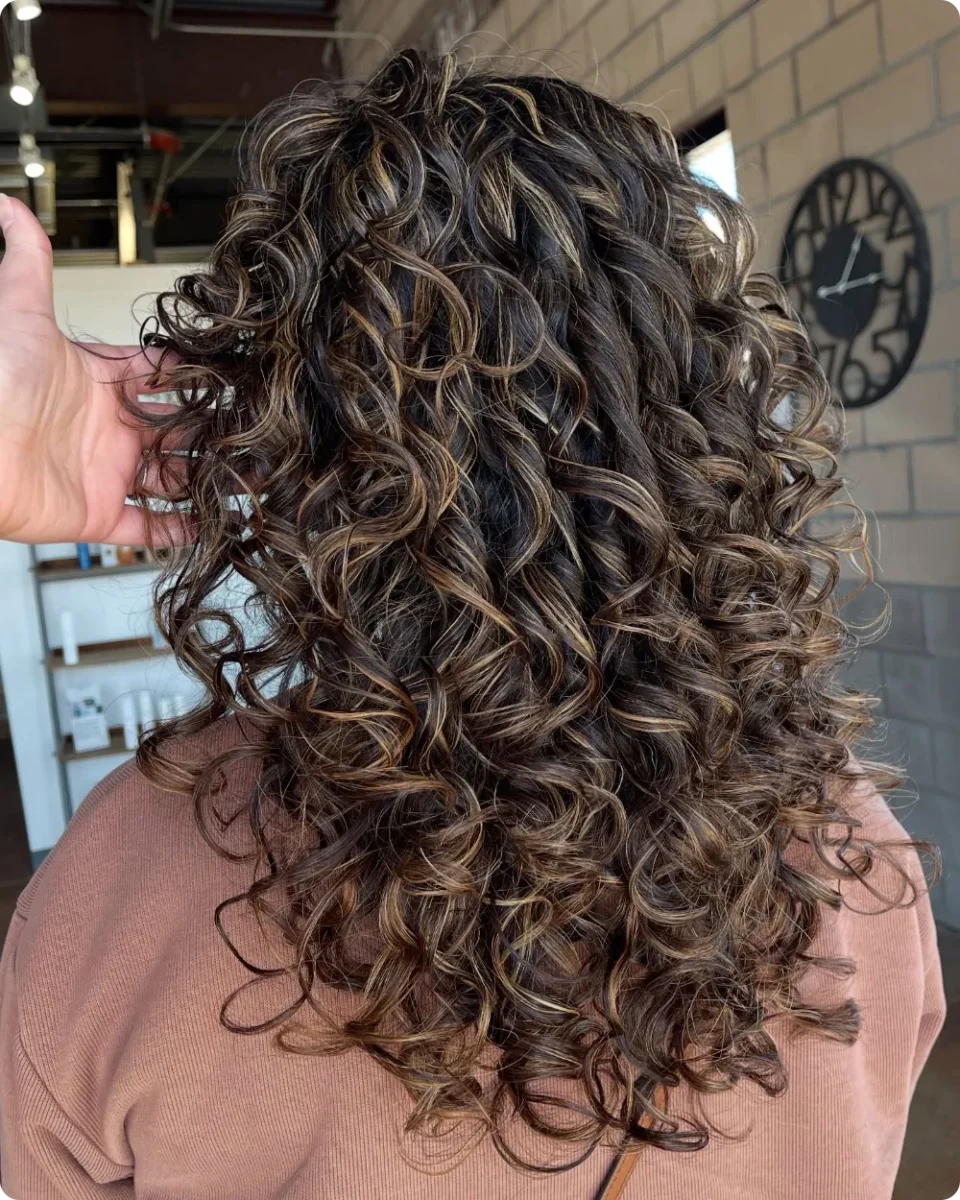
Curls swallow color that is painted the wrong way, and this back view shows what happens when the placement is right. The base looks close to espresso, and the honey pieces are scattered across individual curl clumps instead of sitting in one solid block. Every spiral turns the light bit toward the outside of the curve, so the brightness shows up again and again down the length.
Contrast is high here, which is a fair trade for how much definition it gives. The curls look separated and springy because the eye can follow each one.
Worth knowing before you book: lightening can loosen a curl pattern if it is overdone, so fewer well-placed pieces beat a head full of them. Plan on deeper conditioning afterward.
Color painted on dry, defined curls
Pieces spread out across the whole head
Warm honey tones that suit a deep base
Straight horizontal foils on curly hair
Everything packed around the face only
Cool or brassy tones that fight the base
4. Cool Beige Face-Framing Pieces Against a Near-Black Base
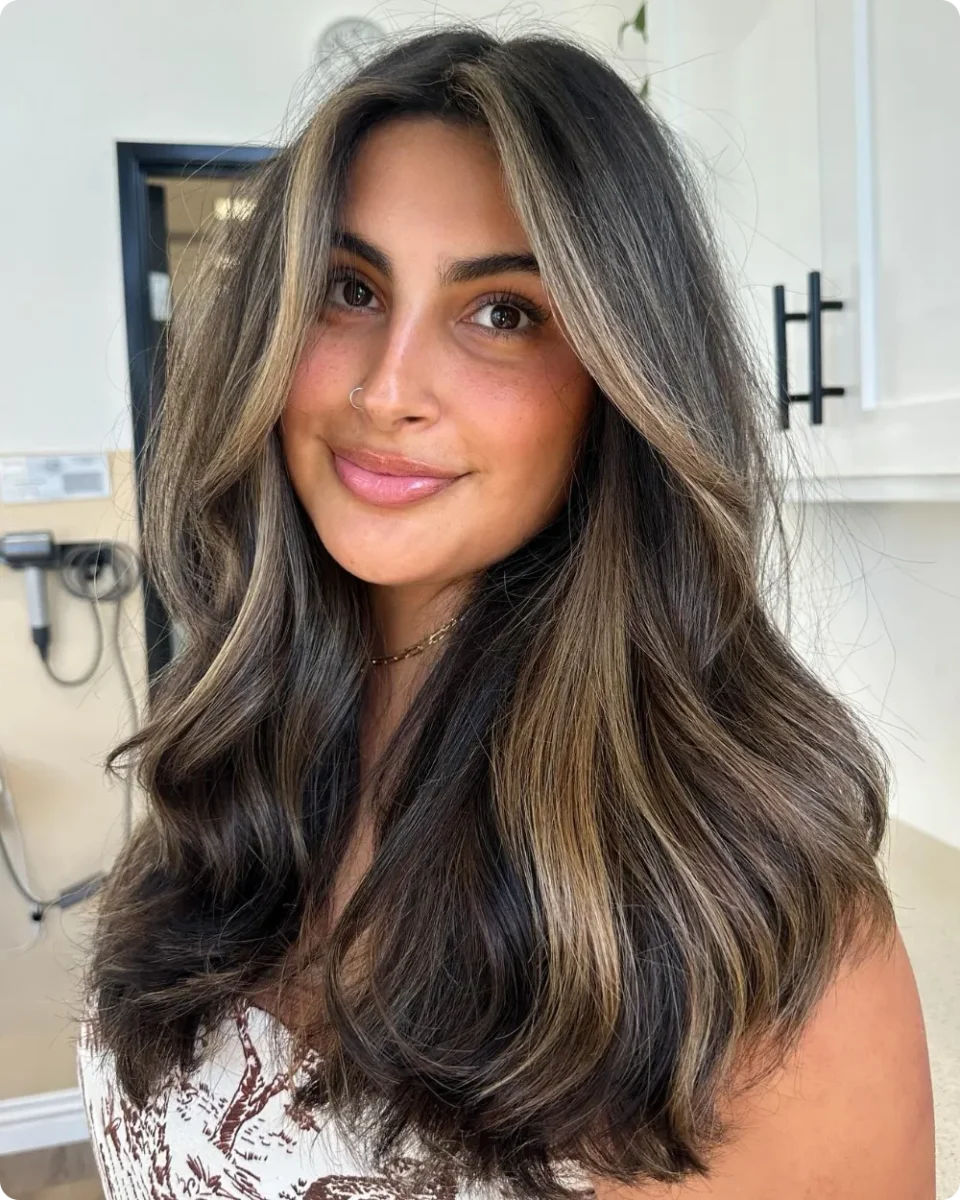
Cool beige, not gold, is the first thing worth noticing. The base stays deep and almost black through the back, while the brightest pieces start high near the part and run down both sides of the face.
What works here:
The placement is selfish, in a good way. Nearly all the lift sits in the two front sections, which is exactly where the camera looks.
The tone stays neutral. Sandy beige next to a dark base reads clean and crisp, while a warm gold would have blurred into the brown.
The back is mostly left alone. Less damage, fewer foils, smaller bill.
A soft bend through the mid-lengths keeps all that contrast from looking striped. Bring a photo like this one and ask specifically for a bright face frame with very little work behind the ear.
5. Copper Red Balayage Warming Up Deep Chocolate Brown
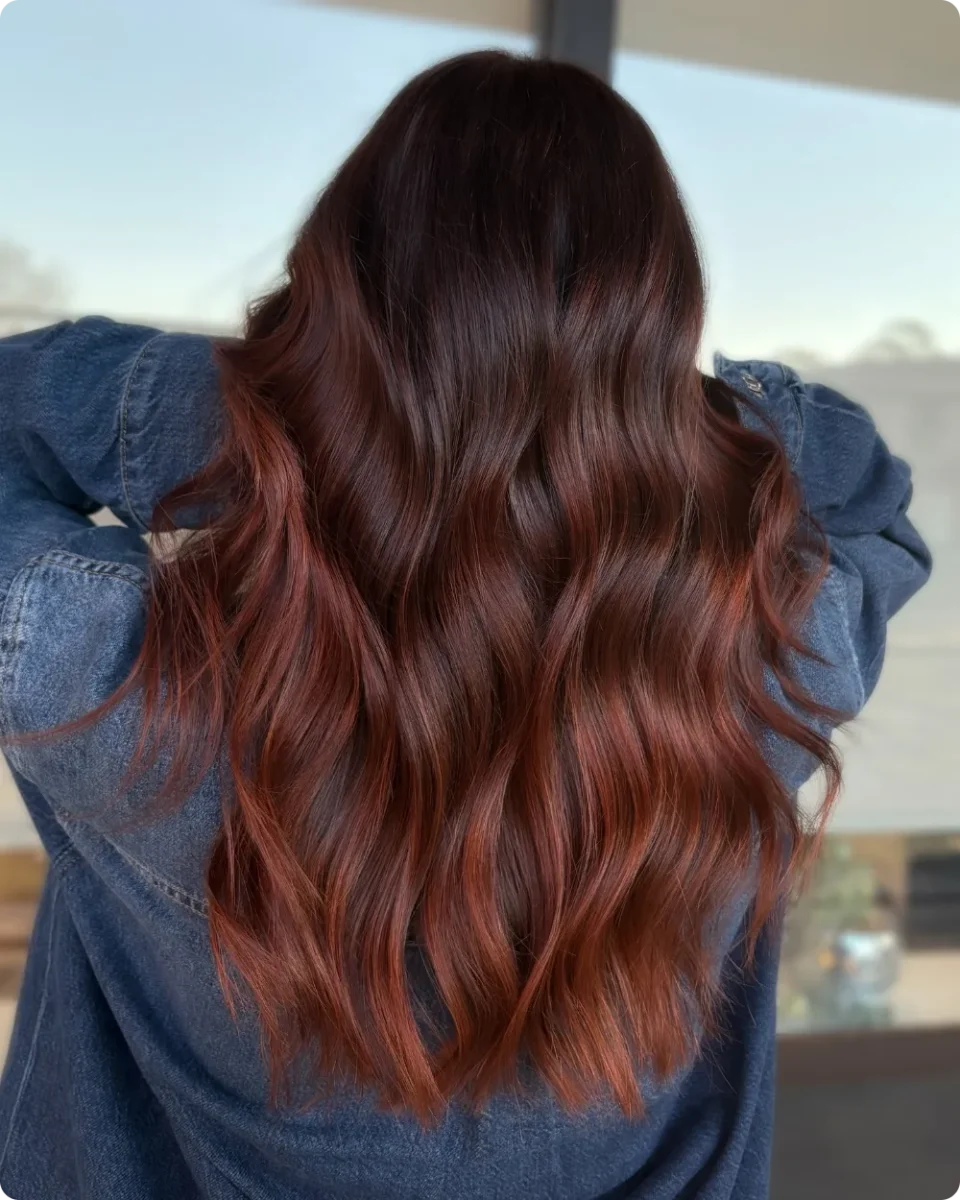
Red does something on dark brown that blonde cannot, it brings heat without lifting the hair anywhere near as light. The roots here stay a deep cool chocolate, then the color builds slowly into a rich copper through the mid-lengths, with the strongest red saved for the last several inches and the top of the waves.
Notice how little red touches the crown. That untouched stretch is what keeps the finish looking done by a colorist instead of dipped.
The tradeoff is upkeep. Red molecules are large and slip out of the hair faster than almost any other tone, so the shade you walk out with will soften within a few weeks unless you protect it.
Hold onto the copper longer
6. Ribbons of Beige Blonde Over a Dark Base Left Visible
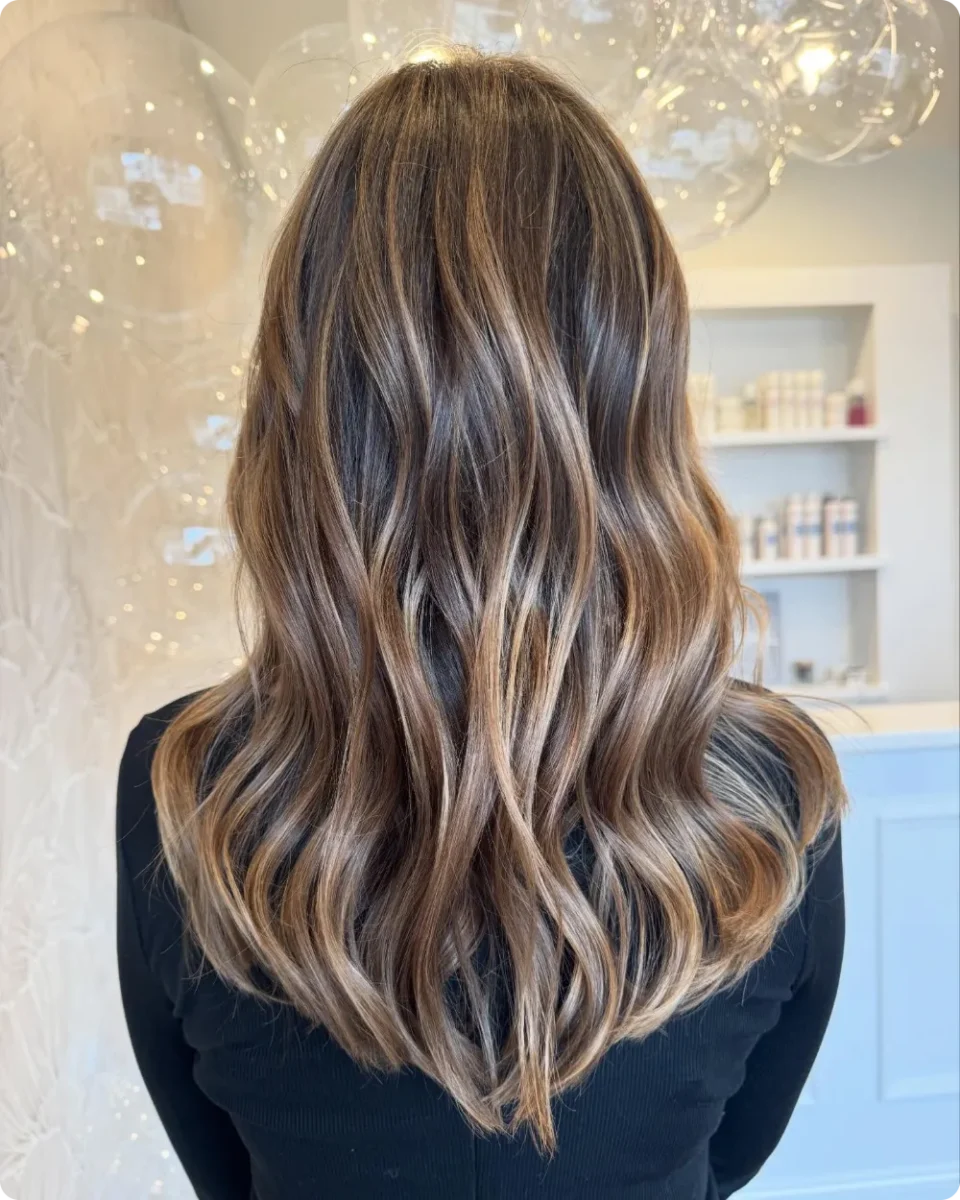
Wide ribbons of sandy blonde run from the upper back straight through the ends, and the dark brown underneath is never fully covered. That leftover darkness is the whole point. It gives the blonde something to sit against, so the waves look deep instead of washed out.
Three things make the placement work:
- The ribbons sit lower on the back sections and higher near the face, so brightness climbs toward the front.
- Some pieces are wide and some are thin, which stops the finish from looking evenly striped.
- The very bottom is the lightest point, so the ends read sun worn rather than bleached.
Curling in alternating directions helps as much as the color does. It folds the light and the dark into each other instead of stacking them in neat rows.
One flat shade of brown from root to tip. The curls are there, but the eye slides right over them and the length looks shorter than it is.
Beige ribbons on top, original brown still showing underneath. Every bend now has a light side and a shadow side, so the hair looks thicker and longer.
7. Cinnamon Warmth Spread Evenly From Crown to Ends
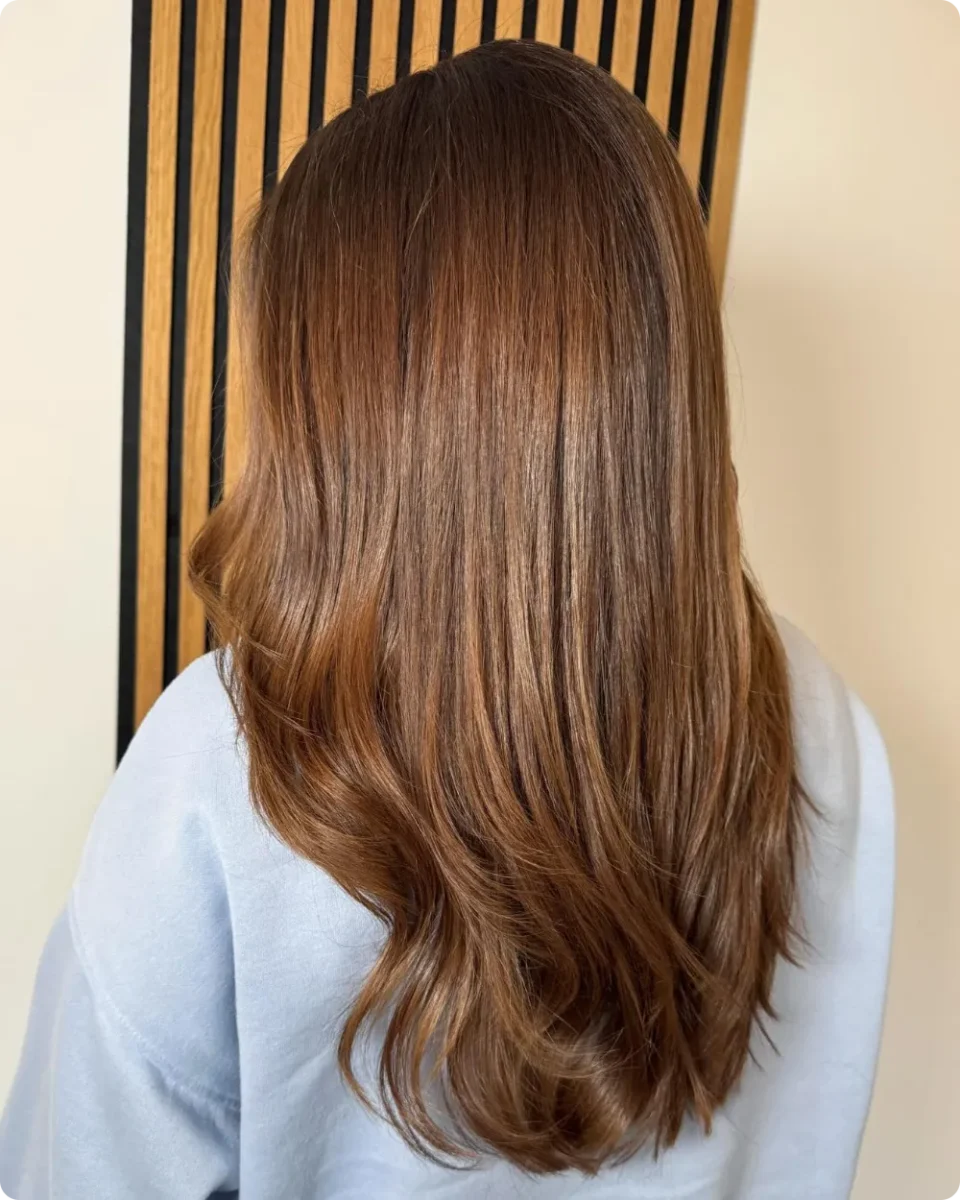
Barely any contrast, and that is the design choice. The color here shifts from a cool brown at the very top into an even cinnamon through the body and ends, without a single visible piece or stripe anywhere.
Straight hair is the honest test of this technique. Flat ironed lengths hide nothing, so any chunky foil would show immediately. Instead the lightness builds so gradually that the eye reads it as one glowing color rather than highlights.
Good match for anyone who has been burned by stripes before, or who wears their hair straight most days.
When the lift is spread across hundreds of fine pieces instead of a few thick ones, straight hair reads as one warm shade with depth, not as highlights sitting on top of brown.
8. Sunlit Cinnamon Streaks Layered Through Bouncy Waves
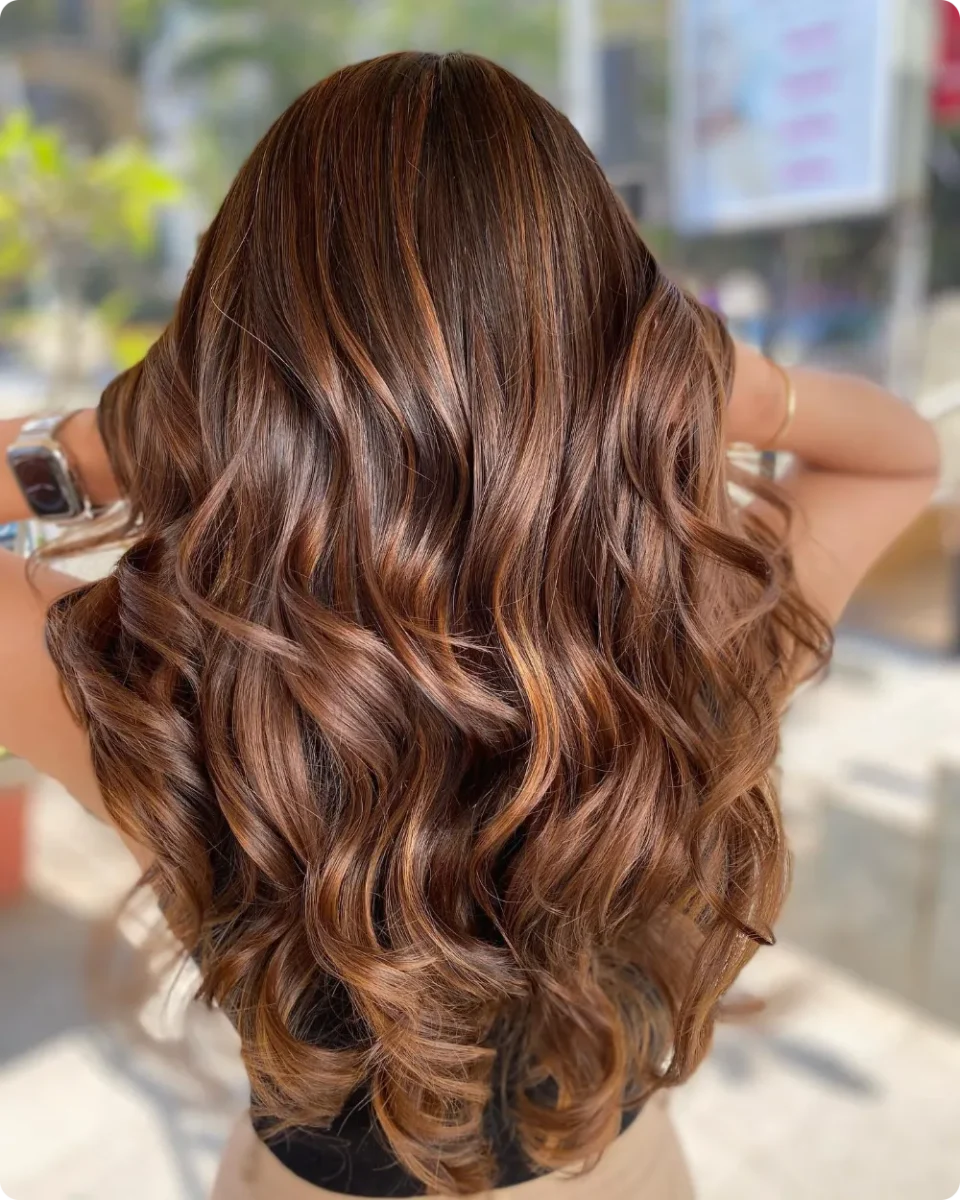
Sun exposure is the reference point for this one. Warm cinnamon and light caramel run in uneven widths through a medium brown base, brightest across the crown and along the outside of every wave, and the whole thing was clearly shot in daylight where that warmth reads strongest.
Where the light lands:
- Across the top of the head, mimicking where real sun hits
- On the raised part of each wave, leaving the valleys darker
- Heavier on the outer sections than through the middle of the back
- Softest right at the part, so the root still looks natural
Ask for warm caramel and cinnamon tones rather than beige. The gold keeps the brown looking rich instead of muddy, especially on olive and warm skin tones.
💡 Quick Tip
Warm tones like these fade toward orange as they grow out. A warm gloss every six to eight weeks pulls the shade back to caramel without touching your root.
9. Thin Mocha Highlights Woven Through Very Long Waves
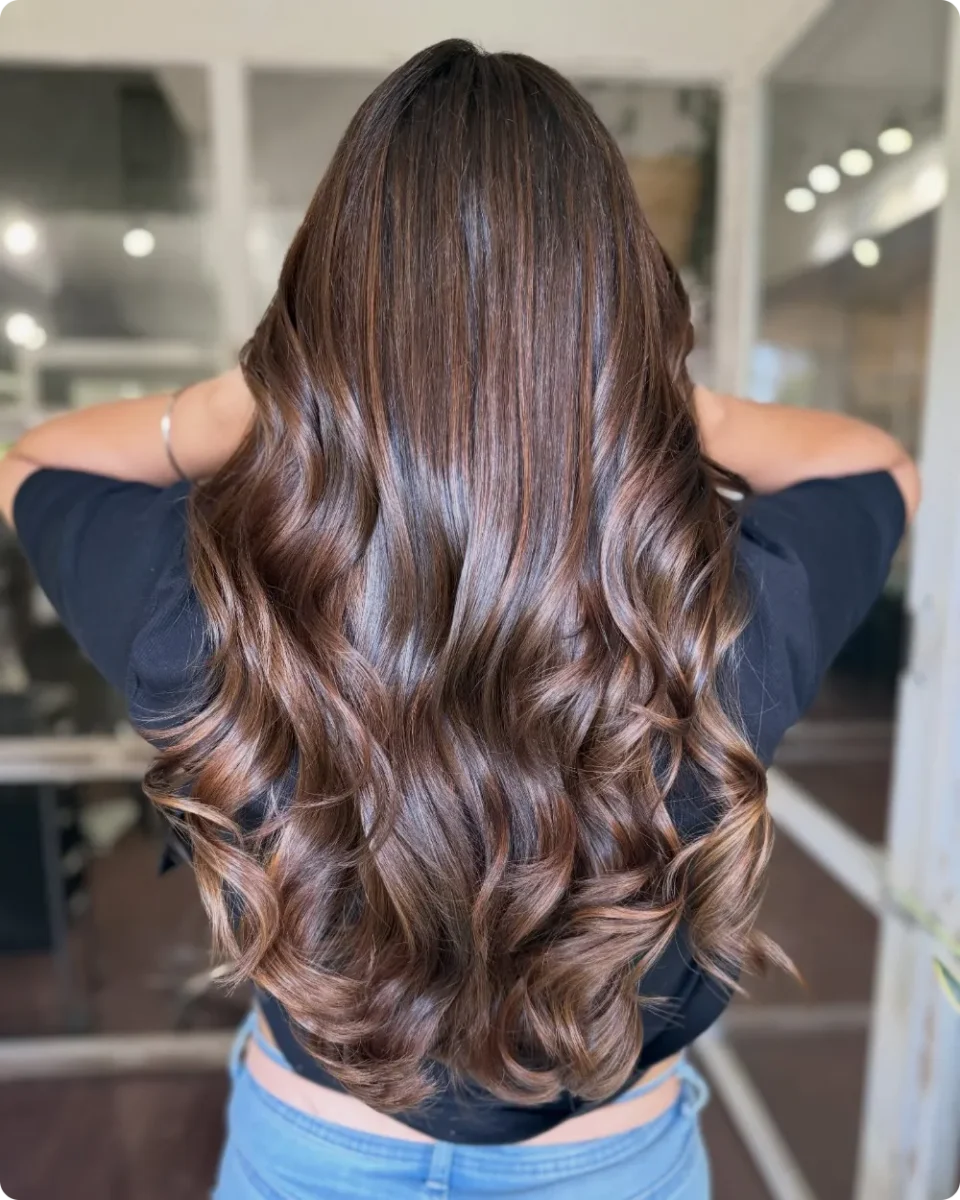
Length changes the math on highlights. Hair this long gives color a lot of room to travel, so the thin mocha and light chestnut pieces here start around the shoulders and get gradually brighter all the way down to the curled ends.
Look at the crown. Almost untouched, deep and glossy, which anchors everything below it. Without that dark top, the ends would float and the length would lose its shape.
The pieces themselves are fine and closely spaced. That matters on long hair, because thick sections would stretch into long obvious bands over two feet of length.
Curling toward the back helps the finish. It stacks the lighter ends into visible spirals at the bottom, which is where all the payoff sits.
Leave the crown and upper back dark, roughly to shoulder level.
Start fine pieces below that line, keeping them narrow and close together.
Build the brightness slowly so the last few inches are the lightest point.
Finish with a mocha gloss over everything to tie the tones together.
10. Bold Honey Blonde Streaks With the Brown Showing Through
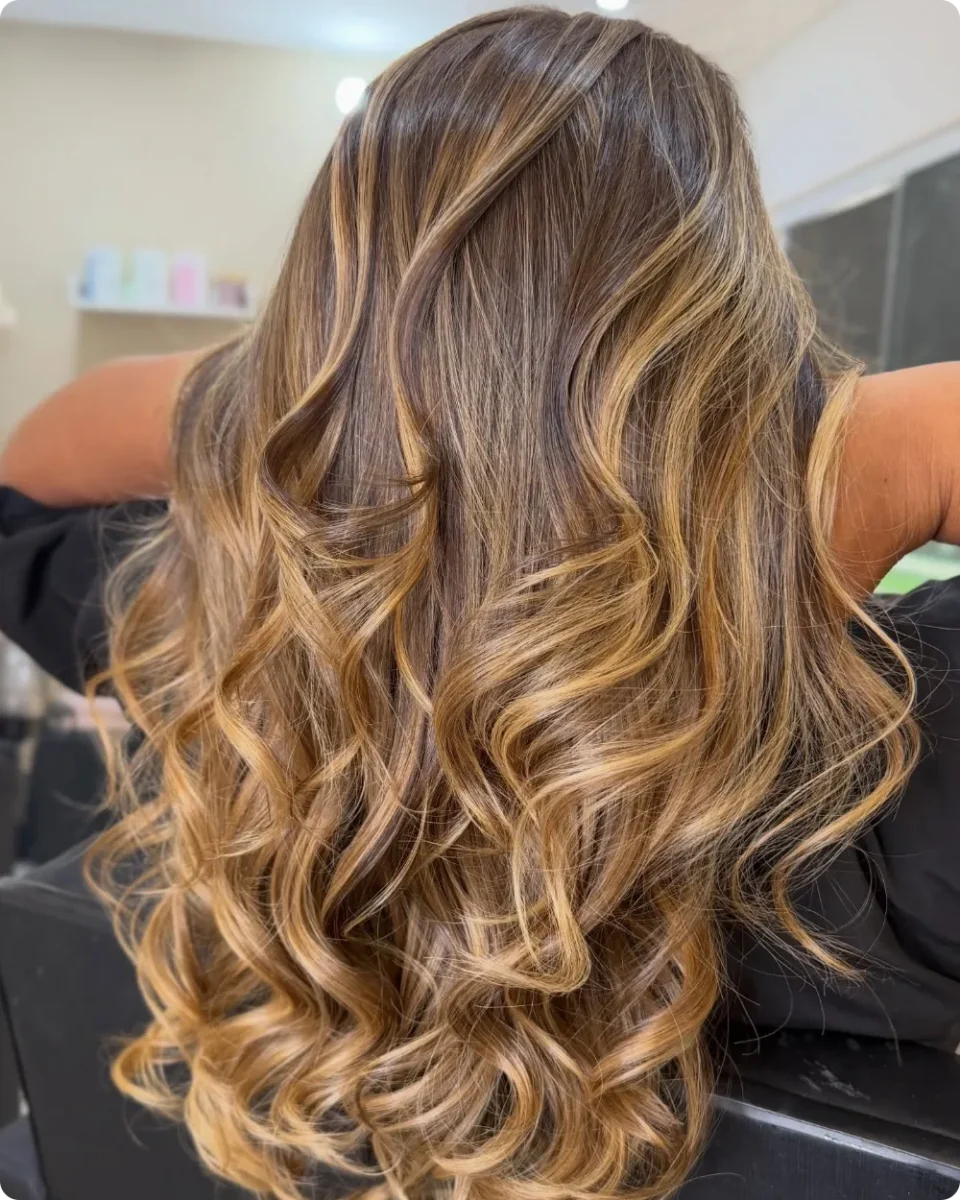
Heavy is the right word for this placement, and it is doing exactly what it should. Thick honey blonde streaks start close to the top and run the full length, with the original brown left in clear strips between them.
The two-tone effect is the payoff. Because neither color takes over, the curls at the bottom look striped in a way that reads intentional and glossy rather than accidental.
Go this bold when:
- Your natural brown is medium rather than near-black
- You want the change to be obvious in one appointment
- You style with curls or waves, which break up the streaks
- You are okay with a visible regrowth line in a few months
Tight curls at the ends matter here. On stick-straight hair, streaks this wide would read as clear vertical bands instead.
11. Toffee Balayage That Builds Slowly From a Dark Crown
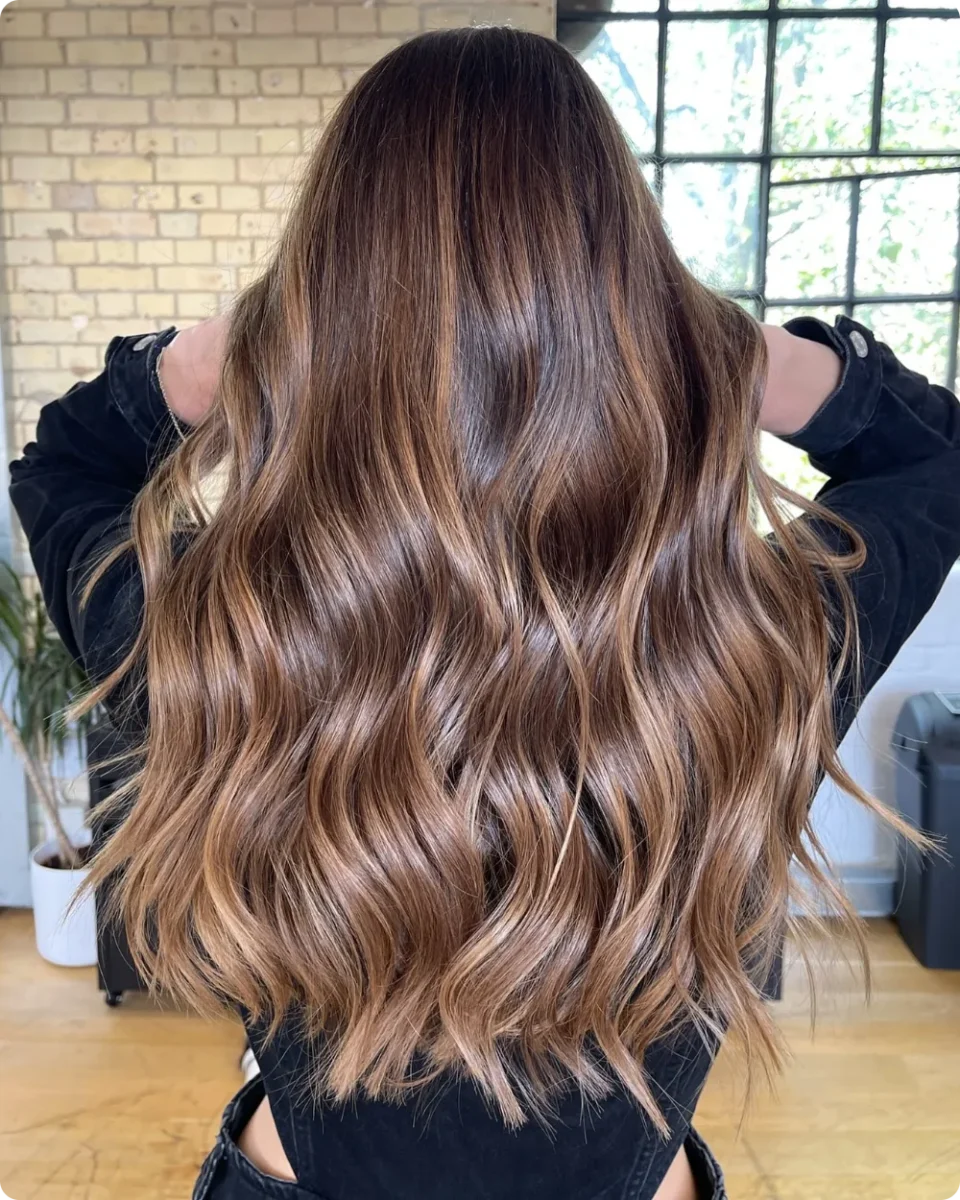
Nothing about the top of this head has been touched. The dark brown holds solid through the crown and upper back, then the toffee starts somewhere around the shoulder blades and keeps getting warmer until the ends look sun softened.
Beach waves make the gradient readable. Each bend catches the toffee on the outer curve and drops back to brown in the dip, so the color looks like it is moving down the length rather than sitting in one spot.
The tone deserves a mention on its own. Toffee has enough warmth to glow but stays brown at heart, so it never fights the base or pulls the finish toward blonde.
A cut with long layers also helps. The lighter interior pieces peek through the darker top layer, which is where a lot of the depth comes from.
| Section | What the colorist does |
|---|---|
| Crown and part | Nothing, natural depth stays |
| Upper back | Feathered starting points, very light touch |
| Mid-lengths | Color builds, toffee becomes visible |
| Ends | Warmest and lightest, saturated fully |
12. Mushroom Brown With Highlights So Soft They Read as Shine
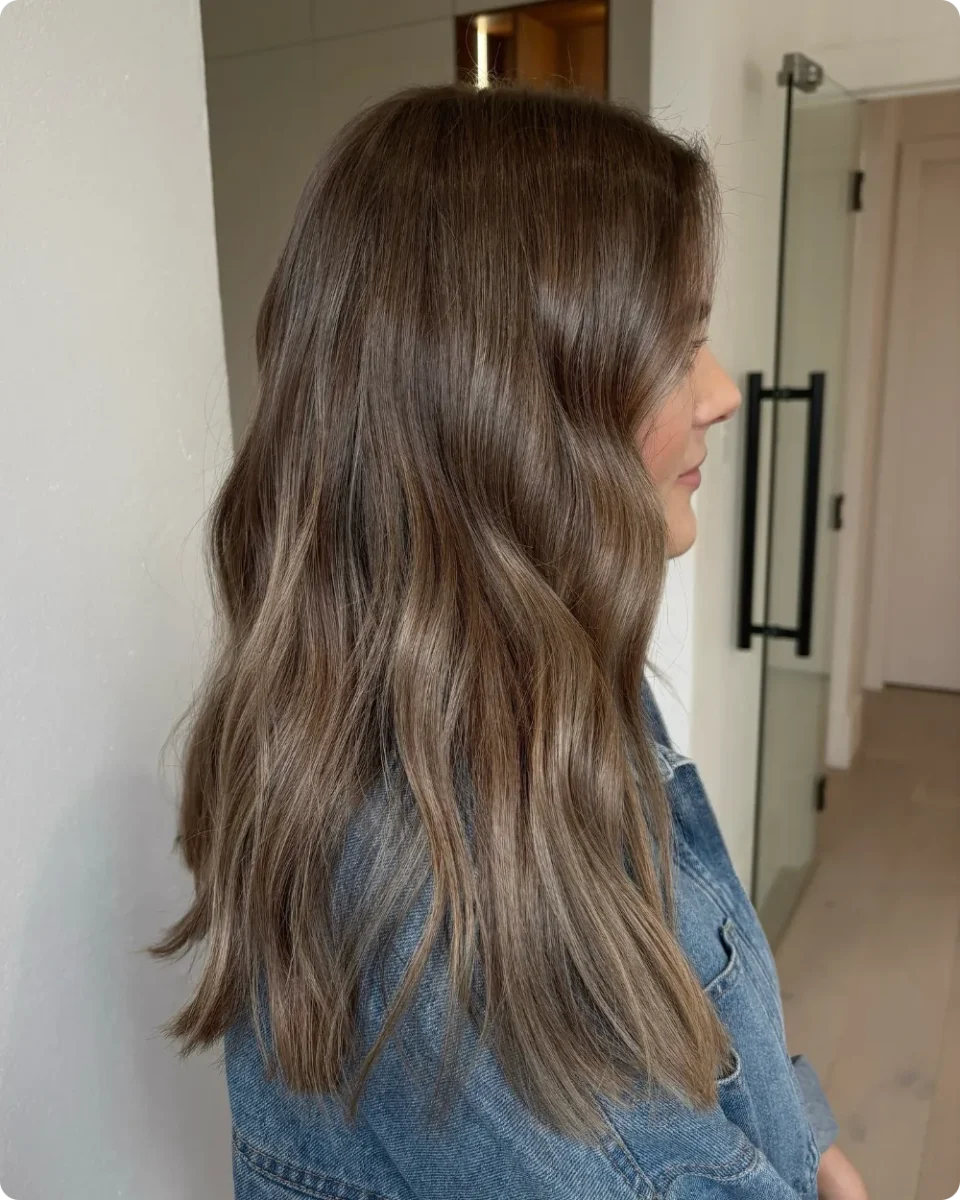
Zero warmth, and it still has dimension. The base is a cool mushroom brown, and the lighter pieces sit only a half shade up in a smoky ash tone, which is why they look more like light hitting the hair than like highlights at all.
Quiet work like this is harder than it looks. A colorist has to keep the lift low and the toner cool, because even a little gold would break the illusion and pull the whole head warm.
Best fit: cool or neutral skin tones, and anyone who dislikes brassiness
Styling note: the soft waves scatter light, which is most of the effect
Honest downside: ash fades warm, so a toner refresh is part of the deal
Low contrast also means low regret. Nothing here is dramatic enough to look wrong as it grows.
Purple or blue toning shampoo, roughly once a week
A shower filter if your water runs hard
Heat protectant before every hot tool
Very hot showers, day after day
Long sun exposure with no protection
Chlorine, especially without rinsing first
13. Espresso Roots Melting Into Mushroom and Sand Mid-Lengths
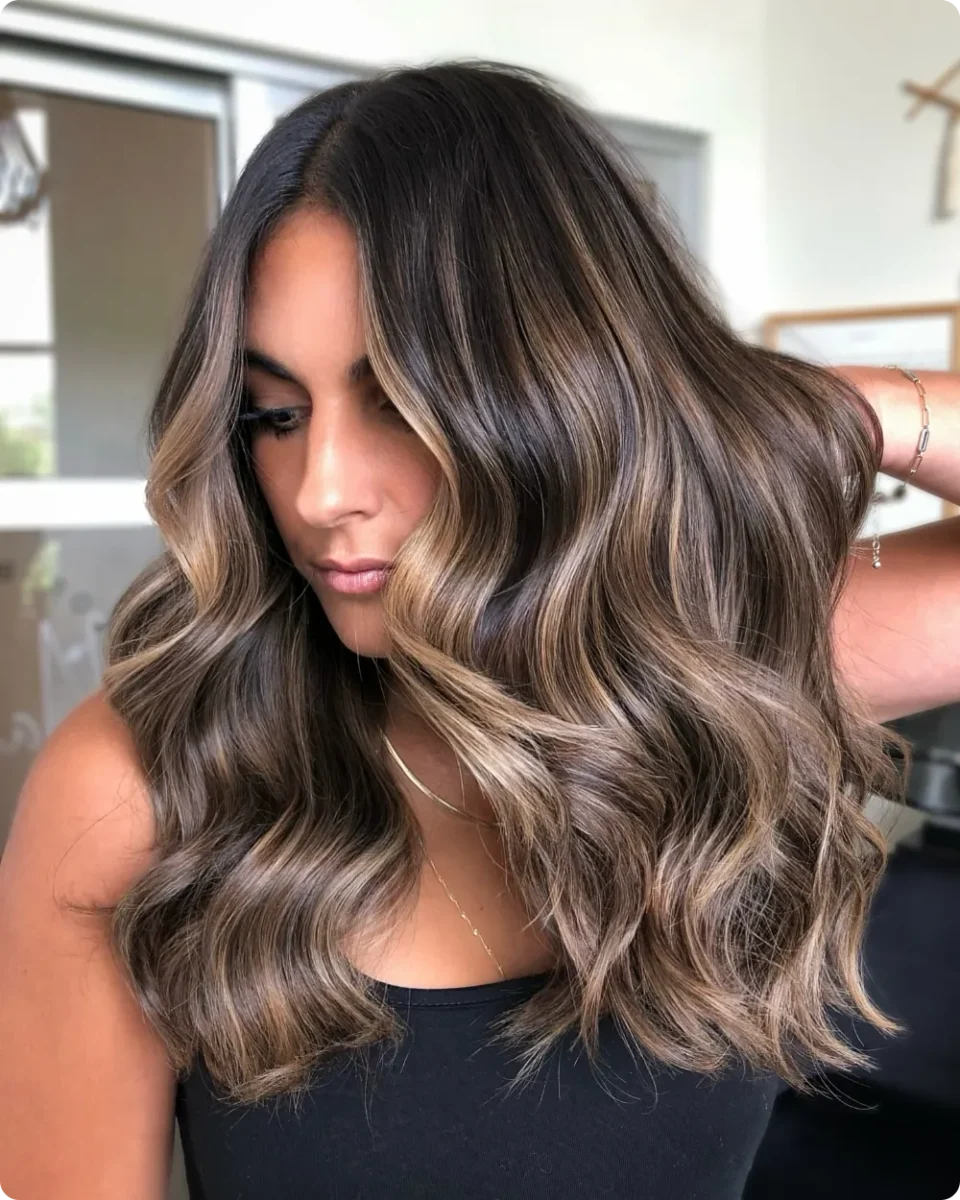
Strong color, and yet the top two inches are completely dark. Espresso roots hold the crown, then the color opens into a mix of mushroom brown and soft sand through the mid-lengths, with the front pieces reaching the lightest point right around the cheekbone.
Look closely at the tones. There are at least three working at once, a deep cool brown, a smoky mid brown, and a warmer sand in the brightest ribbons. That mix is what stops it from looking like one flat bleached layer.
Bring this photo if: you want visible brightness but refuse an obvious root line
Skip it if: you prefer very cool, completely ash-free color
Big glossy waves are part of the result too. The bends push the light pieces toward the surface and tuck the espresso underneath.
📌 Good To Know
Ask your stylist for a root smudge at the end of the appointment. It is a quick step that blurs the line where your natural color meets the lightened hair, and it is the difference between a soft melt like this and a hard stripe.
14. Warm Amber Highlights That Get Stronger Toward the Face
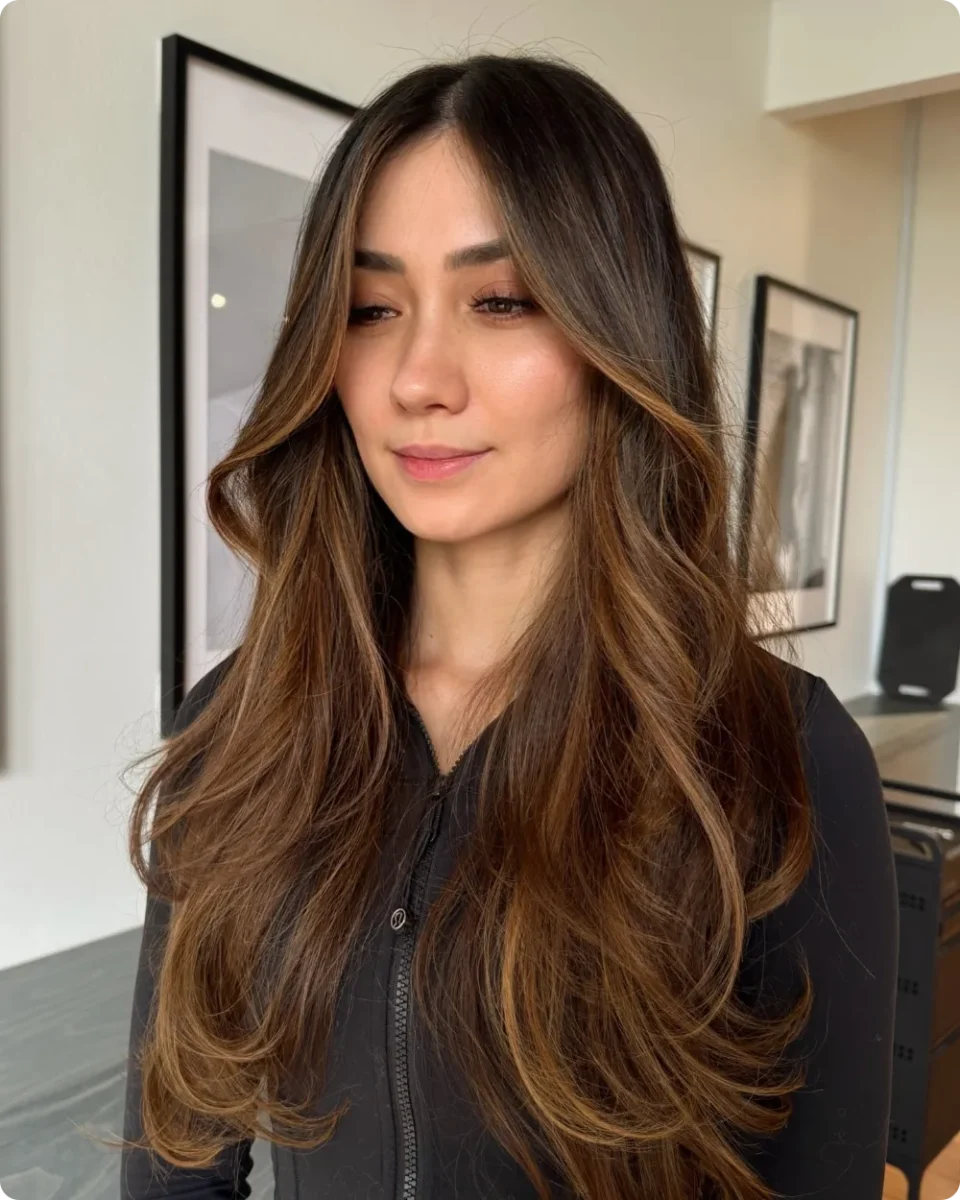
Amber is the word for this tone, a copper leaning warm brown that sits a few shades up from the near-black base. The placement climbs forward. Very little happens at the back of the head, more shows through the side sections, and the strongest pieces land right where the hair falls past the jaw.
How the effect builds:
- Dark base left alone across the crown and back, which keeps the depth.
- Fine amber pieces start around eye level on the side sections.
- Brightness increases toward the front, so the face gets the warmest light.
- Ends stay warm all the way through, no cool or faded tips.
Layers matter as much as color here. The cut lets the amber pieces sit on top of darker layers underneath, which is why the length looks thick rather than thin at the bottom.
15. Dark Crown Over Caramel and Wheat Ends
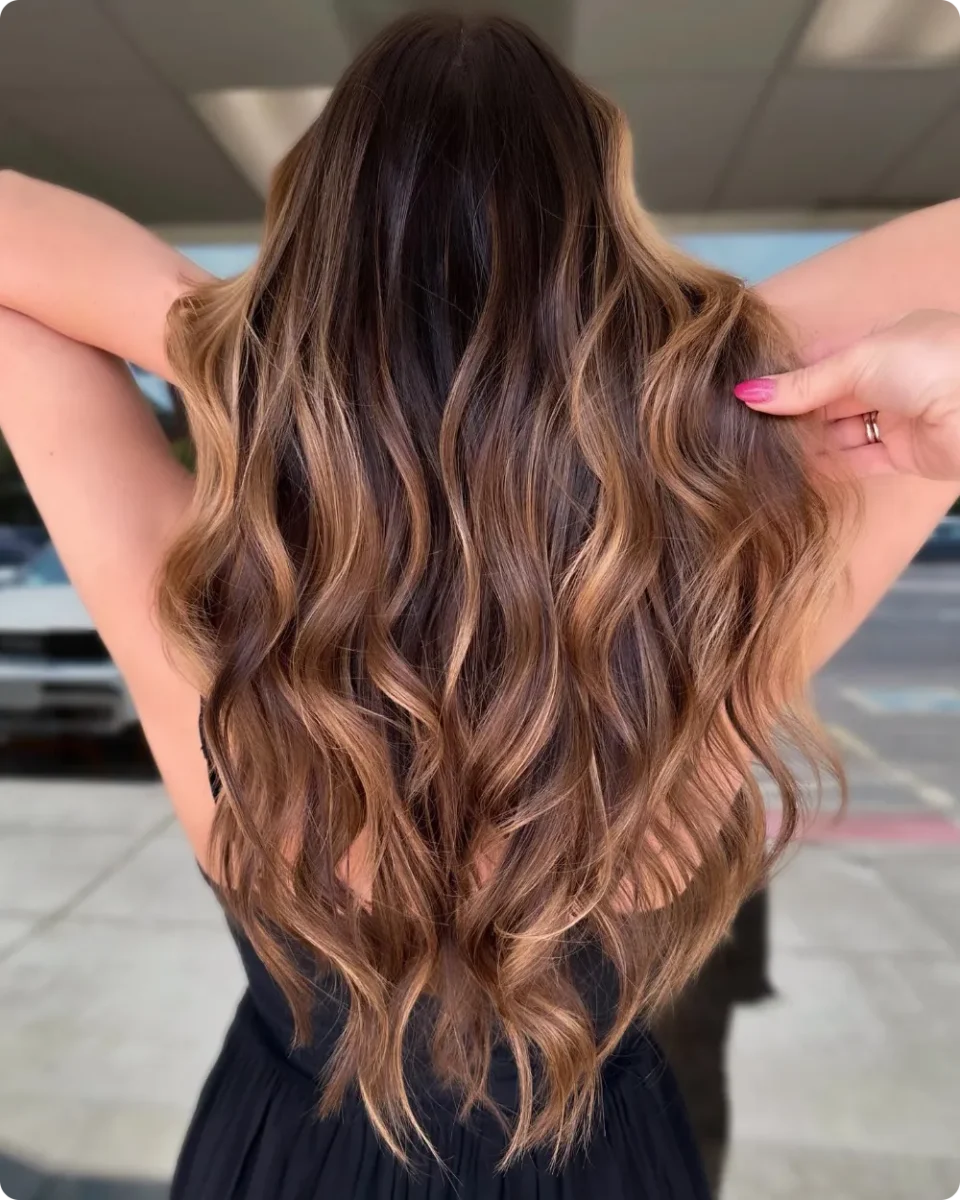
Half the length is one color and half is another, and the join is the interesting part. The top stays a deep brown right through the crown, then somewhere below the shoulders it opens into a heavy mix of caramel and pale wheat that carries all the way to the ends.
Brightness is stacked low on purpose. Because so much light sits in the bottom half, the waves look like they widen as they fall, and the ends read thick and full instead of thin.
A daylight shot like this shows the warm side of the color honestly. Indoors it would look deeper, so keep that in mind when you compare inspiration photos.
One thing to raise at the consultation, going this light on the ends usually takes more than one session if your hair has old color on it.
Deep untouched brown from the part down past the shoulders. It holds the shape of the head and keeps the whole look grounded.
Caramel and wheat stacked through the waves. All the brightness lives here, which makes the ends look fuller and the length look longer.
16. Shoulder-Length Cut With Warm Chestnut Money Pieces
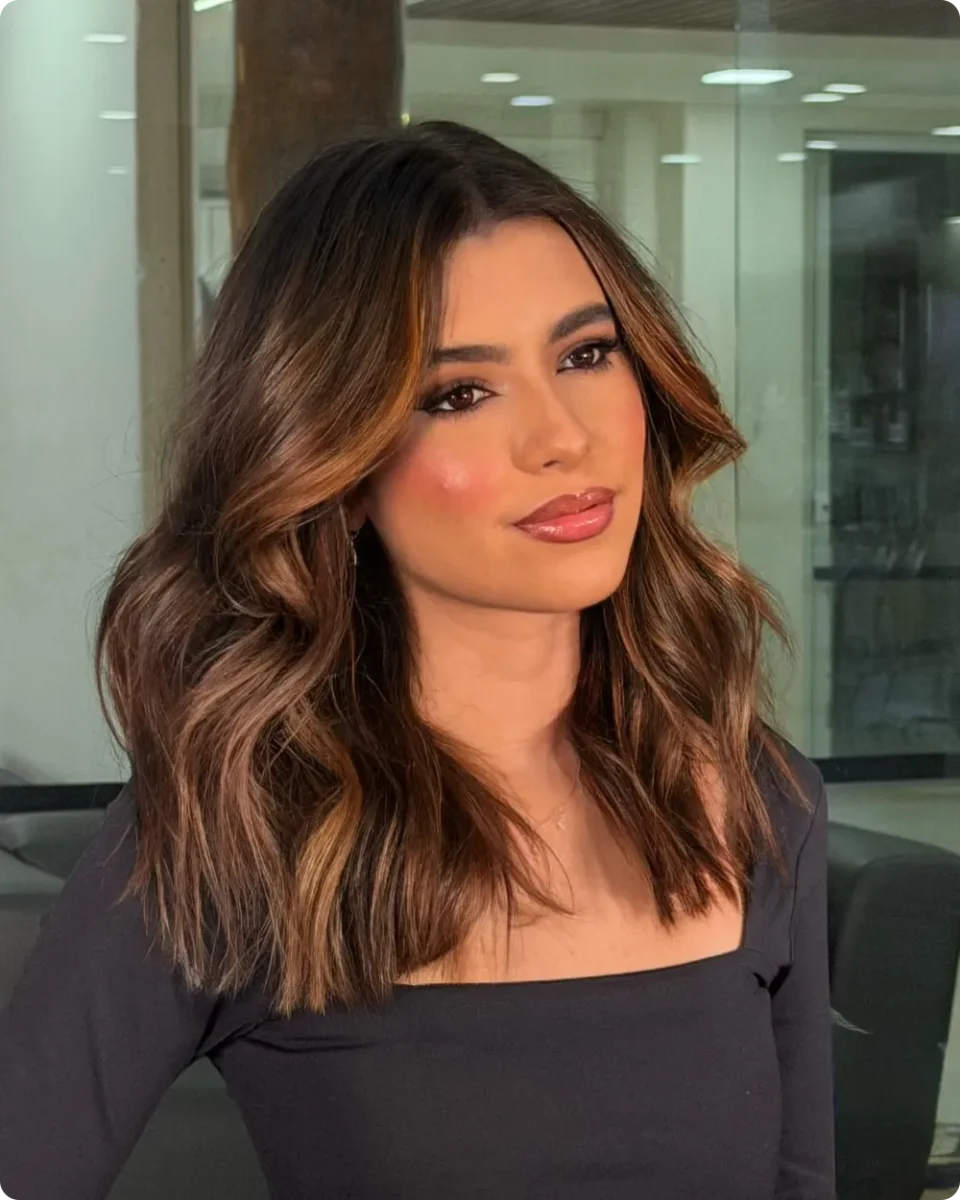
Short lengths need their color placed higher, and this collarbone cut shows why. Warm chestnut pieces start right at the part and run down both sides of the face, so the brightness has room to show even though there are only a few inches of hair to work with.
The money piece framing the cheekbone is the strongest part of the design. Everything else supports it.
Softly bent waves through the ends scatter the chestnut so it never looks like two solid stripes at the front. On a blunt straight blowout, the same placement would feel much heavier.
Fast to maintain too, since most of the color lives where you can see it, and a trim refreshes the shape at the same time.
Recreate this look
17. Rose Toned Copper Balayage on a Lob
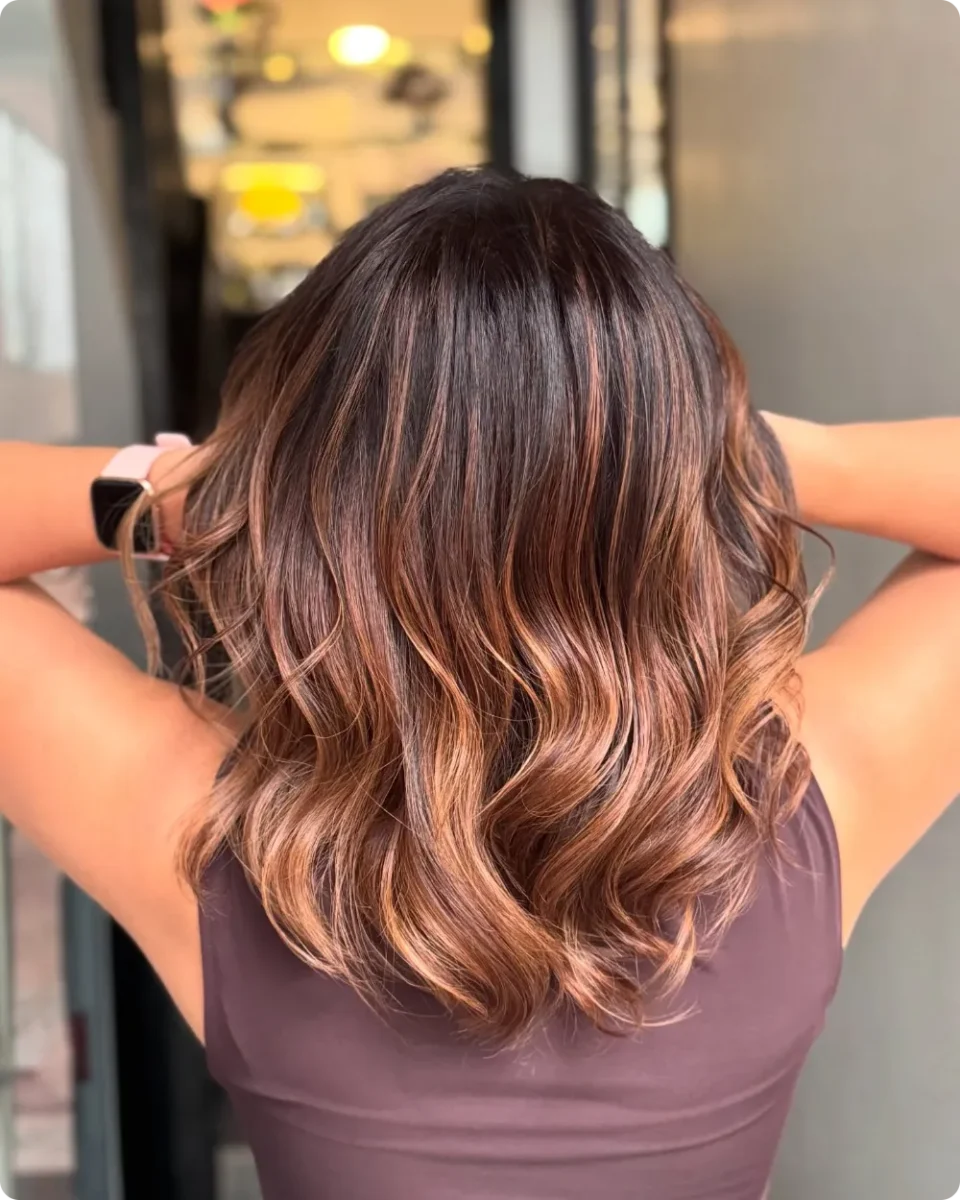
Pink sits underneath this copper, and that is what makes it different from the usual warm brown. The roots stay a deep near-black, the mid-lengths turn a rose tinted copper, and the ends land on a soft peachy caramel that looks almost blush in the light.
Where it shows strongest:
- Through the wave crests, where the light hits first
- On the outer sections that fall forward over the shoulders
- At the very ends, which are the lightest and pinkest point
Rose tones are flattering on fair and medium skin because they echo the color already in your cheeks. They also fade gracefully, sliding toward a soft copper rather than a harsh brass.
The one warning worth taking seriously, pink and rose pigments wash out quickly, so plan on a gloss to keep it from turning plain orange.
Ask for a deep root left untouched, roughly the top three inches.
Have the lightening painted freehand so the starting points stay uneven.
Request a rose or copper gloss over the lightened parts, not the root.
Wave the ends loosely, since flat hair hides the tonal shift.
18. Classic Foiled Highlights Running Root to Tip
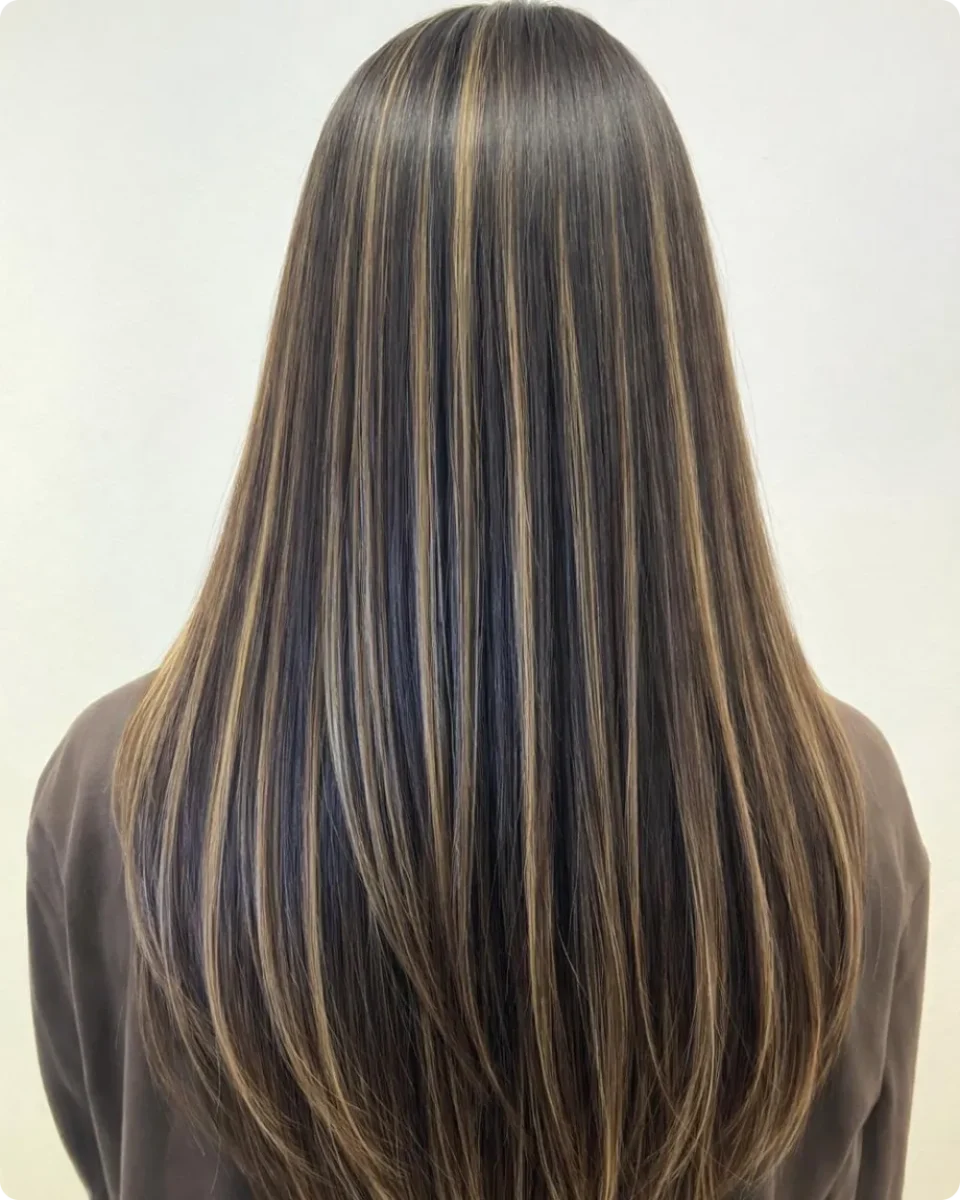
Old school foils, and there is a reason they never fully went away. Clean caramel and light wheat strips run the entire length from the root down, spaced out evenly across a dark brown base so the two colors alternate all the way through.
Poker straight styling puts the technique on full display. Nothing is hidden by waves here, which makes this the clearest example in the whole roundup of how traditional highlighting differs from painted balayage.
What you get: even brightness from the scalp down, no dark top section
What you sign up for: a visible line at the root as it grows, usually within two months
Who it suits: anyone who wants lift near the part, including for covering greys
| Foils, like this photo | Balayage, like earlier entries |
|---|---|
| Color starts right at the root | Root stays dark, color builds lower |
| Even, repeating pattern | Uneven, softer placement |
| Shows clearly on straight hair | Shows best on waves and curls |
| Regrowth line appears sooner | Grows out with almost no line |
The right highlight job is the one that fits how you actually live. Wash your hair often and stretch your salon visits for months? Go low contrast, so the grow out stays quiet. Want a change people notice from across the room? The bolder placements in this list are built for that.
Bring a photo, be honest about your upkeep, and ask what your natural base can realistically handle in one session. Good colorists appreciate that kind of clarity.
Save this for the next time you are in the chair trying to put what you want into words.
- ▸Bring two photos, one you love and one you want to avoid.
- ▸Say whether you want warm or cool, that single word changes everything.
- ▸Mention any box color or henna in your hair, even from years ago.
- ▸Ask how often you will need to come back before you book.
- ▸Take a photo in daylight when you leave, for next time.